The application of a coating to a pre-existing, sealed wooden surface alters its appearance and potentially its protective qualities. This process involves preparing the existing surface, selecting an appropriate topcoat, and executing proper application techniques to ensure adhesion and a durable finish. For example, an outdated cabinet with a polyurethane finish can be updated through surface preparation, priming, and then the application of a chosen hue.
The practice allows for aesthetic customization without complete material replacement, offering a cost-effective and sustainable alternative. It extends the lifespan of existing structures and furniture, reducing waste and conserving resources. Historically, this method has been employed to refresh and modernize interior designs, adapting to changing tastes and styles while preserving the integrity of the underlying wood.
The following sections will delve into crucial aspects such as surface preparation techniques, primer selection, appropriate coating choices, and effective application methodologies, all vital for achieving a successful and lasting result. These elements directly impact the final appearance, durability, and overall value of the renovated wooden item.
Essential Guidance for Coating Pre-Finished Wood
The following guidelines are crucial for achieving a professional and durable result when modifying the surface of sealed wooden items. Proper execution ensures long-lasting adhesion and an aesthetically pleasing finish.
Tip 1: Thoroughly Clean the Existing Surface: Removal of all grease, dirt, and wax is paramount. Use a degreasing cleaner followed by a clean water rinse. For instance, kitchen cabinets often accumulate grease and require careful cleaning prior to any further steps.
Tip 2: Sand the Finish for Adhesion: Lightly abrade the existing surface using fine-grit sandpaper (220-grit or higher). This creates a mechanical key for the primer to adhere to. Avoid aggressive sanding, which can damage the underlying wood. An example would be lightly sanding a glossy door to create a matte surface.
Tip 3: Apply a Quality Bonding Primer: Selection of a primer specifically designed for adhesion to glossy surfaces is critical. Apply a thin, even coat and allow it to dry completely according to the manufacturer’s instructions. Insufficient primer application can result in peeling or chipping of the subsequent coating. Priming is essential for cabinets with a slick varnish finish.
Tip 4: Select the Appropriate Coating: Choose a coating compatible with the primer and suitable for the intended use. Consider factors such as durability, cleanability, and sheen. For example, a water-based acrylic enamel is often preferred for interior woodwork due to its durability and low odor.
Tip 5: Apply Thin, Even Coats: Multiple thin coats are preferable to a single thick coat. This minimizes the risk of drips, runs, and uneven drying. Allow each coat to dry completely before applying the next. Spray application, when feasible, often results in a smoother finish.
Tip 6: Lightly Sand Between Coats (Optional): For an exceptionally smooth finish, lightly sand the primer and each coat with very fine-grit sandpaper (400-grit or higher). This removes any imperfections and improves the adhesion of subsequent coats. Ensure the sanding dust is completely removed before proceeding.
Tip 7: Consider the Environment Appropriate ventilation is very important. Ensure it is in well ventilated environment.
Adherence to these guidelines significantly enhances the likelihood of a successful and long-lasting surface modification, improving both the aesthetic and protective qualities of the coated item.
The subsequent section will address common problems encountered during this process and provide solutions for achieving a professional-grade outcome.
1. Surface Preparation
Surface preparation constitutes a foundational element in effectively modifying a pre-existing, sealed wooden surface. Its impact directly influences the adhesion, durability, and aesthetic quality of the applied coating. Insufficient or improperly executed surface preparation invariably leads to premature coating failure, manifesting as peeling, chipping, or inadequate color uniformity. For instance, if a kitchen cabinet with a polyurethane finish is not adequately degreased and sanded prior to coating application, the new coating will likely lack sufficient adhesion, resulting in peeling within a relatively short timeframe. The causal relationship is undeniable: inadequate surface preparation directly causes compromised coating performance.
The specific preparation techniques required vary depending on the type of existing finish and the intended coating. Glossy surfaces necessitate more aggressive abrasion to create a mechanical bond for the primer. Existing coatings with imperfections, such as scratches or chips, require filling and leveling to achieve a smooth final surface. The selection of cleaning agents is also critical; harsh chemicals can damage certain existing finishes, while inadequate degreasers leave behind residues that impede adhesion. As an illustration, applying a water-based coating over an oil-based varnish without proper sanding and priming will likely result in poor adhesion and a compromised finish.
In summary, meticulous surface preparation is not merely a preliminary step but an essential component of the entire process. It directly impacts the long-term performance and aesthetic appeal of a sealed wooden surface. Recognizing the importance of surface preparation is the cornerstone to achieving professional-grade results. The investment of time and effort in thorough preparation is paramount, as it mitigates the risk of costly rework and ensures a durable, visually appealing outcome.
2. Primer Selection
Primer selection is a critical determinant of success when coating previously finished wooden surfaces. The existing finish, often a varnish, lacquer, or polyurethane, presents a non-porous barrier that inherently resists the adhesion of subsequent coatings. The primary function of a primer in this scenario is to create a bond between the existing finish and the new coating. Incorrect primer selection leads directly to adhesion failure, resulting in peeling, chipping, or blistering of the applied coat. For example, using a standard interior primer on a glossy, polyurethane-coated cabinet will likely result in poor adhesion and an unsatisfactory finish. The primer’s inability to properly bond with the slick surface undermines the entire process.
Specialized bonding primers, formulated with specific resins and additives, are designed to adhere to these challenging surfaces. These primers often contain agents that etch or slightly dissolve the existing finish, creating a mechanical key for adhesion. Furthermore, some primers provide a stain-blocking function, preventing tannins or other extractives from the wood from bleeding through the new coating and discoloring the finish. In practical application, choosing a primer labeled as “adhesion promoting” or specifically designed for glossy surfaces is crucial. Failure to do so necessitates more extensive surface preparation, increasing labor and potential for damage to the underlying wood. A misstep in primer selection can also lead to the need for complete stripping of the newly applied coating and starting the process anew, incurring significant cost and time penalties.
In conclusion, primer selection is not a mere formality but an essential step in ensuring the longevity and aesthetic quality of coating sealed wood. The financial and practical consequences of using an inappropriate primer far outweigh the minimal cost difference between standard and specialized formulations. Careful consideration of the existing finish and the selection of a compatible, high-quality bonding primer is indispensable for achieving a durable and professionally executed outcome.
3. Appropriate Coating
The selection of an appropriate topcoat is paramount when modifying pre-existing, sealed wooden surfaces. This choice directly impacts the final aesthetic, durability, and long-term performance of the modified item. Improper selection can result in adhesion failures, premature wear, and an aesthetically unpleasing outcome.
- Compatibility with Primer and Existing Finish
Ensuring chemical compatibility between the primer, the existing finish, and the new coating is crucial. Incompatible materials can react, leading to adhesion issues, blistering, or discoloration. For instance, applying a lacquer over an oil-based primer can result in a compromised finish. Compatibility charts and manufacturer recommendations should be consulted to avoid such issues.
- Durability and Intended Use
The intended use of the coated item dictates the necessary level of durability. High-traffic surfaces, such as kitchen cabinets or tabletops, require more durable coatings like polyurethane or epoxy. Low-traffic areas, such as decorative trim, may be suitable for less durable coatings like acrylic latex. Consider factors such as scratch resistance, moisture resistance, and UV resistance.
- Sheen Level
Sheen level impacts both the aesthetic and functional properties. High-gloss coatings are more durable and easier to clean but can highlight imperfections. Matte finishes conceal imperfections but are less durable and harder to clean. The choice should align with both aesthetic preferences and practical considerations. For example, a semi-gloss finish is often used on cabinets due to its balance of durability and cleanability.
- Application Method
The selected coating should be compatible with the intended application method. Some coatings are better suited for brushing or rolling, while others require spraying. Factors such as viscosity, drying time, and leveling properties influence the suitability of a coating for a particular application technique. Spray application generally yields a smoother finish, but requires specialized equipment and expertise.
These considerations collectively contribute to the overall success of modifying sealed wood surfaces. The careful selection of a coating that aligns with the primer, existing finish, intended use, and application method ensures a durable, aesthetically pleasing, and long-lasting result. An informed decision is crucial in preventing premature failure and achieving a professional-grade outcome.
4. Application Technique
Application technique constitutes a critical determinant of success when applying coatings to pre-existing, sealed wooden surfaces. The effectiveness of surface preparation and the quality of primer and topcoat selection are rendered inconsequential if the application is executed improperly. Specific techniques, appropriate to the chosen coating and the geometry of the object, directly influence the finish’s appearance, durability, and longevity. Uneven application, resulting from incorrect brushstrokes, roller pressure, or spray gun settings, leads to variations in film thickness. These variations cause inconsistencies in color, sheen, and protective qualities. For example, a poorly applied coat of polyurethane on a finished wood tabletop may exhibit brush marks, runs, or orange peel texture, compromising both its aesthetic appeal and its ability to withstand daily use.
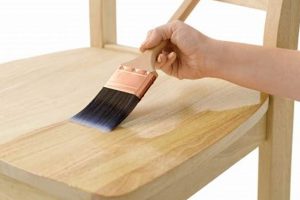
Furthermore, proper application technique directly affects adhesion. Over-application of a coating can lead to solvent entrapment, which weakens the bond between the coating layers and the substrate. Conversely, under-application results in insufficient film thickness, leaving the underlying finish inadequately protected. The correct application method also minimizes the introduction of contaminants, such as dust or airborne particles, which can compromise the smoothness and integrity of the finish. The choice between brushing, rolling, or spraying is often dictated by the size and complexity of the surface, as well as the desired finish quality. Skilled operators understand the nuances of each technique, adjusting their approach to optimize the outcome. For example, intricate moldings may necessitate the use of a fine-finish sprayer to achieve even coverage, whereas larger, flat surfaces are often efficiently coated with a roller.
In conclusion, application technique is not merely a perfunctory step but rather an integral component of the overall process. Mastery of proper techniques, coupled with a thorough understanding of coating properties and equipment operation, is essential for achieving a professional-grade finish. The investment in training and the careful attention to detail during application directly translate into a durable, aesthetically pleasing, and long-lasting modification of the sealed wooden surface. Overlooking the importance of application technique undermines all prior efforts and increases the risk of premature coating failure.
5. Finish Durability
The long-term viability of coating application to sealed wooden surfaces is intrinsically linked to the durability of the resultant finish. The procedure’s primary objective often extends beyond mere aesthetic enhancement; it aims to provide renewed or enhanced protection against environmental factors, physical abrasion, and chemical exposure. Therefore, the finish’s capacity to withstand these stresses directly dictates the overall success and longevity of the endeavor. If the implemented finish lacks adequate durability, it will prematurely fail, manifesting as scratches, chips, discoloration, or complete delamination, negating the time, effort, and material costs invested in the process. A clear example is coating kitchen cabinets; without a durable finish resistant to grease, moisture, and frequent cleaning, the effort will be quickly undone by normal kitchen activity, requiring frequent repairs or complete reapplication.
The selection of appropriate materials and meticulous application techniques are essential to achieving a durable finish. The chosen coating must possess inherent resistance to the specific stresses it will encounter in its intended environment. For instance, exterior applications require UV-resistant coatings to prevent fading and degradation. Interior surfaces, particularly those subject to frequent contact, demand coatings with high abrasion resistance. Furthermore, proper surface preparation, primer selection, and application methods all contribute to the overall integrity and durability of the finish. Insufficient surface preparation, such as inadequate sanding or cleaning, compromises adhesion, rendering the finish vulnerable to premature failure. Similarly, an incompatible primer undermines the bond between the existing surface and the new coating, ultimately reducing its durability.
In summary, finish durability is not merely a desirable attribute, but an indispensable requirement for successfully coating pre-finished wooden surfaces. Attaining a durable finish necessitates a comprehensive approach, encompassing meticulous surface preparation, the selection of appropriate materials, and the implementation of precise application techniques. Understanding the interplay between these factors is critical to achieving a long-lasting and aesthetically pleasing result. While challenges exist in achieving optimal durability, particularly in high-wear environments, a thorough understanding of material properties and best practices can significantly extend the lifespan and value of the modified wooden surface.
6. Adhesion Integrity
Adhesion integrity is paramount in the context of coating previously sealed wooden surfaces. It represents the measure of the bond’s strength between the existing finish, any primer layers, and the final topcoat. Insufficient adhesion invariably leads to coating failure, undermining the aesthetic and protective qualities sought through the application.
- Surface Preparation’s Impact on Adhesion
Adequate surface preparation is the foundational element upon which adhesion integrity rests. The removal of contaminants, such as grease, wax, and dirt, is crucial for establishing a clean substrate. Light abrasion through sanding provides a mechanical key, increasing the surface area for bonding. For instance, if a varnished surface is not adequately sanded prior to coating, the new layer is more likely to peel or chip. The direct correlation is that compromised surface preparation results in diminished adhesion integrity.
- Primer Selection and its Role in Bonding
The selection of a suitable primer is instrumental in promoting adhesion between dissimilar materials. Specialized bonding primers are formulated to adhere to glossy or non-porous surfaces, creating an intermediate layer that facilitates the application of subsequent coatings. The use of an inappropriate primer can result in poor adhesion, as the primer fails to establish a strong bond with the existing finish. An example is employing a standard latex primer on a polyurethane-coated surface, which will likely lead to delamination of the entire system.
- Coating Compatibility and Layer Bonding
Ensuring compatibility between all layers of the coating system is essential for maintaining adhesion integrity. Incompatible materials can react chemically, leading to a weakened bond or even complete separation. For instance, applying a lacquer-based coating over an oil-based primer can result in lifting or wrinkling of the finish. Compatibility charts and manufacturer guidelines should be consulted to mitigate the risk of such failures.
- Environmental Factors and Long-Term Adhesion
Environmental factors, such as temperature, humidity, and exposure to UV radiation, can significantly impact long-term adhesion integrity. Fluctuations in temperature and humidity can cause expansion and contraction of the materials, placing stress on the bond. Prolonged exposure to UV radiation can degrade the coating, reducing its adhesive properties. Protective coatings with UV inhibitors and proper environmental control during application can help to mitigate these risks and ensure lasting adhesion.
These interrelated aspects of adhesion integrity are critical for achieving a successful and durable transformation of a pre-finished wooden surface. Failure to address each of these facets can compromise the entire coating system, negating the benefits sought through coating application. By prioritizing meticulous surface preparation, selecting compatible materials, and considering environmental factors, practitioners can maximize adhesion integrity and ensure the longevity of their work.
Frequently Asked Questions
The following section addresses common inquiries regarding the modification of surfaces already sealed or coated. Accurate information is essential for achieving successful and durable results.
Question 1: Is sanding absolutely necessary before coating a pre-finished surface?
Yes, sanding is generally necessary. It creates a mechanical key, increasing the surface area and promoting adhesion for subsequent layers. The degree of sanding required depends on the existing finish’s gloss level and hardness. However, skipping sanding significantly increases the risk of coating failure.
Question 2: What type of primer is best suited for coating over a glossy polyurethane finish?
A bonding primer specifically formulated for adhesion to glossy surfaces is recommended. These primers often contain additives that etch or partially dissolve the existing finish, creating a stronger bond. Latex or oil-based primers intended for porous surfaces are generally unsuitable.
Question 3: Can any type of coating be applied over an existing finish?
No, compatibility is critical. Coatings must be chemically compatible with the existing finish and any applied primer. Incompatible materials can react, leading to adhesion problems, blistering, or discoloration. Manufacturer guidelines should always be consulted.
Question 4: How many coats are typically required when modifying a pre-finished surface?
The number of coats depends on the opacity of the coating and the desired level of coverage. However, multiple thin coats are generally preferable to a single thick coat. This minimizes the risk of drips, runs, and uneven drying. Typically, one to two coats of primer and two coats of topcoat are sufficient.
Question 5: What are the common signs of coating failure over a pre-finished surface?
Common signs include peeling, chipping, blistering, cracking, and poor adhesion. These issues are often indicative of inadequate surface preparation, incompatible materials, or improper application techniques.
Question 6: How can long-term adhesion be ensured when coating a pre-finished surface?
Long-term adhesion is achieved through meticulous surface preparation, selection of compatible materials, proper application techniques, and protection from environmental factors. Adherence to these principles minimizes the risk of premature coating failure and ensures a durable, aesthetically pleasing result.
Proper planning and execution are essential when altering sealed surfaces. Understanding the principles outlined above significantly increases the likelihood of success.
The next section will explore case studies and practical examples to further illustrate best practices and potential challenges in modifying pre-existing finishes.
Conclusion
The preceding discussion has thoroughly examined the multifaceted process of painting over finished wood. Essential elements explored encompass meticulous surface preparation, the strategic selection of primers and topcoats, the mastery of appropriate application techniques, and the imperative of ensuring long-term finish durability and adhesion integrity. Successful execution in modifying pre-existing finishes hinges upon a comprehensive understanding of these interdependent factors.
Effective and lasting results from painting over finished wood necessitate diligent adherence to best practices. Recognizing the inherent challenges presented by sealed surfaces, practitioners must prioritize informed decision-making and precise execution to achieve professional-grade outcomes. Further research and continued refinement of techniques will undoubtedly contribute to enhanced methodologies within this domain.


