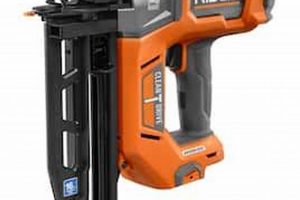
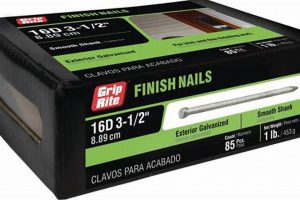
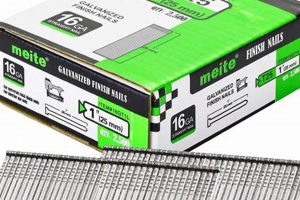
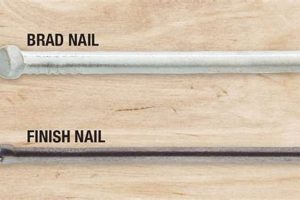
These fasteners are slender, typically 15- or 16-gauge, and designed for applications where minimal visibility is desired. They are frequently used in woodworking projects to attach trim, molding, and other delicate pieces, providing a secure hold without leaving a large, noticeable hole. Examples include securing door casings, installing baseboards, and assembling fine furniture components.
The significance of these lies in their ability to create nearly invisible joints, preserving the aesthetic appeal of finished products. Their use contributes to a clean, professional look, avoiding the need for extensive filling or sanding after installation. Historically, these fasteners have been instrumental in streamlining woodworking processes, offering a more efficient and less intrusive alternative to traditional nailing methods that could split or damage delicate materials.
The following sections will delve deeper into the specific types available, optimal applications, compatible tools, and best practices for achieving superior results when employing these specialized fasteners in various projects.
Essential Application Guidelines
The effective utilization of these fasteners hinges on adherence to specific techniques. The following guidelines promote optimal performance and minimize potential complications during various applications.
Tip 1: Material Compatibility: Select the appropriate fastener length and gauge relative to the materials being joined. Employing overly long or thick fasteners in delicate woods can lead to splitting or visible blemishes.
Tip 2: Tool Calibration: Ensure that the pneumatic or cordless fastening tool is properly calibrated to the recommended pressure or power setting. Insufficient force may result in incomplete fastener insertion, while excessive force can drive the fastener too deeply and damage the surrounding material.
Tip 3: Consistent Fastener Placement: Maintain a consistent spacing and angle when driving fasteners to ensure uniform holding power and a visually appealing finished product. A staggered pattern can enhance structural integrity and minimize the risk of wood splitting.
Tip 4: Avoid Overdriving: Exercise caution to prevent overdriving fasteners, particularly when working with softer woods. Overdriving creates unsightly depressions that necessitate filling and sanding to achieve a smooth, professional finish.
Tip 5: Consider Adhesive Assistance: For high-stress applications or joints requiring exceptional strength, supplement mechanical fastening with a suitable wood adhesive. The adhesive provides additional bonding power and helps prevent joint movement over time.
Tip 6: Pre-Drilling Hardwoods: When working with hardwoods or dense materials, pre-drilling pilot holes can significantly reduce the risk of splitting and facilitate easier fastener insertion. Choose a drill bit that is slightly smaller than the fastener’s shank diameter.
Tip 7: Storage Practices: Store fasteners in a dry environment to prevent corrosion and maintain optimal performance. Exposure to moisture can lead to rust, which weakens the fastener and makes it more prone to breakage during application.
Adhering to these guidelines will maximize the effectiveness of these fasteners and ensure the production of high-quality, durable, and aesthetically pleasing finished products. Proper technique yields stronger, cleaner, and more reliable results.
The subsequent sections will address troubleshooting common issues, maintenance of associated tools, and recommended safety precautions for handling these fasteners and related equipment.
1. Gauge and Length
The selection of appropriate gauge and length is critical to the performance of these fasteners. Gauge, measured as the diameter of the fastener, determines its holding power and the visibility of the resulting hole. A higher gauge number indicates a thinner fastener, suitable for delicate work where minimizing the visual impact is paramount. Conversely, a lower gauge signifies a thicker fastener, providing greater holding strength for heavier trim or more demanding applications. The fastener length must correspond to the combined thickness of the materials being joined, ensuring adequate penetration without protruding through the back. An inappropriate selection can lead to structural instability or cosmetic defects. For example, a thin gauge and short length are suitable for securing thin decorative trim to furniture. A larger gauge and longer length are needed to secure baseboards to a wall stud.
The interplay between gauge and length directly impacts the fastener’s ability to resist pull-out forces. A longer fastener, even with a smaller gauge, can provide a stronger hold due to increased surface area for friction. However, excessively long fasteners risk splitting the wood, particularly in hardwoods. Balancing these factors requires careful consideration of the material’s density and the intended application. When working with materials that might split, a smaller gauge combined with pre-drilling can be an effective solution. In situations demanding high shear strength, a larger gauge is preferred, regardless of cosmetic considerations. In securing crown molding, the length needs to penetrate sufficiently into the wall stud or blocking for secure attachment, while the gauge must not be so large as to cause splitting of the molding itself.
Therefore, selecting these fasteners based on gauge and length requirements contributes directly to the quality and longevity of finished woodworking projects. Misjudging either characteristic can result in weakened joints, visible blemishes, or structural failures. A thorough understanding of material properties, application demands, and fastener specifications is essential for optimal outcomes. Ultimately, correct fastener selection ensures both functional integrity and aesthetic appeal, underscoring the importance of informed decision-making in woodworking.
2. Tool Compatibility
The effective application of these fasteners is intrinsically linked to the compatibility of the driving tool. A pneumatic or cordless tool designed specifically for these gauges and lengths is essential for consistent and reliable performance. Mismatched tools can lead to improper fastener seating, resulting in protruding nail heads, damaged workpieces, or tool malfunctions. For instance, attempting to use a tool designed for framing nails with these smaller fasteners invariably leads to jamming, damage to the driver mechanism, and ineffective fastening.
Consider the practical scenario of installing intricate trim work. A specialized finish nailer, calibrated for the specific gauge of the fasteners, ensures that each fastener is driven to the precise depth without marring the surrounding material. This precision is crucial for achieving a professional, seamless finish. In contrast, a generic nail gun lacks the necessary control, often resulting in overdriving or angled insertions that compromise the aesthetic appeal and structural integrity of the trim. Furthermore, using the incorrect tool can void warranties and potentially cause safety hazards due to improper fastener ejection or tool failure.
Therefore, understanding and adhering to tool compatibility guidelines is paramount when working with these fasteners. Selecting the right tool, maintaining it properly, and ensuring it is calibrated to the appropriate settings are fundamental steps in achieving consistent, high-quality results. Disregarding this critical aspect can lead to wasted materials, increased labor costs, and compromised project outcomes. Ultimately, the investment in a compatible tool is an investment in the efficiency, precision, and safety of woodworking endeavors involving these specialized fasteners.
3. Wood Types
The selection of wood type directly influences the effectiveness and outcome when using these fasteners. Different wood densities and grain structures react uniquely to fastener insertion, impacting holding power and the potential for splitting. Softwoods, such as pine or fir, are generally more susceptible to splitting, necessitating finer gauge fasteners and careful application techniques. Hardwoods, like oak or maple, require more force for penetration, potentially demanding thicker gauge fasteners or pre-drilling to prevent bending or breakage. Ignoring these material properties can lead to compromised joints and aesthetic imperfections.
Consider the scenario of attaching delicate trim to a pine frame. A thinner gauge is preferable to minimize the risk of splitting the softwood, but it might provide insufficient holding power for a secure joint. This challenge can be addressed by using a longer fastener within the acceptable gauge range or supplementing the mechanical fastening with wood glue. Conversely, when securing hardwood molding to a hardwood doorframe, pre-drilling pilot holes becomes essential to prevent fastener bending or wood splitting, ensuring a clean and durable connection. The choice also factors into the final finish; in some cases, the visual impact of the fastener needs to be considered, necessitating a careful blend of fastener size and wood grain pattern.
Ultimately, a comprehensive understanding of wood types and their interaction with these fasteners is paramount for achieving professional-quality results. The correct pairing of fastener specifications with wood characteristics minimizes material damage, optimizes holding power, and contributes to the longevity of the woodworking project. Disregarding this relationship can lead to structural weaknesses, cosmetic flaws, and project failures, underscoring the importance of informed decision-making throughout the woodworking process. Therefore, meticulous assessment of wood properties should always precede fastener selection and application.
4. Proper Angle
Achieving the correct angle during fastener insertion is crucial for maximizing the effectiveness of these slender fasteners. Deviation from the intended angle introduces several potential problems. Firstly, it compromises the holding power of the fastener. An angled insertion reduces the amount of fastener surface area in direct contact with the materials being joined, diminishing frictional resistance and increasing the likelihood of pull-out. Secondly, an improper angle can lead to cosmetic issues. Angled fasteners are more likely to protrude or create visible blemishes on the surface of the workpiece. Finally, in severe cases, an incorrect angle can even cause the fastener to glance off the wood grain, resulting in bending, breakage, or even a potentially dangerous ricochet. Proper angling ensures the fastener penetrates directly into the material, optimizing its holding capacity and minimizing surface imperfections.
Consider the practical application of securing crown molding. If the fastener is driven at too steep an angle, it might penetrate the molding but fail to adequately engage the underlying wall stud or blocking. This results in a weakened connection prone to failure over time. Conversely, if the angle is too shallow, the fastener may exit the back of the molding, creating an unsightly and potentially hazardous projection. Maintaining the correct angle, typically perpendicular to the surface being fastened, guarantees a secure and visually appealing result. Another example is the installation of door casings. Fasteners driven at consistent and appropriate angles along the casing’s length provide uniform pressure and prevent warping or shifting, leading to a more durable and professional-looking installation.
In summary, understanding and consistently executing proper angling techniques is essential for successful utilization of these fasteners. Failure to do so compromises both structural integrity and aesthetic quality. Maintaining attention to detail and employing techniques that ensure consistent and accurate fastener placement is therefore vital for any woodworking project involving these specialized fasteners. The challenges associated with angled insertions underscore the importance of precision and careful execution throughout the fastening process.
5. Consistent Depth
Achieving consistent depth when employing these fasteners is paramount for both structural integrity and aesthetic appeal. Inconsistent depth, where some fasteners are under-driven and others over-driven, undermines the intended clamping force and creates visual imperfections. The effectiveness of these specific nails depends on their ability to embed fully, but not excessively, into the materials being joined. Under-driving leaves nail heads protruding, posing a snagging hazard and detracting from the finished appearance. Over-driving, conversely, weakens the joint by crushing the surrounding wood fibers and creating unsightly dimples that require filling and sanding. The uniformity of depth contributes directly to a professional and durable outcome. For instance, when installing baseboards, consistent depth ensures a flush, even surface along the wall, eliminating shadows and preventing dust accumulation.
The consistency in depth is directly related to tool calibration and operator technique. Pneumatic nailers require accurate pressure settings to deliver uniform driving force. Cordless nailers rely on consistent battery power and motor performance to achieve similar results. In either case, the operator must maintain a consistent angle and apply steady pressure to the tool to ensure each fastener is driven to the same depth. Varying wood densities can also affect depth consistency. Softer woods require less driving force than hardwoods, necessitating adjustments to tool settings or technique. In critical applications, such as furniture assembly, variations in depth can compromise the structural integrity of the joints, leading to instability and premature failure. Therefore, achieving consistent depth requires a combination of proper tool maintenance, careful material assessment, and skillful application techniques.
In conclusion, consistent depth is not merely a cosmetic consideration; it is a fundamental component of successful fastening with these nails. Challenges in achieving consistent depth stem from variations in material properties, tool performance, and operator skill. Overcoming these challenges necessitates careful attention to detail, proper tool calibration, and consistent application techniques. Understanding and prioritizing this aspect is essential for achieving durable, aesthetically pleasing, and professionally executed woodworking projects. Ignoring depth consistency ultimately compromises the quality and longevity of the finished product, reinforcing the importance of this often-overlooked detail.
Frequently Asked Questions About Fastener Applications
This section addresses common inquiries regarding the selection, application, and performance of these fasteners in various woodworking projects. The following questions and answers provide concise guidance to ensure optimal results.
Question 1: What is the recommended gauge for securing delicate trim to softwood?
A higher gauge (e.g., 18-gauge) is generally preferred to minimize splitting. Pre-drilling may further mitigate this risk. However, structural considerations must also be evaluated to ensure appropriate holding power.
Question 2: How should the tool pressure be adjusted for different wood densities?
Lower pressure settings are suitable for softwoods to prevent overdriving. Hardwoods necessitate higher pressure for proper fastener seating. Gradual adjustments and test insertions are recommended to optimize the setting.
Question 3: Is adhesive necessary in addition to mechanical fastening?
Adhesive enhances joint strength, particularly in high-stress applications or where long-term stability is critical. Select an appropriate wood adhesive compatible with the materials being joined.
Question 4: What steps can be taken to prevent fasteners from bending during insertion?
Pre-drilling pilot holes, particularly in hardwoods, reduces the likelihood of bending. Selecting fasteners with appropriate shank hardness also contributes to improved driving performance.
Question 5: How should fasteners be stored to prevent corrosion?
Store fasteners in a dry, enclosed environment to minimize exposure to moisture. Desiccant packs can be added to further mitigate humidity-related corrosion.
Question 6: What safety precautions should be observed when operating pneumatic fastening tools?
Always wear appropriate eye and ear protection. Ensure the tool is properly maintained and that all safety mechanisms are functioning correctly. Disconnect the air supply before performing any maintenance or adjustments.
The preceding answers offer guidance on achieving successful and safe results. Adherence to these recommendations contributes to the longevity and quality of woodworking projects.
The subsequent sections will explore specific applications. They also cover tool maintenance, and advanced techniques to further optimize the use of these fasteners across a wide spectrum of woodworking tasks.
Conclusion
This article has explored critical aspects of “bostitch finish nails,” including material compatibility, tool requirements, application techniques, and troubleshooting strategies. Selecting the correct gauge and length, coupled with appropriate tool settings and adherence to proper angles and depth, are essential for achieving optimal results in various woodworking projects. A comprehensive understanding of wood types and their interaction with these fasteners contributes to structurally sound and aesthetically pleasing outcomes.
Mastery of these techniques enhances the quality and longevity of woodworking projects, reduces material waste, and promotes safe working practices. Continued adherence to these principles will ensure consistent, professional results in applications requiring these fasteners, solidifying their significance in the realm of finish carpentry and fine woodworking. The pursuit of knowledge and skill refinement in fastener application remains paramount for practitioners seeking excellence in their craft.


