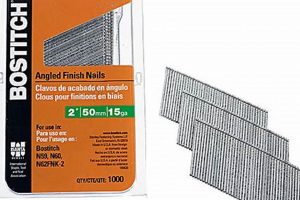
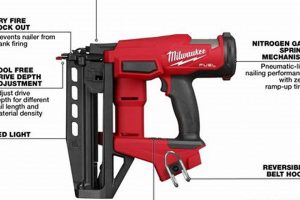
These fasteners are slender, small-headed nails primarily employed in woodworking and carpentry. Their design allows them to be driven almost entirely below the surface of the wood, leaving a minimal hole that can be easily filled and concealed with wood filler or putty. This characteristic makes them ideal for applications where aesthetics are a primary concern. An example of use is attaching decorative molding around a window frame.
The use of such fasteners is crucial in projects requiring a clean, professional appearance. They provide a secure hold while minimizing visual disruption. Their historical prevalence stems from the demand for refined craftsmanship in furniture making and architectural detailing, where concealing the means of attachment is as important as the attachment itself. They allow the beauty of the woodwork to remain the focus, unmarred by visible nail heads.
Subsequent sections will delve into the selection criteria for these fasteners, appropriate driving techniques, and considerations for choosing the right size and material for different wood types and project requirements. This will encompass hand-driving methods versus the use of pneumatic nailers and a comparative analysis of various coatings and materials affecting performance and longevity.
Essential Guidance for Utilizing Specialized Fasteners
The following are key recommendations to optimize the use of these specialized fasteners in achieving high-quality trim work.
Tip 1: Select the Appropriate Gauge: Smaller gauges minimize splitting, particularly when working with hardwoods. Choose the thinnest gauge that provides sufficient holding power for the specific trim material and application.
Tip 2: Prioritize Countersinking: Consistently countersink the fastener heads slightly below the surface. This ensures proper filling and prevents the filler from protruding or cracking over time. A nail set is essential for this step.
Tip 3: Employ Strategic Placement: Position the fasteners in areas less prone to stress or movement. For example, when attaching crown molding, concentrate fasteners near the points of contact with the wall and ceiling.
Tip 4: Consider Adhesive Augmentation: In conjunction with the specialized fasteners, apply a thin bead of construction adhesive to the back of the trim. This significantly enhances holding power and reduces the likelihood of the trim detaching over time.
Tip 5: Utilize Proper Driving Technique: When hand-driving, maintain a consistent hammering angle and force. Avoid bending the fastener or damaging the surrounding wood. When using a pneumatic nailer, adjust the pressure to prevent over-driving.
Tip 6: Match Material to Environment: If the trim is to be installed in a high-moisture environment, such as a bathroom, opt for stainless steel or coated fasteners to prevent corrosion and staining.
Tip 7: Test on Scrap Wood: Before installing the trim, test the fastener size and driving technique on a piece of scrap wood to ensure that it does not cause splitting or damage.
Adhering to these guidelines will result in a more secure, aesthetically pleasing, and long-lasting trim installation.
The concluding sections will discuss the long-term maintenance and potential issues associated with different types of trim fastening.
1. Gauge
Gauge, in the context of fasteners used for trim work, refers to the diameter of the nail shank. It plays a crucial role in determining both the holding power and the potential for splitting the trim material. A thorough understanding of gauge is essential for selecting the correct fastener for a given application.
- Holding Power and Material Thickness
A larger gauge offers increased holding power due to its greater cross-sectional area. However, this comes at the cost of increased potential for splitting delicate trim, especially near edges or in hardwoods. Conversely, a smaller gauge minimizes the risk of splitting but may lack sufficient holding power for heavier or more substantial trim pieces.
- Wood Hardness and Grain Orientation
Softer woods, such as pine or cedar, generally tolerate larger gauges without significant risk of splitting. Hardwoods like oak or maple require finer gauges to prevent damage. The orientation of the wood grain also influences gauge selection; driving a nail parallel to the grain increases the likelihood of splitting compared to driving it perpendicular.
- Aesthetic Considerations
The gauge indirectly affects the final appearance of the trim work. A smaller gauge leaves a smaller hole, requiring less filler and resulting in a cleaner, more professional look. Overly large gauge nails, even if properly countersunk, can create noticeable imperfections after filling and finishing, diminishing the overall aesthetic appeal.
- Pneumatic Nailer Compatibility
When using a pneumatic nailer, the gauge of the fastener must be compatible with the tool’s specifications. Using an incorrect gauge can lead to malfunctions, damage to the nailer, and improper fastener installation. Always consult the nailer’s manual for recommended gauge ranges.
In summary, the selection of an appropriate gauge for fasteners in trim work necessitates a careful balance between holding power, the risk of splitting, aesthetic requirements, and tool compatibility. A well-informed decision ensures a secure, visually appealing, and long-lasting trim installation.
2. Length
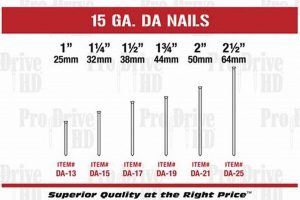
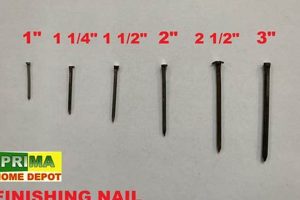
The length of a fastener significantly impacts its holding power and suitability for trim applications. An insufficient length fails to penetrate the substrate adequately, resulting in a weak connection prone to loosening or complete failure. Conversely, excessive length risks protruding through the back of the substrate, creating an unsightly appearance or posing a safety hazard. Selecting the appropriate length requires careful consideration of the trim thickness and the material it is being attached to. For example, attaching a -inch thick trim piece to a -inch drywall requires a fastener length that penetrates at least inch into the framing member behind the drywall. The formula should ensure secure, lasting attachment without unnecessary protrusion.
Practical application further necessitates accounting for the density and hardness of the substrate. A softer substrate, such as pine, allows for slightly shorter lengths compared to hardwoods like oak, where greater penetration is required for adequate grip. Moreover, the presence of adhesives can influence the required length; when used in conjunction with a quality construction adhesive, a slightly shorter length may suffice, as the adhesive contributes significantly to the overall holding strength. In the absence of adhesive, greater length is imperative to ensure a robust mechanical bond. Consider attaching baseboard trim to a concrete wall using construction adhesive; fasteners function primarily to hold the trim in place while the adhesive cures, so a shorter length is appropriate.
The crucial aspect of length selection lies in balancing secure attachment with aesthetic considerations and safety. A comprehensive approach considers the material properties of both the trim and the substrate, the use of supplementary adhesives, and the potential for protrusion. A properly chosen fastener length ensures a durable, visually appealing trim installation while mitigating safety risks associated with exposed nail points. Neglecting the role of length compromises the integrity and longevity of the finish work.
3. Head Style
The head style of a fastener is a defining characteristic dictating its suitability for trim applications. The fundamental objective of using a fastener in this context is to provide a secure attachment while minimizing visual intrusion. Consequently, head styles for specialized fasteners prioritize concealment. The small, often nearly absent, head is designed to be driven flush with or slightly below the surface of the trim, allowing for subsequent filling and finishing to create an undetectable join. Deviation from this principle undermines the very purpose of employing these fasteners. An oversized head, for example, would necessitate extensive filling and sanding, compromising the integrity of the surrounding wood and increasing the labor required for a professional finish. The selection of an appropriate head style is therefore not merely an aesthetic choice, but a functional imperative.
Several distinct head styles cater to specific trim requirements. Brads, characterized by their minimal, often headless design, are ideal for delicate trim where splitting is a concern. Their near invisibility after filling makes them a preferred choice for intricate moldings or fine veneer work. Pin nails, even smaller than brads, offer virtually no holding power on their own but excel at temporarily securing trim while adhesives cure. Conversely, slight-headed fasteners offer a balance between holding strength and concealability. Their small, rounded heads provide a slightly larger surface area for driving, while still allowing for effective filling. The choice between these options hinges on the specific demands of the trim project, the type of wood being used, and the desired level of finish.
In conclusion, the relationship between head style and specialized fasteners for trim is one of fundamental interdependence. The head style directly influences the fastener’s ability to achieve a seamless, professional finish. The selection of an appropriate head style, based on material properties, holding requirements, and aesthetic considerations, is crucial for realizing the intended benefits. Ignoring these factors will negate the advantages of using specialized fasteners, resulting in an inferior trim installation and a compromised final product.
4. Material
The material composition of fasteners fundamentally influences their performance and longevity when used in trim applications. Selecting an appropriate material is crucial to prevent corrosion, ensure adequate holding power, and maintain the aesthetic integrity of the finished trim work.
- Steel Alloys and Carbon Content
Steel is a common material choice, but its properties vary significantly based on alloy composition and carbon content. High-carbon steel offers increased strength and holding power, while low-carbon steel is more malleable and less prone to fracturing during driving. The specific steel alloy must be carefully considered based on the type of wood and the intended application. For instance, hardwoods may necessitate higher carbon steel for secure fastening.
- Stainless Steel and Corrosion Resistance
Stainless steel provides superior corrosion resistance compared to standard steel. This is particularly important in environments with high humidity or potential for water exposure, such as bathrooms or exterior trim. The chromium content in stainless steel forms a protective layer that prevents rust and degradation, ensuring a long-lasting and aesthetically pleasing finish. The cost is higher than regular steel, reflecting its advanced properties.
- Brass and Aesthetic Compatibility
Brass offers excellent corrosion resistance and a distinct aesthetic appeal. Its golden hue complements certain wood types and finishes, making it a suitable choice for decorative trim applications. However, brass is generally softer than steel, so its use is typically limited to lighter-duty applications where holding power is not paramount. Brass usage adds a touch of sophistication.
- Copper and Antimicrobial Properties
Copper possesses natural antimicrobial properties and excellent corrosion resistance, although it is softer than steel. Its reddish-brown color can add a unique visual element to trim work. Copper is often used in historical restoration projects or in environments where hygiene is a concern. It’s softer and more expensive than other materials.
The choice of material for fasteners significantly impacts the durability and visual quality of trim installations. An informed decision, based on environmental conditions, wood type, and aesthetic preferences, is essential for achieving optimal results and preventing future complications such as corrosion or structural failure. This decision affects the final visual appeal and longevity of the trim.
5. Coating
The application of coatings to fasteners used in trim work is a critical factor influencing their performance, longevity, and compatibility with various materials and environments. Coatings serve multiple purposes, ranging from enhancing corrosion resistance to improving driving ease and minimizing discoloration of the surrounding wood. Therefore, understanding the different types of coatings available and their respective properties is essential for selecting the appropriate fastener for a given trim application.
- Zinc Coating and Corrosion Protection
Zinc coatings, applied through galvanization or electroplating, provide a sacrificial barrier against corrosion. When moisture and oxygen are present, the zinc corrodes preferentially to the underlying steel, protecting it from rust. This is particularly important in damp or humid environments, where unprotected steel would quickly degrade. However, zinc coatings may not be suitable for direct contact with certain acidic woods, as they can react and cause discoloration. A common example is using galvanized nails in cedar siding, leading to black staining around the nail head. Coating thickness dictates the level of protection.
- Polymer Coating and Reduced Friction
Polymer coatings, such as Teflon or similar compounds, reduce friction during driving, making the fastener easier to install and minimizing the risk of bending or breaking. This is especially beneficial when working with hardwoods or using pneumatic nailers, where excessive force can damage the wood or the tool. These coatings also help prevent the fastener from adhering to resinous woods, which can make them difficult to remove. These coatings result in a smoother installation process.
- Phosphate Coating and Paint Adhesion
Phosphate coatings create a porous surface that enhances paint adhesion. This is particularly useful when the trim is to be painted, as it ensures a strong bond between the paint and the fastener head, preventing chipping or peeling. Phosphate coatings also offer a degree of corrosion resistance, although they are not as effective as zinc coatings in this regard. They are often used in interior trim applications where paint finish is crucial. Surface preparation is vital for optimal paint adhesion.
- Colored Coating and Aesthetic Matching
Colored coatings allow the fastener head to blend seamlessly with the color of the trim, minimizing its visibility and enhancing the overall aesthetic appeal. These coatings are typically applied using paints or powder coatings and can be matched to a wide range of colors and finishes. Colored coatings are particularly useful when the fastener head will be exposed or when filling and painting are not desired. Careful color matching is critical to achieving the desired effect. It enhances visual appeal.
In summary, the choice of coating for specialized fasteners directly influences the performance, durability, and aesthetic quality of the trim installation. Factors such as environmental conditions, wood type, desired finish, and application method must be carefully considered to select the appropriate coating. A well-chosen coating extends the life of the fastener, protects the trim from damage, and contributes to a professional, visually appealing final product. Ignoring coating considerations introduces risks like premature failure and staining.
6. Driving Method
The driving method significantly impacts the effectiveness and aesthetic quality of trim installations utilizing specialized fasteners. The technique employed directly influences the fastener’s holding power, the potential for damage to the trim material, and the overall finish. Precise and controlled application is paramount for achieving optimal results.
- Hand Driving and Precision Control
Hand driving allows for meticulous control over the fastener’s placement and depth. This method is particularly suitable for delicate trim or hardwoods prone to splitting. The use of a nail set is essential to countersink the fastener head without marring the surrounding surface. While slower than mechanized methods, hand driving offers unparalleled precision for intricate work.
- Pneumatic Nailers and Efficiency
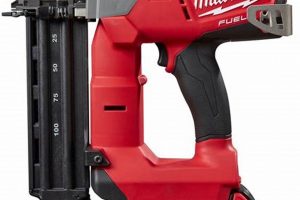
Pneumatic nailers offer increased speed and efficiency, particularly for larger trim projects. These tools drive fasteners with consistent depth and force, reducing the risk of uneven installations. However, careful adjustment of air pressure is crucial to prevent overdriving or damaging the trim. The selection of the correct nailer gauge and fastener type is also essential for compatibility and optimal performance. Examples of their efficiency can be found in projects involving mass production of furniture.
- Depth Adjustment and Material Compatibility
Regardless of the driving method employed, precise depth adjustment is critical for ensuring that the fastener head is flush with or slightly below the surface of the trim. Overdriving can create unsightly indentations, while underdriving leaves the fastener head exposed, both compromising the aesthetic appeal. The appropriate depth setting depends on the material’s hardness and thickness. Testing on scrap material is recommended before beginning the final installation.
- Angle and Trajectory Considerations
The angle at which the fastener is driven can significantly affect its holding power and the risk of splitting. Driving at a slight angle, known as toe-nailing, can increase the fastener’s resistance to pull-out forces. However, this technique requires careful execution to avoid damaging the trim or causing the fastener to protrude. Maintaining a consistent trajectory is also essential for achieving a uniform and professional finish.
The choice of driving method depends on the specific requirements of the trim project, the type of material being used, and the desired level of precision. While pneumatic nailers offer speed and efficiency, hand driving provides greater control for delicate work. Regardless of the method chosen, careful attention to depth adjustment, angle, and trajectory is essential for achieving a secure and visually appealing trim installation using specialized fasteners. Skillful execution elevates the projects quality significantly.
Frequently Asked Questions
The following addresses common inquiries regarding the selection, application, and performance of fasteners designed for trim work. These questions are intended to clarify best practices and mitigate potential issues.
Question 1: What is the appropriate gauge for fasteners used on hardwood trim to prevent splitting?
A thinner gauge is generally recommended for hardwood trim to minimize the risk of splitting. Gauges ranging from 18 to 23 are typically suitable. Pre-drilling pilot holes can further reduce the likelihood of splitting, especially near edges.
Question 2: How does the length of a fastener impact its holding power in trim applications?
The length of the fastener directly correlates with its holding power. The fastener must penetrate sufficiently into the substrate to provide a secure connection. A general rule of thumb is to ensure the fastener penetrates at least two-thirds of the substrate thickness. However, this may vary based on the substrate’s density and hardness.
Question 3: What are the advantages of using stainless steel fasteners in trim applications?
Stainless steel fasteners offer superior corrosion resistance compared to standard steel. This is particularly beneficial in environments with high humidity or potential water exposure, such as bathrooms or exterior trim. Stainless steel prevents rust and degradation, ensuring a long-lasting and aesthetically pleasing finish.
Question 4: How can the visibility of fastener heads be minimized in trim work?
Several strategies can minimize fastener head visibility. The use of brad or pin nails, characterized by their minimal heads, is effective. Countersinking the fastener heads and filling the resulting holes with wood filler or putty is another common practice. Matching the filler color to the trim further reduces visibility.
Question 5: What is the purpose of coatings on fasteners used in trim applications?
Coatings serve various purposes, including enhancing corrosion resistance, reducing friction during driving, and improving paint adhesion. Zinc coatings protect against rust, polymer coatings reduce friction, and phosphate coatings promote paint adhesion. The appropriate coating depends on the specific application and environmental conditions.
Question 6: Is it necessary to use adhesive in conjunction with fasteners when installing trim?
While not always mandatory, the use of adhesive is highly recommended for enhancing the stability and longevity of trim installations. Construction adhesive provides a strong bond between the trim and the substrate, reducing the reliance on mechanical fastening alone. This is particularly beneficial for larger or heavier trim pieces.
Selecting and applying fasteners correctly is essential for durable, aesthetically pleasing trim work. Considerations of gauge, length, material, coating, and driving method are critical for optimal results.
The subsequent discussion will examine the potential challenges and long-term maintenance considerations associated with specialized fasteners in trim installations.
Conclusion
The preceding analysis underscores the critical role that appropriately selected and applied finish nails for trim play in achieving high-quality, durable, and aesthetically pleasing trim installations. Key considerations include gauge, length, head style, material, coating, and driving method. A thorough understanding of these elements is essential for ensuring a secure, long-lasting, and visually seamless finish.
Competent application of such fasteners is indispensable for maintaining both structural integrity and visual appeal in diverse construction and woodworking projects. Proper selection, application, and maintenance extend the lifespan of trim work and prevent costly repairs or replacements. Continued adherence to best practices will ensure optimal performance and enduring quality in all trim-related endeavors.


