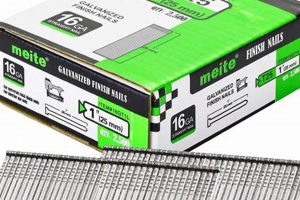
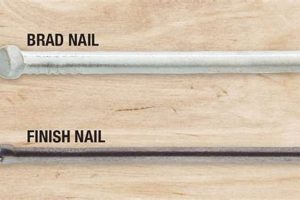
These slender fasteners, often used in woodworking and trim applications, are characterized by a protective zinc coating applied to their surface. This coating provides resistance against corrosion, extending the lifespan of the nail and preventing rust stains on the finished project. An example of their use is in securing delicate molding where a minimal, almost invisible head is desired.
The advantage of employing these fasteners lies primarily in their increased durability in environments exposed to moisture or weather. The zinc layer acts as a barrier, preventing oxidation of the underlying steel. Historically, this protective measure has been essential in exterior projects and areas prone to dampness, ensuring the longevity and aesthetic quality of the construction. They are an evolution from traditional fasteners, addressing the inherent weakness of iron or steel when exposed to the elements.
The following sections will delve into the specific applications, installation techniques, and selection criteria related to these specialized fasteners, offering a detailed understanding of their role in various construction and finishing projects.
Essential Usage Guidance
Optimal performance and longevity when using these fasteners depend on adherence to specific installation and selection principles. The following tips offer guidance on proper usage.
Tip 1: Select the Correct Gauge: Consider the thickness of the materials being joined. A thinner gauge is appropriate for delicate trim, while a thicker gauge may be necessary for securing heavier pieces.
Tip 2: Utilize a Nail Set: Employ a nail set to drive the head slightly below the surface of the wood. This prevents damage to the surrounding material and allows for a seamless finish when filling the hole.
Tip 3: Pre-Drill Hardwoods: When working with hardwoods, pre-drilling pilot holes is essential to prevent the nail from bending or splitting the wood. The pilot hole should be slightly smaller than the diameter of the fastener.
Tip 4: Avoid Overdriving: Excessive force during installation can damage the coating, compromising its protective properties and potentially weakening the joint. Drive the fastener with controlled pressure.
Tip 5: Consider Environmental Factors: In particularly corrosive environments, such as coastal areas, consider using stainless steel fasteners as an alternative for superior corrosion resistance.
Tip 6: Proper Storage: Store unused fasteners in a dry environment to prevent premature corrosion or rust. A sealed container is recommended for long-term storage.
Correct application and material consideration are fundamental for realizing the benefits of these fasteners, which include a secure hold and resistance to environmental degradation.
The subsequent sections will explore alternative types of fasteners and their suitability for specific construction needs, providing a broader perspective on available fastening solutions.
1. Corrosion Resistance
Corrosion resistance is a critical factor in determining the longevity and performance of fasteners, particularly those used in exterior or damp environments. For galvanized finishing nails, this resistance is achieved through a protective zinc coating, significantly enhancing their suitability for a wide range of applications.
- Sacrificial Anode Action
Zinc, being more electrochemically active than steel, acts as a sacrificial anode. In the presence of moisture, the zinc corrodes preferentially, protecting the underlying steel from oxidation. This process ensures the integrity of the nail even when the coating is scratched or partially damaged. A real-world example is their use in fence construction, where constant exposure to weather necessitates robust corrosion protection.
- Barrier Protection
The zinc coating forms a physical barrier between the steel core and the environment, preventing direct contact with moisture and corrosive agents. This barrier effect is crucial in preventing rust and maintaining the structural integrity of the nail. Application in marine environments, where salt water accelerates corrosion, demonstrates the importance of this protective barrier.
- Extended Lifespan
By mitigating corrosion, the zinc coating extends the service life of the finishing nails. This is particularly valuable in applications where replacement or repair is difficult or costly. For instance, in securing trim on high-rise buildings, the enhanced durability reduces maintenance requirements.
- Aesthetic Preservation
Corrosion often leads to rust stains, which can detract from the appearance of the finished project. The galvanized coating prevents the formation of rust, maintaining the aesthetic quality of the work. Consider the use of these nails in fine woodworking projects where the visual appeal is paramount.
The collective action of these factors establishes corrosion resistance as a primary benefit, rendering them indispensable for diverse projects where longevity and aesthetic integrity are essential. The advantages of this protective coating extend from preventing structural degradation to maintaining the visual appeal of finished constructions.
2. Minimal Head
The characteristic small head of galvanized finishing nails is not merely an aesthetic choice; it is a functional design element that dictates their suitability for specific applications. This feature influences their holding power, visibility, and the overall finish quality of a project.
- Concealed Fastening
The primary role of a minimal head is to allow for nearly invisible fastening. The small head size permits the nail to be driven nearly flush with the surface of the material, minimizing its visual impact. In trim work and fine woodworking, where aesthetics are paramount, this characteristic is essential for achieving a clean, professional look. Consider the application of attaching delicate molding; a large nail head would be unsightly and detract from the overall design.
- Reduced Surface Damage
A smaller head reduces the likelihood of causing surface damage to the surrounding material during installation. This is particularly important when working with softwoods or delicate finishes. When using a nail set, the minimal head allows for easier countersinking without splitting or marring the surface. For example, when installing window casings, a larger head would be more likely to damage the wood frame.
- Filling and Concealment
The reduced size of the head makes it easier to fill the nail hole with wood filler or putty, further concealing the fastener. This is a crucial step in achieving a seamless finish, particularly in applications where the nail head would otherwise be visible. In furniture making, the ability to completely hide the nail head is often critical for achieving a high-quality result.
- Limited Holding Power
It is important to acknowledge that a minimal head inherently offers less holding power compared to nails with larger heads. Therefore, these nails are best suited for applications where shear strength is not the primary concern and where the materials being joined are relatively lightweight. Using them to secure heavy structural elements would be inappropriate due to the compromised holding capability.
These aspects highlight the connection between the minimal head design and the specific applications for galvanized finishing nails. While the small head contributes to a refined appearance, it also necessitates careful consideration of the fastener’s limitations in terms of structural integrity and load-bearing capacity. Their selection should be driven by a comprehensive assessment of project requirements, ensuring that aesthetic considerations are balanced with functional performance. Other options are available where greater holding power is needed, such as larger headed nails or screws.
3. Material Compatibility
Material compatibility is a critical consideration when employing galvanized finishing nails in construction and woodworking projects. The interaction between the fastener and the surrounding material can affect the longevity, structural integrity, and aesthetic outcome of the finished work. Proper material selection mitigates potential adverse reactions and ensures optimal performance.
- Acidic Wood Species
Certain wood species, such as redwood and cedar, contain naturally occurring acids. These acids can accelerate the corrosion of the zinc coating on galvanized nails, reducing their lifespan and potentially leading to staining of the wood. It is advisable to use stainless steel nails or other corrosion-resistant fasteners when working with these types of wood to prevent premature failure. The use of standard galvanized nails in such instances may void warranties or lead to costly repairs.
- Electrolytic Corrosion
When dissimilar metals are in contact in the presence of an electrolyte (such as moisture), galvanic corrosion can occur. If galvanized nails are used in conjunction with other metals, such as aluminum flashing, the zinc coating may corrode more rapidly due to the electrochemical potential difference. To minimize this risk, use compatible fasteners and materials, or incorporate a barrier to isolate the metals. For instance, utilizing neoprene washers between the nail head and the aluminum surface can mitigate direct contact and reduce the likelihood of corrosion.
- Chemical Treatments
Some wood treatments, such as those containing copper-based preservatives, can react negatively with the zinc coating on galvanized nails. This reaction can lead to accelerated corrosion and potential staining of the wood. Review the compatibility of any wood treatment products with galvanized fasteners prior to application. Incompatible treatments may necessitate the use of alternative fastener materials or the application of a protective coating on the nail head to prevent direct contact.
- Environmental Factors
Environmental conditions such as humidity, salinity, and exposure to pollutants can also affect the material compatibility of galvanized finishing nails. In coastal environments, the high salt content in the air can accelerate the corrosion process, regardless of the wood species. Similarly, industrial pollutants can contribute to acid rain, which can degrade the zinc coating. In these environments, stainless steel fasteners or specialized coatings may be necessary to provide adequate corrosion resistance and ensure long-term performance. Regular inspection and maintenance are recommended to identify and address any signs of corrosion early on.
The careful consideration of material compatibility factors directly impacts the effectiveness and durability of galvanized finishing nails. By understanding the potential interactions between the fasteners, the surrounding materials, and the environment, construction professionals can make informed decisions that ensure the longevity and aesthetic quality of their projects. Ignoring these compatibility issues can result in premature failure, increased maintenance costs, and compromised structural integrity.
4. Gauge Selection
Gauge selection is a critical parameter influencing the performance and application suitability of galvanized finishing nails. It determines the nail’s diameter, impacting its holding power, resistance to bending, and propensity to split the wood. A higher gauge number corresponds to a smaller diameter. Therefore, selecting the appropriate gauge for a specific task necessitates a careful evaluation of the materials being joined and the desired outcome. For instance, securing delicate trim often requires a higher gauge (thinner) nail to minimize visible damage and reduce the risk of splitting, whereas fastening thicker boards may necessitate a lower gauge (thicker) nail for increased holding strength. Inappropriate gauge selection can result in compromised joint integrity, aesthetic imperfections, or material damage. The cause-and-effect relationship between gauge selection and project outcome underscores the importance of this decision.
The practical implications of gauge selection are evident in various scenarios. When applying thin veneers to substrates, using a low-gauge (thick) nail could cause significant surface disruption and detract from the finished appearance. Conversely, attempting to fasten heavy crown molding with a high-gauge (thin) nail might lead to inadequate support and potential joint failure over time. Real-world examples of this include the selection of 18-gauge nails for attaching cabinet backs to frames or using 15-gauge nails for securing heavier door casings. The success of these applications hinges on understanding the load-bearing capacity and material properties related to each gauge. Furthermore, the type of wood significantly impacts the optimal gauge selection; hardwoods require thinner nails to prevent splitting, while softer woods can accommodate thicker nails for increased stability.
In summary, gauge selection for galvanized finishing nails is a balance between achieving adequate holding power and minimizing surface damage or material splitting. Understanding the relationship between nail diameter, material thickness, and wood density is paramount for successful application. The challenges of selecting the correct gauge are mitigated by considering the specific requirements of each project and adopting best practices for nail installation, such as pre-drilling pilot holes in hardwoods. Correct gauge selection contributes directly to the structural integrity, aesthetic quality, and long-term durability of the finished project, reinforcing its significance in the broader context of fastening solutions.
5. Secure Holding
The term “secure holding,” in the context of galvanized finishing nails, refers to the nail’s ability to maintain a reliable and durable connection between materials. This capability stems from a combination of factors, including the nail’s shank design, material properties, and the installation method. Galvanized finishing nails achieve secure holding primarily through friction between the nail shank and the surrounding wood fibers. The surface texture and any barbs or rings on the shank enhance this friction, increasing resistance to pull-out forces. Real-world examples include securing trim to wall studs, where the nails must resist shear forces and maintain a flush, seamless connection. Inadequate holding power can result in loose trim, gaps, and potential structural instability. Therefore, secure holding is a paramount component of the fastener’s intended function.
The effectiveness of secure holding is further influenced by the density and type of wood being fastened. Softer woods offer less resistance to nail penetration, potentially diminishing holding power, whereas hardwoods provide greater frictional resistance but may require pre-drilling to prevent splitting. The choice of nail length and gauge also impacts secure holding; longer nails penetrate deeper into the substrate, increasing frictional surface area, and thicker gauges offer greater shear strength. Consider, for instance, securing a chair rail to a drywall-covered wall; the nails must penetrate both the drywall and the underlying stud to achieve a secure connection. In this scenario, using too short of a nail or a nail of insufficient gauge can result in the chair rail pulling away from the wall under minimal stress.
In summary, secure holding is a critical attribute of galvanized finishing nails, determined by a complex interplay of factors including nail design, material properties, installation technique, and the characteristics of the materials being joined. Achieving optimal secure holding requires careful consideration of these factors and adherence to best practices for nail selection and installation. Failure to prioritize secure holding can compromise the structural integrity, aesthetic appeal, and longevity of the finished project. While galvanization provides corrosion resistance, the mechanical properties governing secure holding are equally essential for long-term performance.
Frequently Asked Questions
The following section addresses common inquiries concerning the selection, application, and performance characteristics of these fasteners.
Question 1: What differentiates electro-galvanized and hot-dipped galvanized finishing nails?
Electro-galvanized nails receive a thin zinc coating applied via electroplating, offering moderate corrosion resistance suitable for interior applications. Hot-dipped galvanized nails undergo immersion in molten zinc, resulting in a thicker, more robust coating ideal for exterior projects demanding greater protection against moisture and the elements.
Question 2: Are galvanized finishing nails appropriate for use with pressure-treated lumber?
Standard galvanized finishing nails are generally not recommended for direct contact with pressure-treated lumber. The chemicals used in pressure treatment can accelerate corrosion of the zinc coating. It is advisable to use stainless steel fasteners specifically designed for compatibility with treated wood.
Question 3: How does the gauge of a finishing nail impact its holding power and the likelihood of splitting wood?
A lower gauge number indicates a thicker nail diameter, resulting in increased holding power but a higher risk of splitting the wood, particularly in hardwoods. Conversely, a higher gauge number signifies a thinner nail, reducing the risk of splitting but potentially compromising holding strength. Selection of an appropriate gauge requires balancing these considerations.
Question 4: Can galvanized finishing nails be used in applications requiring structural load bearing?
These nails are primarily intended for finishing and trim work, not structural applications involving significant load bearing. The small head and slender shank provide limited resistance to shear and pull-out forces. Structural applications necessitate the use of framing nails or screws designed for high-load performance.
Question 5: What is the recommended installation technique to minimize surface damage when using galvanized finishing nails?
Employing a nail set is recommended to drive the nail head slightly below the surface of the material without marring the surrounding area. Pre-drilling pilot holes, particularly in hardwoods, further minimizes the risk of splitting and ensures precise nail placement.
Question 6: How should galvanized finishing nails be stored to prevent premature corrosion?
Store unused nails in a dry, well-ventilated environment to minimize exposure to moisture. A sealed container or bag can further protect the nails from atmospheric humidity, extending their lifespan and preventing the formation of rust.
The information provided in these FAQs offers clarification on common queries and aids in the informed selection and application of galvanized finishing nails.
The subsequent section will explore alternative fastening solutions and their respective strengths and limitations.
Conclusion
This exploration has detailed the characteristics, applications, and limitations of galvanized finishing nails. Key points include their corrosion resistance, minimal head design, material compatibility considerations, proper gauge selection for specific tasks, and importance of secure holding. Proper application and selection of these fasteners directly influence the longevity and aesthetic quality of finished projects.
The information presented serves as a guide for professionals and hobbyists alike in making informed decisions regarding fastening solutions. Understanding the capabilities and constraints of galvanized finishing nails empowers individuals to achieve optimal results in various construction and woodworking endeavors, ensuring durable and visually appealing outcomes.


