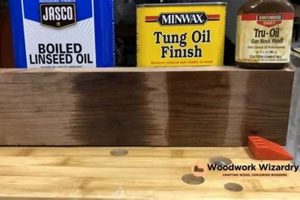
The act of revitalizing the protective coating on wooden surfaces is a common practice in furniture maintenance and historical preservation. This process addresses damage like scratches, clouding, or general wear that detracts from the aesthetic appeal and compromises the wood’s defense against environmental factors. An example includes addressing a water ring on a varnished tabletop or mitigating sun damage on a cherished antique.
Properly executed refurbishment enhances the beauty and longevity of wooden items. It can significantly increase the value of antiques and family heirlooms, preserving cultural heritage. Furthermore, it avoids the need for costly replacements, promoting sustainable practices by extending the life cycle of existing possessions.
The following sections will detail methods for surface preparation, product selection based on the existing coating type, and application techniques. Strategies for addressing specific types of damage and achieving a professional, long-lasting outcome will also be explored.
Essential Considerations for Surface Coating Renewal
The following are key recommendations for ensuring a successful process of revitalizing a protective layer on wooden surfaces.
Tip 1: Proper Surface Preparation: Thorough cleaning is paramount. Remove all traces of wax, grease, and dirt with appropriate solvents before proceeding. A clean surface ensures optimal adhesion of the new coating.
Tip 2: Identification of Existing Coating: Determine the type of existing protective layer (e.g., varnish, lacquer, shellac). This is crucial because incompatible products can lead to undesirable results, such as lifting or clouding.
Tip 3: Application of Thin Coats: Apply multiple thin coats rather than a single thick coat. This minimizes the risk of runs, drips, and air bubbles, resulting in a smoother, more even finish.
Tip 4: Adequate Drying Time: Allow sufficient drying time between coats, as specified by the manufacturer. Rushing the drying process can compromise the integrity and durability of the final surface.
Tip 5: Light Sanding Between Coats: Lightly sand between coats with fine-grit sandpaper (e.g., 320-grit or higher). This creates a slightly roughened surface, promoting better adhesion of subsequent layers.
Tip 6: Appropriate Environmental Conditions: Work in a well-ventilated area with moderate temperature and humidity. Extreme conditions can negatively affect drying times and the overall quality of the layer.
Tip 7: Consider a Test Area: Before applying any product to the entire surface, test it in an inconspicuous area. This allows for assessment of color compatibility and adhesion.
These essential considerations contribute to a more professional and durable outcome when engaging in the process of protective coating renewal, ensuring the longevity and aesthetic appeal of wooden items.
The next section will address common issues encountered during this process and strategies for effective troubleshooting.
1. Surface Preparation
Surface preparation constitutes a foundational element within the process of protective coating refurbishment. Its impact directly determines the adhesion, uniformity, and longevity of the new coating. Inadequate surface preparation inevitably leads to compromised results. For example, residual wax on a wooden surface acts as a barrier, preventing proper bonding of the new coating and resulting in peeling or flaking over time. Similarly, ingrained dirt or grease creates an uneven substrate, leading to visible imperfections and a lack of uniform sheen in the refurbished layer.
The necessity of thorough cleaning extends beyond the removal of visible contaminants. Microscopic residues can impede optimal adhesion. Techniques such as solvent cleaning, light abrasion with fine-grit sandpaper, and tack cloth wiping are employed to ensure a pristine surface. The selection of appropriate cleaning agents is critical; harsh chemicals may damage the underlying wood, while ineffective cleaners fail to remove stubborn residues. The presence of a stable, clean surface is therefore a prerequisite for achieving a professional-quality refurbishment.
In summary, meticulous surface preparation is not merely a preliminary step but an integral determinant of the success of protective layer renewal. Its importance lies in creating a foundation conducive to optimal adhesion and a flawless final result. Neglecting this crucial stage results in suboptimal outcomes, negating the benefits of subsequent steps and ultimately compromising the integrity of the wooden item being refurbished.
2. Coating identification
Accurate determination of the existing protective layer type is paramount to successfully revitalizing wooden surfaces. Compatibility between existing and new coatings dictates the longevity and aesthetic quality of the finished surface. Misidentification can lead to adhesion failures, discoloration, or irreversible damage.
- Visual Inspection and Solvent Testing
Visual cues such as sheen level and the presence of crazing or alligatoring can provide initial clues. Solvent testing, involving the application of small amounts of solvents like denatured alcohol or lacquer thinner to an inconspicuous area, can indicate the coating’s susceptibility to dissolving, swelling, or remaining unaffected. For instance, shellac readily dissolves in denatured alcohol, while lacquer reacts to lacquer thinner. These reactions help narrow down the possibilities.
- Historical Context and Age of the Item
The age and origin of the wooden item often provide valuable context. Antique furniture, for example, is more likely to be coated with shellac or varnish than with modern polyurethane coatings. Researching the historical usage of coatings during the period the item was manufactured can significantly aid in identification efforts. Construction techniques and hardware styles can further corroborate these findings.
- Chemical Spot Tests
More definitive identification can be achieved through chemical spot tests, although these require caution and expertise. Specific reagents react differently with various coating types, producing observable color changes or other indicators. For instance, a specific test might differentiate between nitrocellulose lacquer and acrylic lacquer. These tests should be performed in a well-ventilated area, following appropriate safety protocols.
- Microscopic Analysis
In certain cases, microscopic analysis may be necessary. A small sample of the coating can be examined under magnification to identify its structure and composition. This method is particularly useful for complex or layered coatings, or when other identification techniques prove inconclusive. The services of a professional conservator or analytical laboratory may be required for this level of analysis.
In conclusion, proper coating identification forms a critical juncture in the process. The techniques described enable informed decisions regarding the selection of compatible products and application methods, minimizing the risk of adverse reactions and maximizing the chances of achieving a durable and aesthetically pleasing outcome.
3. Product Compatibility
Successful protective coating refurbishment hinges significantly on the principle of product compatibility. This principle underscores the necessity of selecting coatings, solvents, and other materials that are chemically and physically compatible with both the existing coating (if any remains) and the underlying wood substrate. Failure to adhere to this principle frequently results in undesirable outcomes, including adhesion failures, visual defects, and accelerated degradation of the renewed surface.
- Solvent Interactions and Coating Layers
The solvents present in a new coating can interact adversely with a pre-existing protective layer. For instance, applying a lacquer-based coating over an oil-based varnish can cause the solvents in the lacquer to soften or dissolve the underlying varnish, resulting in wrinkling, lifting, or bubbling. Careful consideration of solvent type and strength is therefore essential. Testing in an inconspicuous area is recommended to assess potential solvent interactions before full application.
- Adhesion and Bonding Characteristics
Compatibility in terms of adhesion is critical for long-term durability. Different coating types possess varying bonding characteristics. Applying a coating that lacks sufficient adhesion to the existing protective layer (or the bare wood, if the old coating has been completely removed) will result in peeling or flaking over time, even if the initial appearance is satisfactory. Surface preparation techniques, such as sanding or the application of a bonding agent, can sometimes improve adhesion but cannot compensate for fundamental incompatibilities.
- Chemical Reactivity and Color Stability
Certain coatings may chemically react with each other, leading to discoloration or other visual defects. For example, applying an alkyd-based coating over a surface previously treated with a silicone-based polish can result in poor drying and a cloudy or streaky appearance. Similarly, incompatibility in terms of UV resistance can lead to uneven fading or yellowing over time. The use of compatible products with similar UV-blocking properties is crucial for maintaining consistent color and appearance.
- Flexibility and Movement
Wood expands and contracts with changes in humidity and temperature. Coatings must be flexible enough to accommodate this movement without cracking or delaminating. Applying a rigid coating over a flexible substrate (or vice versa) can lead to premature failure. The choice of coating should consider the expected environmental conditions and the inherent flexibility of the wood species.
The selection of compatible products is therefore a central determinant of the success and longevity of any protective coating renewal project. A thorough understanding of coating chemistry, solvent interactions, adhesion characteristics, and the properties of the wood substrate is essential for making informed decisions and achieving professional-quality results. Proper assessment prevents costly errors and ensures the preservation of valuable wooden items.
4. Application Technique
The effectiveness of any effort aimed at protective layer refurbishment is inextricably linked to the application technique employed. Even the highest quality coatings, if improperly applied, will yield subpar results, negating the benefits of meticulous surface preparation and judicious product selection. Application flaws manifest in various forms, including uneven coverage, brush marks, drips, runs, air bubbles, and contamination from dust or other particles. These imperfections detract from the aesthetic appeal of the finished surface and compromise its protective properties.
The appropriate application method varies depending on the type of coating, the size and shape of the object being refurbished, and the desired level of finish. Brushing, spraying, and wiping are common application techniques, each with its own advantages and disadvantages. Brushing, for example, is suitable for small or intricate surfaces but can be prone to brush marks if not executed with skill. Spraying offers the potential for a smooth, even coating but requires specialized equipment and a controlled environment to minimize overspray and contamination. Wiping is often used for applying penetrating oils or stains and requires careful attention to ensure uniform coverage and prevent pooling.
Ultimately, a proficient application technique represents a synthesis of knowledge, skill, and attention to detail. It requires an understanding of the coating’s viscosity, drying time, and flow characteristics, as well as the proper use of application tools and techniques. Mastering these skills is essential for achieving a durable, aesthetically pleasing, and protective coating, thereby extending the lifespan and enhancing the value of the refurbished wooden item. Consistent practice and adherence to best practices significantly improve the likelihood of successful outcome in protective layer refurbishment.
5. Drying Time
In the process of protective layer refurbishment, drying time emerges as a critical factor that significantly influences the overall quality and durability of the renewed surface. Insufficient drying, whether between coats or before the item is put back into service, can lead to a range of problems, from a soft, easily damaged coating to trapped solvents that compromise the long-term integrity of the surface. The cause-and-effect relationship is direct: inadequate drying weakens the protective layer, rendering it more susceptible to scratches, water damage, and other forms of wear. For example, a table hurriedly returned to use after recoating may exhibit impressions from objects placed on its surface if the coating has not fully hardened.
The practical significance of understanding drying time lies in its impact on the longevity and aesthetic appeal of wooden items. Each coating typevarnish, lacquer, shellac, polyurethanepossesses a unique drying profile dictated by its chemical composition and the environmental conditions, such as temperature and humidity. Compliance with the manufacturer’s recommended drying times ensures that the coating achieves its optimal hardness, adhesion, and resistance to solvents and abrasion. Furthermore, allowing sufficient drying time minimizes the risk of solvent entrapment, which can lead to blistering, clouding, or a lingering odor. A well-executed protective layer renewal process incorporates patient adherence to drying time requirements.
Accurate determination of the appropriate duration involves consideration of factors beyond the manufacturers specifications. Thick coatings, low temperatures, and high humidity levels can all extend drying times. Conversely, warm, dry conditions can accelerate drying, but excessive heat may cause the coating to dry too quickly, resulting in cracking or other defects. Challenges arise when dealing with older or unknown coatings, where precise drying information is unavailable. In these instances, careful observation and testing are necessary to ascertain when the surface is sufficiently dry. In conclusion, a thorough understanding of drying time and its influencing factors is essential for achieving a professional and long-lasting result in protective layer refurbishment, connecting directly to the final quality and protection afforded to the wooden item.
6. Sanding (between coats)
The practice of sanding between coats is a crucial step in the process of protective layer renewal, significantly impacting the smoothness, adhesion, and overall quality of the finished surface. This technique is not merely cosmetic; it serves functional purposes essential for achieving a durable and aesthetically pleasing outcome.
- Removal of Imperfections
Sanding between coats eliminates imperfections such as dust particles, air bubbles, and brush strokes that may become trapped within the coating as it dries. These imperfections, if left unaddressed, can create an uneven surface and detract from the clarity and luster of the protective layer. For example, small dust motes landing on a freshly applied coat of varnish will create noticeable bumps; sanding removes these and prepares the surface for the next layer.
- Enhancing Adhesion
Light sanding between coats creates a slightly roughened surface, providing a mechanical key for subsequent layers to adhere to. This is particularly important when applying multiple coats of a coating or when applying a different type of coating over an existing one. The increased surface area and texture promote better bonding and prevent delamination or peeling over time. Imagine applying a new coat of paint over a glossy surface; without sanding, the new coat would likely peel easily.
- Leveling the Surface
Sanding between coats helps to level the surface, removing minor ridges and valleys that may result from uneven application or variations in the underlying wood. This leveling action contributes to a smoother, more uniform finish. Consider the application of multiple coats of lacquer; each coat may exhibit slight variations in thickness; sanding between coats evens these out, resulting in a glass-like surface.
- Preparing for Subsequent Coats
Sanding between coats prepares the surface to receive the next coat, ensuring optimal adhesion and a uniform appearance. The specific grit of sandpaper used is critical; too coarse a grit can create scratches, while too fine a grit may not provide sufficient abrasion. Typically, fine-grit sandpaper (e.g., 320-grit or higher) is used for sanding between coats to achieve a smooth, yet textured surface conducive to bonding.
In summary, sanding between coats is an integral component of quality protective layer refurbishment. It addresses surface imperfections, enhances adhesion, levels the surface, and prepares for subsequent coats, all contributing to a durable and aesthetically pleasing outcome that maximizes the protective properties of the renewed surface. This practice is not merely an optional step; it is a fundamental technique for achieving professional-grade results and ensuring the longevity of wooden items.
7. Environmental Control
Environmental control is a significant factor during protective layer refurbishment, influencing the curing process and overall quality of the renewed coating. Fluctuations in temperature and humidity can directly affect the drying rate, adhesion, and final appearance of the coating. For example, high humidity retards the evaporation of solvents, extending drying times and potentially leading to a hazy or cloudy finish. Conversely, excessively warm temperatures may cause the coating to dry too rapidly, resulting in cracking or blistering. Dust and airborne particles represent another critical environmental concern; these contaminants can settle on the wet coating, creating imperfections and compromising the smoothness of the surface.
Effective environmental control measures involve maintaining consistent temperature and humidity levels within the recommended range for the specific coating being applied. This may require the use of climate control systems, such as air conditioners, dehumidifiers, or heaters, to regulate the ambient environment. Air filtration systems can remove dust and other airborne contaminants, preventing them from settling on the wet coating. Proper ventilation is also essential to ensure adequate air circulation and prevent the buildup of solvent vapors. Real-world examples include setting up a dedicated spray booth with controlled temperature, humidity, and filtration for applying lacquer or varnish, or using a climate-controlled room for applying slower-drying coatings like oil-based paints.
In conclusion, environmental control constitutes a crucial component of quality protective layer refurbishment. Maintaining stable temperature and humidity, minimizing dust and airborne contaminants, and ensuring proper ventilation contribute significantly to achieving a durable, aesthetically pleasing, and long-lasting finish. Ignoring environmental factors increases the risk of coating defects and compromises the protective properties of the renewed surface, underscoring the practical significance of this understanding for successful refurbishment projects.
Frequently Asked Questions
The following section addresses common inquiries regarding the processes and considerations involved in protective layer refurbishment of wooden surfaces. The information provided aims to clarify uncertainties and promote informed decision-making.
Question 1: What distinguishes the effectiveness of over-the-counter products compared to professional refurbishment services?
Over-the-counter products offer a convenient and cost-effective solution for minor surface imperfections. However, their effectiveness is limited in addressing extensive damage or complex coating issues. Professional refurbishment services provide specialized expertise, equipment, and access to higher-quality materials, resulting in superior and more durable outcomes.
Question 2: Is it always necessary to remove the existing protective layer before applying a new one?
Complete removal of the existing protective layer is not invariably required. The necessity depends on factors such as the condition of the existing coating, the type of new coating being applied, and potential compatibility issues. If the existing coating is intact, well-adhered, and compatible with the new coating, scuff sanding and cleaning may be sufficient preparation.
Question 3: What are the potential risks associated with attempting to match an existing stain color during protective layer refurbishment?
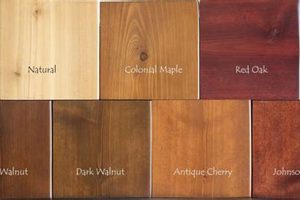
Matching an existing stain color presents several challenges, including variations in wood grain, stain absorption, and the effects of aging. Attempting to precisely match a stain color without proper expertise can result in an uneven or mismatched appearance. It is advisable to test the stain in an inconspicuous area before applying it to the entire surface.
Question 4: How should one approach the refurbishment of antique wooden items with historical or sentimental value?
Refurbishing antique wooden items requires a cautious and conservative approach to preserve their historical integrity. It is recommended to consult with a qualified conservator or furniture restoration specialist before undertaking any work. Avoid aggressive stripping methods or the use of harsh chemicals that could damage the item. Prioritize reversible treatments whenever possible.
Question 5: What role does humidity play in achieving a successful protective layer refurbishment?
Humidity significantly influences the drying and curing process of coatings. High humidity levels can retard the evaporation of solvents, extending drying times and potentially leading to a cloudy or uneven finish. Low humidity levels can cause the coating to dry too quickly, resulting in cracking or blistering. Maintaining consistent humidity levels within the recommended range for the specific coating is crucial.
Question 6: Is there a method for determining if a protective layer is truly dry to the touch and safe for use?
Assessing dryness to the touch is a preliminary indicator but does not guarantee that the coating has fully cured. A more reliable method involves applying moderate pressure to the surface with a fingertip. If the coating feels firm and does not leave a fingerprint or indentation, it is likely sufficiently dry for light use. However, full curing may take several days or weeks, depending on the coating type and environmental conditions.
These answers address fundamental concerns regarding surface coating revitalization. Understanding these considerations helps ensure a more successful and durable outcome.
The following section will delve into potential problems and solutions encountered during the process.
Restore Finish Wood
This exploration has detailed the multifaceted process required to restore finish wood. Key aspects covered include surface preparation, coating identification, product compatibility, application techniques, drying times, inter-coat sanding, and environmental control. Each of these elements directly impacts the quality and longevity of the refurbished surface. Neglecting any single element undermines the overall outcome.
Successful revitalization of protective layers on wooden surfaces demands careful planning, meticulous execution, and adherence to established best practices. While challenges may arise, a commitment to these principles ensures the preservation and enhancement of valuable wooden items for years to come. Continued research and refinement of techniques will further improve the effectiveness and sustainability of surface coating restoration efforts.


