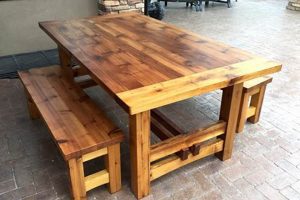
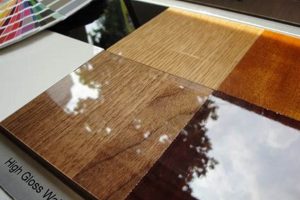
A durable, glossy surface created through the application of a two-part polymer system over timber. This results in a hard, protective layer that enhances the aesthetic appeal of the underlying material while providing resistance to scratches, moisture, and UV degradation. Common applications include furniture surfacing, bar tops, and decorative art pieces where a clear, glass-like effect is desired.
The popularity of this surfacing method stems from its capacity to preserve and accentuate the natural beauty of the wood grain while offering a high level of protection against daily wear and tear. Historically, similar coatings were used primarily in industrial settings; however, advancements in resin formulations and application techniques have made it accessible and desirable for both professional and hobbyist woodworkers. The resultant surface resists staining, chemical damage, and is easily cleaned, extending the lifespan of the wood and reducing maintenance requirements.
The following sections will delve into the specific types of materials used, the appropriate preparation techniques required, the application process, and the various finishing methods available to achieve optimal results. Furthermore, safety precautions and troubleshooting tips will be addressed to ensure a successful project outcome.
Essential Considerations for Achieving a Superior Surface
Successful implementation of this protective layer requires careful attention to detail at each stage. Overlooking crucial elements can compromise the integrity and aesthetics of the final product. The following tips offer guidance to ensure optimal results.
Tip 1: Surface Preparation is Paramount: Thoroughly sand the wood surface to create a mechanical bond. Remove all dust and contaminants with a tack cloth or compressed air prior to applying the resin.
Tip 2: Select the Appropriate Resin: Different formulations offer varying properties, such as UV resistance, cure time, and viscosity. Choose a resin specifically designed for wood finishing to ensure compatibility and longevity.
Tip 3: Accurate Measurement and Mixing: Adhere strictly to the manufacturer’s recommended mixing ratios. Incorrect proportions can result in incomplete curing, leaving the surface tacky or brittle.
Tip 4: Controlled Pouring Technique: Pour the mixed resin slowly and deliberately to minimize the introduction of air bubbles. Work in thin layers to prevent excessive heat buildup during the curing process.
Tip 5: Bubble Removal is Essential: Employ a heat gun or torch with care to remove trapped air bubbles. Hold the heat source a safe distance from the surface and use sweeping motions to avoid scorching the resin.
Tip 6: Temperature and Humidity Control: Maintain a stable environment during curing. Extreme temperatures or high humidity can negatively impact the curing process and the final finish quality.
Tip 7: Multiple Coats for Enhanced Protection: Applying several thin coats, with light sanding between each, provides a thicker, more durable layer with improved resistance to wear and tear.
Tip 8: Proper Curing Time is Crucial: Allow the resin to fully cure according to the manufacturer’s instructions before subjecting the surface to use. Rushing this process can compromise the integrity of the finish.
By following these guidelines, woodworkers can ensure a high-quality, durable, and aesthetically pleasing result. Proper preparation, careful application, and attention to detail are key to maximizing the benefits of this surface treatment.
The following sections will explore advanced techniques, troubleshooting common issues, and maintenance procedures to extend the lifespan and beauty of the finished surface.
1. Surface Preparation
The adhesion and overall performance of a polymerized coating are directly and significantly impacted by the condition of the underlying timber surface. Inadequate preparation creates a weak bond, predisposing the coating to premature failure such as peeling, cracking, or clouding. Contaminants such as dust, oil, or wax interfere with the chemical bond between the timber and the resin. A smooth, sanded surface provides an increased surface area for mechanical adhesion, essential for a robust and long-lasting bond.
Practical examples illustrate the criticality of proper preparation. Consider a table top application where residual sanding dust was not thoroughly removed prior to coating. Over time, the coating may delaminate in areas where dust particles acted as a barrier. Conversely, a meticulously prepared surface, sanded to a fine grit and cleaned with a solvent to remove oils, provides a strong, uniform bond that resists impact, moisture, and chemical exposure. The difference between these two scenarios highlights the profound impact of surface preparation on the longevity and aesthetic quality of the finished product.
Therefore, meticulous surface preparation is not merely a preliminary step but an integral component of achieving a successful polymerized coating. Its importance cannot be overstated, as it directly determines the durability and visual appeal of the finished piece. Investing time and effort in proper sanding, cleaning, and drying translates to a coating that protects the wood substrate, enhances its natural beauty, and withstands the rigors of daily use. This crucial step minimizes potential issues and contributes to the project’s long-term success.
2. Resin Selection
The choice of specific polymerized compound is a determining factor in the success and longevity of the surfacing on timber. Different formulations offer distinct properties that directly influence the finished product’s appearance, durability, and resistance to environmental factors. Selecting an appropriate system requires careful consideration of the project’s intended use and exposure conditions.
- UV Resistance
Some formulations incorporate UV inhibitors to mitigate yellowing and degradation from sunlight exposure. This is particularly crucial for outdoor applications, furniture placed near windows, or projects utilizing light-colored pigments. Without adequate UV protection, the surface may become discolored and brittle over time. For example, a bar top exposed to direct sunlight will require a UV-resistant formulation to maintain its clarity and structural integrity.
- Viscosity
The viscosity, or thickness, of the compound influences its self-leveling properties and bubble release. Lower-viscosity systems are generally easier to pour and allow air bubbles to escape more readily, resulting in a smoother, clearer finish. Higher-viscosity systems may be preferred for applications requiring build-up on vertical surfaces or for embedding objects within the coating. Selecting the proper viscosity minimizes imperfections and enhances the overall aesthetic appeal.
- Cure Time
Cure time varies significantly between different formulations and is influenced by ambient temperature and humidity. Fast-curing formulations allow for quicker project completion but may offer a shorter working time and require more precise mixing. Slow-curing formulations provide a longer working time, allowing for more intricate designs and bubble removal, but require a longer period before the project can be handled or put into use. Matching the cure time to the project’s complexity and environmental conditions is crucial for preventing issues such as incomplete curing or excessive heat buildup.
- Hardness and Abrasion Resistance
The hardness and abrasion resistance of the cured surface determines its ability to withstand scratches, impacts, and general wear and tear. Formulations designed for high-traffic areas, such as table tops or flooring, should exhibit high hardness and excellent abrasion resistance to maintain their appearance over time. Selecting a system with appropriate hardness ensures the longevity and aesthetic appeal of the finished product, preventing premature wear and the need for frequent refinishing.
These facets of material selection collectively impact the final characteristics of the surfaced timber. The selection process necessitates a comprehensive understanding of the intended application, environmental factors, and desired aesthetic qualities. A well-informed selection process is paramount to achieving a durable, visually appealing, and long-lasting surface that enhances the inherent beauty of the wood.
3. Accurate Mixing
Accurate mixing is a non-negotiable prerequisite for achieving a successful polymerized surface on timber. The chemical reaction that transforms liquid resin into a solid, protective layer depends entirely on the precise ratio of resin to hardener, as specified by the manufacturer. Deviation from this ratio initiates a cascade of negative effects, fundamentally compromising the integrity and performance of the coating. Insufficient hardener results in a soft, tacky surface that never fully cures, rendering it vulnerable to scratches, dents, and staining. Conversely, an excess of hardener can lead to premature curing, brittleness, and a tendency to crack or delaminate over time. In both scenarios, the intended protective qualities are diminished or entirely negated.
Consider a situation where a woodworker, relying on imprecise measurement methods, mixes a batch with a slight excess of resin. While the initial application might appear satisfactory, over the following weeks the surface remains slightly pliable, attracting dust and grime. The finish lacks the expected hardness, showing scratches from even minor contact. In contrast, a meticulously measured and thoroughly mixed batch achieves optimal cross-linking, resulting in a hard, clear surface resistant to abrasion, moisture, and chemical damage. The visual clarity and durability of this correctly mixed batch significantly enhances the value and longevity of the underlying timber project. Furthermore, inadequate mixing, even with correct ratios, can create streaks or cloudy patches due to localized areas of uncured resin, negatively impacting aesthetics.
In summary, accurate mixing is not merely a best practice; it is the foundational step upon which the success of a polymerized surface treatment rests. Strict adherence to manufacturer’s recommendations regarding both ratio and mixing technique is paramount to achieving the desired hardness, clarity, and long-term durability. Overlooking this critical step introduces substantial risk of premature failure and ultimately undermines the investment in materials and labor. The resultant surface becomes a liability rather than an asset, failing to protect the timber and detracting from its aesthetic appeal.
4. Pouring Technique
The method by which catalyzed polymeric materials are introduced onto a timber substrate significantly impacts the quality and consistency of the resulting coating. Controlled application minimizes defects, promotes uniform distribution, and ultimately dictates the aesthetic and protective properties of the polymerized layer. Precise execution in this phase is critical for achieving a professional and durable finish.
- Minimizing Air Entrapment
The introduction of air bubbles during pouring can compromise both the structural integrity and visual clarity of the polymerized coating. A slow, deliberate pouring technique, executed close to the surface, minimizes turbulence and reduces the likelihood of air entrapment. For example, pouring from a height creates a plunging effect, forcing air into the mixture, whereas a controlled stream from a low angle allows the material to flow smoothly across the surface. Addressing this factor is crucial for producing a flawless, transparent surface.
- Maintaining Uniform Thickness
Consistent layer thickness is essential for achieving uniform curing and preventing distortions or stress concentrations within the polymerized coating. A controlled pouring rate and consistent movement across the timber surface ensure even distribution. For instance, uneven spreading can result in regions that cure at different rates, leading to warping or cracking. Proper technique promotes consistent protection and visual harmony across the entire surface.
- Controlling Flow and Leveling
The inherent self-leveling properties of certain polymeric formulations can be leveraged through precise pouring techniques. Allowing the material to flow naturally, without forced spreading, minimizes surface imperfections and promotes a smooth, glossy finish. Overworking the material can introduce air bubbles or disrupt the leveling process. For example, a single, continuous pour across a horizontal surface allows gravity to assist in achieving a perfectly level coating.
- Managing Material Waste
An efficient pouring technique minimizes material waste and prevents unnecessary mess. Precise application reduces the need for extensive sanding or rework, saving both time and resources. Directing the flow accurately and avoiding over-pouring ensures that the catalyzed material is utilized effectively and efficiently. This is especially critical with costly, high-performance polymeric compounds.
These facets of pouring technique directly influence the final quality and performance of the polymerized coating on timber. Skillful execution in this phase is essential for maximizing the inherent properties of the material and achieving a durable, aesthetically pleasing finish. Attention to detail during pouring reduces the need for corrective measures and ultimately contributes to the long-term success of the surfacing project.
5. Bubble Removal
Air entrapment during the application of a polymerized coating on timber invariably results in the formation of bubbles within the cured film. These bubbles, if not effectively removed, compromise both the aesthetic appearance and structural integrity of the finished surface. The presence of bubbles creates visual imperfections, disrupting the clarity and smoothness of the coating. Furthermore, they weaken the cured film, making it more susceptible to cracking, chipping, and delamination, particularly in high-stress areas. For example, a table top with numerous entrapped bubbles will exhibit a diminished aesthetic appeal and be prone to surface damage from everyday use. The relationship is direct and causal: air entrapment necessitates bubble removal for a successful application.
Various techniques are employed to mitigate bubble formation and facilitate their removal. These include pre-heating the catalyzed polymeric material to reduce its viscosity, slow and controlled pouring to minimize air introduction, and the use of specialized tools such as heat guns or propane torches to encourage bubbles to rise to the surface and dissipate. Application of a heat source requires caution, as excessive heat can cause scorching or discoloration. Mechanical methods, such as vibrating the timber surface, can also aid in bubble removal. Selection of the appropriate technique depends on the specific polymerized compound being used, the size and shape of the timber substrate, and the ambient environmental conditions. Careful execution of these techniques is crucial for achieving a defect-free surface.
In summary, effective bubble removal is an indispensable step in achieving a high-quality polymerized finish on timber. Entrapped air bubbles detract from both the visual appeal and the durability of the coating. By employing appropriate techniques and exercising diligence throughout the application process, professionals can minimize bubble formation and achieve a smooth, clear, and structurally sound finish that enhances the inherent beauty and longevity of the timber substrate. The process demands attentiveness and precision to ensure the best results for lasting surface treatment.
6. Curing Environment
The ambient conditions during the curing process are paramount for achieving optimal properties and long-term performance. Environmental factors directly influence the chemical reactions responsible for solidification and cross-linking within the applied coating. Precise control over these factors ensures the creation of a durable, aesthetically pleasing, and long-lasting surface.
- Temperature Control
Temperature significantly affects the rate and completeness of the chemical reaction. Low temperatures retard the curing process, potentially resulting in incomplete cross-linking and a soft, pliable finish. Elevated temperatures accelerate the reaction, which may lead to excessive heat build-up, warping, or premature hardening. Maintaining the manufacturer’s recommended temperature range, typically between 70-80F (21-27C), ensures a controlled and uniform curing process. For example, curing a tabletop in a cold garage during winter will likely result in a compromised finish, whereas a heated environment promotes proper hardening.
- Humidity Management
High humidity levels can interfere with the curing process, particularly with certain formulations. Excess moisture can react with the curing agents, leading to cloudiness, surface tackiness, or the formation of amine blush, a waxy film on the surface. Low humidity, while less problematic, can accelerate evaporation of solvents within the coating, potentially resulting in shrinkage and cracking. Maintaining relative humidity levels within the range specified by the manufacturer, often between 40-60%, helps to ensure a clear, smooth, and durable surface. For instance, applying this surface treatment in a humid environment may result in a cloudy or sticky outcome.
- Dust and Contaminant Control
Airborne particles, dust, and other contaminants can settle on the wet surface during curing, becoming permanently embedded in the finished coating. This results in visual imperfections and can compromise the surface’s smoothness and gloss. Maintaining a clean, dust-free environment is essential for achieving a flawless finish. This can be achieved through the use of air filters, plastic sheeting, and careful cleaning practices. Failing to control dust contamination can lead to a gritty or textured final product, detracting from its aesthetic appeal.
- Air Circulation
Proper air circulation helps to dissipate heat generated during the curing process and promote uniform evaporation of solvents. Stagnant air can lead to localized hot spots or uneven curing, resulting in surface imperfections. Gentle air circulation, achieved through the use of fans, helps to maintain a consistent temperature and humidity level across the entire surface. Adequate airflow is crucial for achieving a uniform and consistent finish, particularly for large-scale applications.
These environmental considerations are inextricably linked to the successful implementation of a polymerized surface. Neglecting these factors can lead to a range of defects, compromising both the aesthetic appearance and long-term performance of the coating. Attentive management of temperature, humidity, dust, and air circulation is crucial for achieving a durable, visually appealing, and long-lasting surface that enhances the inherent beauty of the wood.
7. Proper Curing Time
The temporal dimension of the hardening process directly governs the ultimate performance characteristics. Adherence to manufacturer-specified durations is not merely a guideline but a critical determinant of the coating’s mechanical strength, chemical resistance, and aesthetic clarity. Premature use or handling before full polymerization compromises the structural integrity, rendering the surface vulnerable to scratching, denting, and chemical attack. Conversely, extending the curing duration beyond recommended limits generally does not impart additional benefits and may, in certain formulations, lead to adverse effects such as embrittlement.
Consider a scenario where a bar top is coated and put into service before complete polymerization. The surface may initially appear adequate, but under the stress of normal use spills, impacts from glassware, cleaning the coating will exhibit premature wear, staining, and potential delamination. This necessitates costly repairs or complete re-application. In contrast, a similar surface, allowed to cure fully, will withstand these stresses, maintaining its clarity and protective function for an extended period. Furthermore, attempting to accelerate the curing process through artificial heating can also be detrimental, inducing thermal stresses that lead to cracking or warping. Practical application dictates that patience and adherence to the specified timeframe are essential for realizing the full potential of the material. The exact duration varies depending on formulation, ambient temperature, and humidity, requiring strict compliance with product specifications.
In summary, the temporal aspect of polymerization is integral to the successful utilization of this surface treatment. Ignoring recommended curing times introduces a significant risk of compromising the coating’s performance and longevity. Understanding the temporal dependence is vital for ensuring a durable, aesthetically pleasing, and functional surface. Recognizing the critical role of the temporal element in this process represents a cornerstone of effective application, minimizing potential problems and contributing to the project’s lasting success.
Frequently Asked Questions
The following addresses common inquiries and misconceptions concerning the application of polymerized surface treatments on timber, providing concise and authoritative answers.
Question 1: Is this surface treatment suitable for outdoor applications?
The suitability of this treatment for exterior use is contingent upon the specific formulation employed. Formulations lacking ultraviolet (UV) inhibitors are susceptible to degradation and yellowing upon prolonged exposure to sunlight. Selection of a UV-resistant product is essential for outdoor projects to maintain its clarity and integrity.
Question 2: How does this surfacing compare to traditional varnishes or lacquers?
Polymerized surface treatments generally offer superior durability, chemical resistance, and abrasion resistance compared to traditional varnishes and lacquers. These materials typically exhibit greater film thickness and self-leveling properties, resulting in a smoother, more robust finish. However, application requires more precise techniques and longer curing times.
Question 3: Can this protective layer be applied over stained timber?
This material can indeed be applied over stained timber. It is crucial to ensure the stain is fully cured and any excess stain is removed prior to application. A compatibility test on a small, inconspicuous area is recommended to verify proper adhesion and prevent any adverse reactions between the stain and the resin.
Question 4: How is this protective layer cleaned and maintained?
Cleaning this type of surface generally involves the use of mild soap and water. A soft cloth is recommended to avoid scratching the surface. Harsh chemicals, abrasive cleaners, and scouring pads should be avoided. Periodic application of a specialized surface restorer can help maintain the gloss and luster of the finish.
Question 5: What is the typical lifespan of this surface treatment on wood?
The lifespan of the treatment is influenced by factors such as the quality of the materials used, the application technique, the level of traffic or use, and the environmental conditions to which the wood is exposed. Properly applied and maintained, a high-quality surface treatment can last for several years, providing lasting protection and aesthetic enhancement.
Question 6: How can the surface be repaired if it becomes damaged?
Minor scratches and imperfections can often be addressed through light sanding and re-application of a thin layer of the material. More significant damage may require complete removal and re-application of the coating. Consulting with a qualified professional is recommended for complex repairs to ensure a seamless and durable restoration.
In conclusion, achieving a successful polymerized surfacing hinges on meticulous attention to preparation, material selection, application technique, and environmental controls. A thorough understanding of these principles is essential for realizing the full potential of this protective and aesthetic treatment.
The following section will delve into advanced techniques and troubleshooting common issues encountered during the application process.
Epoxy Resin Finish on Wood
The preceding exploration has illuminated the critical facets of achieving a high-quality polymerized surface on timber. Success hinges on meticulous preparation, informed material selection, precise application, stringent environmental control, and unwavering adherence to recommended curing parameters. Failure to address any of these elements can compromise the integrity, aesthetics, and longevity of the resulting surface. The information presented underscores the complexity inherent in the proper application, moving beyond simplistic portrayals to reveal the nuanced skill and understanding required.
As advancements in materials science continue, the potential for enhanced performance and novel applications of polymerized timber surfaces will undoubtedly expand. A commitment to ongoing education, rigorous technique refinement, and a thorough understanding of the chemical and physical properties involved is paramount for those seeking to harness the full potential of this increasingly prevalent finishing method. The onus remains on practitioners to approach the process with diligence and precision, ensuring that the final product meets the highest standards of durability and aesthetic appeal, thereby contributing to the preservation and enhancement of the underlying timber substrate.


