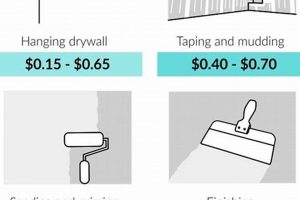
The standardization of wallboard surface preparation outlines a system that categorizes the degree of completion achieved on a drywall installation. These standardized measures range from simply taping and mudding joints to applying multiple coats and achieving a smooth, paint-ready surface. As an example, a Level 1 preparation is typically used in areas not accessible to the public, such as service corridors, while a Level 5 preparation is reserved for areas requiring the highest degree of aesthetic perfection and critical lighting conditions.
Adherence to specified standards ensures consistent results and clear communication between contractors, builders, and clients. Selecting the appropriate level can optimize project costs by preventing unnecessary over-finishing, while also ensuring a high-quality appearance suitable for the intended purpose. Historically, these guidelines evolved to address inconsistencies in drywall finishing quality and to provide a common framework for expectations and budgeting.
Subsequent sections will delve into the specific characteristics of each stage, including application techniques, materials required, and recommended uses. Further discussion will address factors influencing the selection of the appropriate stage, such as lighting conditions, paint selection, and budgetary considerations.
Practical Guidance
The following recommendations offer practical insights into achieving optimal results when addressing wallboard surface treatment. Careful consideration of these guidelines will contribute to a professional and durable outcome.
Tip 1: Select the Appropriate Stage: Consider the environment where the wallboard is installed. Utility areas benefit from simpler surface treatment, while high-visibility areas require a more refined approach.
Tip 2: Ensure Proper Joint Treatment: Tape and compound application are critical to prevent cracking. Use quality materials and follow manufacturer specifications for optimal adhesion.
Tip 3: Apply Multiple Coats Strategically: Each coat of joint compound fills imperfections. More visible locations, for example, hallways may require additional coats to ensure a smooth, even surface.
Tip 4: Sand Carefully: Sanding removes imperfections, but excessive sanding damages the paper face. Use appropriate grit sandpaper and a light touch.
Tip 5: Prime Before Painting: Primer seals the surface, promotes adhesion, and ensures uniform paint coverage. Select a primer compatible with the wallboard and selected paint.
Tip 6: Inspect Under Lighting: Critical lighting highlights imperfections. Use work lights to identify areas needing further attention during the finishing process.
Tip 7: Consider Texture: Texture can disguise minor imperfections. However, ensure the chosen texture is appropriate for the space and desired aesthetic.
Tip 8: Allow Adequate Drying Time: Insufficient drying leads to shrinkage and cracking. Adhere to the joint compound manufacturer’s recommended drying times between coats and before painting.
Effective planning and meticulous execution are essential for a successful project. By following these guidelines, a durable and aesthetically pleasing wallboard finish can be achieved.
The subsequent section summarizes the key considerations in selecting and applying the right preparation strategy.
1. Surface Smoothness
Surface smoothness is a defining characteristic of specified wallboard surface preparation and directly correlates with the achieved grade. The higher the standardized stage, the greater the expectation of a defect-free and planar surface. This is achieved through a series of processes, including multiple applications of joint compound, precise sanding, and, in some cases, the application of a skim coat to minimize imperfections. The selection of a lower grade prioritizes efficiency and cost-effectiveness, resulting in visible joints and fastener heads, while a higher grade emphasizes aesthetics and requires increased labor and material expenditures.
For instance, a Level 2 preparation, often found in garages or storage areas, permits tool marks and visible compound ridges. Conversely, a Level 5 preparation, prevalent in high-end architectural spaces, demands a virtually flawless surface, free from any discernible imperfections, ready to receive glossy or highly reflective paints. The choice between these grades hinges on the intended use of the space, the lighting conditions, and the specified aesthetic requirements of the project. In areas with natural light, even minor surface inconsistencies can become highly visible, necessitating a higher-grade level to ensure a satisfactory result.
In summary, surface smoothness is not merely a cosmetic consideration, but a fundamental component. Selecting the appropriate degree of smoothness, as defined by the specified preparation requirements, is critical for achieving both the aesthetic goals and the long-term performance of the wallboard system. Balancing the desired level of smoothness with budgetary constraints and project timelines requires a clear understanding of the characteristics and implications of each standardized stage.
2. Joint Compound Application
Joint compound application is integral to achieving each distinct stage of wallboard surface preparation, directly influencing the final appearance and performance. The quantity, type, and technique of compound application differentiate each standardized stage and dictate the overall quality of the finished surface.
- Number of Coats
The number of joint compound coats applied increases with each successive stage. Level 1 and 2 preparations may involve only a single coat over tape, while Level 4 and 5 require multiple coats to conceal imperfections and achieve a smooth surface. This directly impacts both material costs and labor time.
- Type of Compound
Different types of compound are suited for specific applications. Taping compound, designed for initial joint coverage, offers strong adhesion. Topping compound, used for subsequent coats, sands more easily to create a smoother surface. The selection and appropriate layering of these compounds is crucial for achieving the desired result at each specified stage.
- Application Technique
Consistent and skilled application is critical. Feathering the edges of the compound minimizes ridges and ensures a seamless transition between the finished joint and the wallboard surface. Improper technique leads to visible imperfections and detracts from the intended aesthetic, especially in higher grade levels.
- Surface Preparation
Proper surface preparation is integral to joint compound application. Cleaning and priming the wallboard ensures adhesion and even compound drying. Failure to prepare the surface results in poor adhesion and potential cracking, regardless of the standardized stage selected.
The efficacy of joint compound application is a cornerstone of achieving the desired outcome. From the initial taping to the final skim coat, each step must be executed with precision and attention to detail. Understanding the nuances of compound selection, application technique, and surface preparation is paramount in successfully realizing the aesthetic and functional goals of any wallboard project.
3. Sanding Technique
Sanding technique is a critical determinant in achieving the specified finish for wallboard, playing a pivotal role in the final appearance of walls and ceilings. The level of finish dictates the required sanding precision and the selection of appropriate tools and abrasives. Improper sanding leads to surface imperfections, compromising the integrity of the intended finish and potentially requiring costly rework. For instance, achieving a Level 5 finish, which demands a perfectly smooth, paint-ready surface, necessitates meticulous sanding with fine-grit sandpaper to eliminate any visible ridges or imperfections left by the joint compound. Conversely, a Level 2 finish, commonly found in utility areas, requires minimal sanding primarily to level the joint compound, where minor imperfections are acceptable. The choice of sandpaper grit, sanding pressure, and the use of specialized tools such as sanding blocks or pole sanders are all directly influenced by the desired surface preparation.
Furthermore, the effect of sanding technique extends beyond mere aesthetics. Over-sanding can expose the paper facing of the wallboard, weakening the surface and compromising paint adhesion. Conversely, insufficient sanding leaves behind ridges and bumps that become readily visible under paint, especially under critical lighting conditions. In practical applications, a skilled drywall finisher understands the nuances of each finish level and adjusts their sanding approach accordingly. For example, when preparing walls for a high-gloss paint finish, a Level 5 surface is essential, requiring multiple sanding passes with progressively finer grits to achieve the necessary smoothness. A failure to achieve the correct sanding technique can manifest in noticeable defects, such as paint flashing or uneven sheen, undermining the desired aesthetic effect. The process also often depends on the type of compound used, as some compounds are formulated for easier sanding than others.
In summary, sanding technique is not merely an ancillary step, but a fundamental component. Selecting the appropriate sanding tools and abrasives, coupled with a precise and controlled approach, is paramount in achieving the specified preparation requirements for wallboard. The challenges in achieving a high-quality surface are often rooted in a lack of understanding of the relationship between sanding technique and the finish level. Addressing these challenges requires proper training, careful attention to detail, and a commitment to quality craftsmanship, ultimately leading to superior and more durable wall and ceiling surfaces.
4. Primer Compatibility
The relationship between primer compatibility and standardized wallboard surface preparation is crucial for the longevity and aesthetic quality of finished walls and ceilings. The degree of surface preparation directly influences the primer type needed to achieve optimal adhesion, uniform paint coverage, and long-term performance. For instance, a Level 5 finish, characterized by its smoothness and absence of imperfections, requires a high-quality primer formulated to enhance the sheen and uniformity of topcoats. In contrast, a Level 2 finish, commonly used in less critical areas, may require a more robust primer capable of sealing exposed paper surfaces and minimizing texture variations before painting. Incompatibility between the primer and the wallboard finish results in problems such as paint peeling, blistering, or uneven sheen, necessitating costly repairs and reapplication.
Several factors dictate the proper selection of primer for each finish level. The porosity of the wallboard surface varies depending on the standardized stage; lower grades are more porous, requiring primers with superior sealing properties to prevent excessive paint absorption. The presence of joint compound, particularly in areas where extensive sanding has occurred, affects the surface pH, potentially impacting primer adhesion. Acrylic primers are generally suitable for higher grades, providing excellent adhesion and a smooth base for topcoats. Conversely, PVA (polyvinyl acetate) primers, are commonly used for lower grades, offering cost-effectiveness and adequate sealing properties. An example of the impact is seen in environments exposed to high humidity; there, use of a moisture-resistant primer suited to the specific surface treatment is crucial to prevent delamination and moisture-related paint failures.
Understanding the nuanced interaction between primer compatibility and the level of wallboard preparation is paramount for achieving durable, aesthetically pleasing, and cost-effective results. Selecting the appropriate primer based on the specific characteristics of each finish level ensures optimal paint adhesion, uniform coverage, and long-term performance. Ignoring this critical aspect can lead to premature paint failure, increased maintenance costs, and compromised aesthetics. The financial implications of primer incompatibility, including material waste, labor costs, and potential damage to the substrate, underscore the importance of careful primer selection based on the specific needs of each wallboard system.
5. Cost Considerations
Cost considerations are inextricably linked to specified gypsum board preparation, directly influencing the selection of the appropriate stage. The higher the selected level, the greater the expenditure on materials, labor, and time. A Level 1 finish, suitable for areas hidden from public view, represents the lowest cost option due to minimal joint treatment. Conversely, a Level 5 finish, designed for areas demanding a flawless appearance, incurs significantly higher costs owing to multiple compound applications, extensive sanding, and specialized labor. Selecting a stage that exceeds functional requirements results in unnecessary financial outlay. Ignoring the interplay between cost and preparation can lead to project overruns and compromised budget adherence. For example, specifying a Level 4 finish in a warehouse would be economically unsound, whereas a Level 2 finish in a high-end office would be aesthetically unacceptable, incurring remediation costs.
Analyzing the cost implications requires a detailed assessment of material expenses, including joint compound, sandpaper, and primer. Labor costs are also a significant factor, with higher levels demanding more skilled and time-intensive application techniques. Project timelines extend with increasing level requirements, impacting overall construction schedules and potentially increasing indirect costs. Life-cycle cost analysis provides a comprehensive view, factoring in long-term maintenance and potential repair expenses. A lower-grade surface preparation necessitates more frequent repainting or repairs, potentially offsetting initial cost savings. In contrast, a higher-grade preparation reduces the need for maintenance and provides a more durable, long-lasting finish. Consider the case of a commercial building where the high-traffic reception area used level 5 finishing. Even though it cost more upfront, this reduced lifetime maintenance for the appearance.
Effective budget management requires a thorough understanding of the cost drivers associated with each stage of preparation. Balancing aesthetic demands with financial constraints necessitates a practical approach, considering the intended use of the space, lighting conditions, and budgetary limitations. A comprehensive strategy integrates cost analysis, material selection, and skilled labor to achieve the optimal balance between quality and affordability. Failing to address these cost considerations early in the planning phase results in avoidable financial burdens. An informed decision-making process, incorporating cost data and a clear understanding of preparation requirements, contributes to successful project outcomes and fiscal responsibility.
Frequently Asked Questions About Specified Gypsum Board Preparation
The following section addresses common inquiries concerning standardized wallboard surface treatments, offering clarification and practical guidance for industry professionals.
Question 1: What distinguishes Level 4 from Level 5 preparation?
Level 4 preparation involves embedding tape in joint compound, applying two separate coats of compound, and sanding smooth. Level 5 preparation requires an additional skim coat of joint compound over the entire surface, achieving a more uniform and smooth finish suitable for critical lighting conditions.
Question 2: Is it possible to apply a Level 5 preparation directly over existing Level 2 preparation?
Applying a Level 5 preparation over an existing Level 2 is technically feasible, though it requires thorough preparation. Inspect the existing surface for damage or imperfections, address any defects, and apply multiple coats of topping compound to achieve a consistent surface. This process typically demands more material and labor compared to starting with a Level 1 or newly installed gypsum board.
Question 3: How does paint sheen affect the selection of specified preparation?
Paint sheen significantly impacts the visibility of surface imperfections. High-gloss paints accentuate even minor flaws, necessitating a Level 5 finish. Matte or flat paints are more forgiving and often suitable for Level 3 or Level 4 preparations.
Question 4: What are the implications of selecting an inappropriate specified preparation?
Selecting a preparation level that is too low results in visible joints, fastener heads, and surface imperfections, negatively impacting the aesthetic quality. Over-specifying leads to increased costs without necessarily improving the functionality or appearance of the space.
Question 5: Does the type of lighting influence the necessary surface preparation?
Lighting conditions significantly impact the perception of surface imperfections. Critical lighting, such as direct sunlight or spotlights, accentuates even minor flaws, necessitating a higher level of preparation. Diffuse or indirect lighting is more forgiving and allows for lower preparation levels.
Question 6: What is the best way to ensure a consistent finish across large wall surfaces?
Achieving a uniform preparation across large areas requires consistent application techniques, proper material selection, and meticulous sanding. Skilled applicators and the use of specialized tools, such as power sanders and spray equipment, contribute to uniform results.
In summary, proper selection and execution of wallboard preparation are critical for ensuring the desired aesthetic and functional outcomes. Careful consideration of factors such as paint sheen, lighting conditions, and budgetary constraints are essential for informed decision-making.
The subsequent section presents a comparative analysis, contrasting the characteristics of each level.
Levels of Gypsum Board Finish
The preceding exploration has illuminated the nuanced characteristics inherent within standardized wallboard preparation. Key distinctions, including surface smoothness, joint compound application, sanding technique, primer compatibility, and cost considerations, dictate the selection and execution of each specified level. Proper understanding of these elements ensures the realization of both aesthetic aspirations and functional prerequisites.
Effective utilization of these standardized guidelines necessitates informed decision-making, balancing project-specific requirements with fiscal prudence. Continued diligence in understanding and applying this standardized system will serve to elevate industry standards, optimizing both efficiency and the resultant quality of finished interior spaces.


![Status Check: Is Ragna Crimson Manga Finished [Spoiler Alert!] Best Final Touch: Elevate Your Projects with Professional Finishing Status Check: Is Ragna Crimson Manga Finished [Spoiler Alert!] | Best Final Touch: Elevate Your Projects with Professional Finishing](https://bestfinaltouch.com/wp-content/uploads/2025/12/th-666-300x200.jpg)
