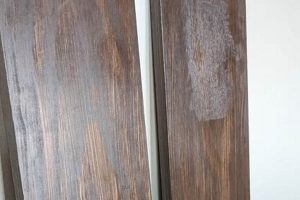
A surface coating designed to rejuvenate aged or damaged furniture and wooden surfaces is considered a vital product for preservation. This specialized coating often contains oils, solvents, and sometimes pigments, which penetrate existing finishes to revitalize the underlying material. For instance, a common application involves applying this coating to an antique table to reduce the appearance of scratches and fading, enhancing its overall aesthetic appeal.
The significance of this approach lies in its ability to improve the look of furniture without the need for complete stripping and refinishing. This offers cost-effectiveness and preserves the original character of the piece. Historically, similar methods were used to maintain valuable furniture, demonstrating a long-standing appreciation for preserving original materials and craftsmanship.
The application and benefits now highlighted set the stage for a deeper exploration of specific types, proper usage techniques, and considerations for different wood types and finish conditions. Understanding these facets is crucial for achieving optimal outcomes when employing such products.
Application Guidance
The following tips are intended to maximize the effectiveness and longevity when employing revitalization coatings on wood surfaces. Careful adherence to these recommendations will contribute to optimal outcomes.
Tip 1: Surface Preparation is Paramount. Prior to application, ensure the surface is clean and free of loose debris. Gently wipe down the piece with a soft cloth dampened with mineral spirits to remove dust, grime, and wax buildup. This enhances adhesion and penetration.
Tip 2: Conduct a Spot Test. Before applying the product to the entire surface, test a small, inconspicuous area to assess compatibility and desired results. This precaution prevents unintended alterations to the finish.
Tip 3: Apply Thin, Even Coats. Overapplication can lead to a sticky or uneven finish. Utilize a clean, lint-free cloth to apply the coating in thin, consistent layers, working with the grain of the wood.
Tip 4: Allow Sufficient Drying Time. Follow the manufacturer’s recommendations for drying times between coats. Premature application of additional layers can impede proper curing and result in a compromised finish.
Tip 5: Consider Environmental Conditions. Application in conditions of excessive humidity or extreme temperatures can negatively impact the drying and curing processes. Optimal conditions typically involve moderate temperatures and low humidity.
Tip 6: Buff for Enhanced Sheen. Once the coating has fully cured, gently buff the surface with a clean, dry cloth to achieve the desired sheen level and remove any residual residue.
Tip 7: Proper Disposal of Materials. Dispose of used cloths and applicators according to local regulations. Improper disposal can pose environmental hazards.
Adherence to these guidelines facilitates the successful revitalization of wood surfaces, preserving their beauty and extending their lifespan. This preliminary guidance now transitions to considerations for various wood types and specific damage scenarios.
1. Penetrating Oils
Penetrating oils constitute a critical component in surface revitalization formulations. Their primary function involves penetrating existing finishes, softening hardened resins, and replenishing lost oils within the wood itself. This action reduces the appearance of dryness, cracking, and minor surface imperfections. The inclusion of penetrating oils allows for a degree of restoration without necessitating complete removal of the original finish. For example, a common application involves the revival of an old dresser where the existing varnish has become brittle and cracked. The penetrating oil softens the varnish, allowing it to regain some flexibility and adhere better to the wood substrate, thereby improving the overall appearance and structural integrity.
The effectiveness of penetrating oils hinges on their chemical composition and ability to interact with the existing finish. Certain formulations contain solvents that facilitate penetration, while others incorporate resins or polymers that deposit a protective layer. This interaction softens the existing finish, enabling it to fuse and heal minor surface damage. Furthermore, this process can restore the luster and sheen that are often lost over time due to exposure to sunlight, temperature fluctuations, and general wear and tear. When applied to a piece of furniture with a faded or worn finish, the oil reintroduces depth and richness to the color, enhancing the visual appeal of the piece.
In conclusion, penetrating oils are integral to the functionality of this specialized surface coating, enabling it to rejuvenate and protect wood surfaces without requiring extensive refinishing. The proper selection and application of these oils can significantly extend the life of valuable furniture and other wooden objects, preserving their beauty and historical value. Understanding their role is key to achieving successful restoration outcomes.
2. Solvent Blend
The efficacy of surface revitalization coatings relies significantly on the specific solvent blend incorporated into their formulation. This blend dictates the product’s ability to dissolve, penetrate, and interact with existing finishes, thereby influencing the overall restoration process. The selection of appropriate solvents is critical to achieving desired outcomes.
- Solvency Power
Solvent blends are engineered to dissolve aged varnishes, lacquers, and shellacs, allowing the product to penetrate the existing finish layer. The solvency power determines the depth and speed of penetration, influencing how effectively the product can revitalize dried or cracked surfaces. For instance, a solvent blend with high solvency power can effectively dissolve heavily oxidized varnish on an antique cabinet, enabling the coating to meld with the existing finish and reduce the appearance of damage.
- Evaporation Rate
The evaporation rate of the solvent blend affects the drying time and film formation of the finish. A balanced evaporation rate ensures that the coating dries evenly and forms a durable, consistent film. If the solvent blend evaporates too quickly, it can lead to uneven drying and surface defects. Conversely, a slow evaporation rate can prolong drying time and increase the risk of dust contamination. A solvent blend with a moderate evaporation rate is beneficial to ensure an even surface.
- Resin Compatibility
The solvent blend must be compatible with the resins and polymers present in the product to ensure proper film formation and adhesion. Incompatible solvents can cause the coating to separate, curdle, or fail to adhere to the surface. To clarify, coatings formulated with specific solvent blends will maximize their performance as long as the product’s directions are being followed. Therefore, the selection of compatible solvents is critical to the coating’s overall performance and longevity.
- Safety and Environmental Considerations
Solvent blends pose safety and environmental hazards. Formulations are increasingly focused on incorporating low-VOC (volatile organic compound) solvents to minimize air pollution and reduce exposure to harmful chemicals. In contrast, products with high-VOC solvents can pose respiratory and skin irritation risks. Therefore, understanding the safety and environmental impacts of solvent blends is essential for responsible use and disposal.
In summary, the properties of the solvent blend significantly influence the performance and safety of surface revitalization. By carefully selecting and balancing the components of the solvent blend, manufacturers can create products that effectively rejuvenate aged finishes while minimizing environmental impact and health risks. The choice of solvent blend is a key factor in achieving successful and sustainable results.
3. Color blending
Color blending constitutes a critical aspect of surface revitalization, addressing variations in tone and hue that arise from age, UV exposure, or previous damage. Its integration within surface revitalization products ensures a uniform and aesthetically pleasing final appearance.
- Pigment Matching
Successful color blending relies on precise pigment matching to the original finish. Surface revitalization formulations often incorporate pigments that can be adjusted to replicate the base color and undertones of the existing surface. For instance, when addressing a sun-faded tabletop, accurately matching the pigment allows the revitalizing coating to seamlessly integrate with the remaining color, mitigating the appearance of discoloration.
- Translucent Toners
Translucent toners play a key role in adjusting the overall tone and depth of color without obscuring the underlying wood grain or finish details. These toners allow for subtle color corrections, enhancing the richness and warmth of the wood. As an example, the subtle application of amber-toned toner can restore the golden glow of an antique mahogany piece, counteracting age-related dullness without masking the wood’s natural character.
- Layering Techniques
Color blending frequently involves layering techniques to achieve complex color matches and depth. Multiple thin coats of different toners or tinted coatings are applied to build up the desired color gradually. For example, when addressing a multi-colored wood inlay, careful layering of different pigments allows for the restoration of individual color variations within the inlay, resulting in a cohesive and vibrant appearance.
- UV Inhibitors
Some surface revitalization products incorporate UV inhibitors to mitigate future fading and discoloration. These inhibitors protect the blended color from degradation due to sunlight exposure, prolonging the longevity of the restored finish. For instance, furniture treated with a surface revitalization product containing UV inhibitors will retain its color integrity longer than untreated furniture, especially when exposed to direct sunlight.
These color blending aspects are critical for successful surface revitalization, enabling the restoration of a uniform and aesthetically pleasing appearance. The integration of pigment matching, translucent toners, layering techniques, and UV inhibitors ensures that restored surfaces retain their color integrity and visual appeal over time.
4. Surface cleaning
Surface cleaning is an indispensable precursor to the application of any surface revitalization product. The presence of contaminants such as dust, grease, wax, or loose debris creates a barrier, impeding the proper adhesion and penetration of revitalizing agents. This interference compromises the intended rejuvenating effect and may lead to uneven finishes or premature failure. For example, if a surface with old wax buildup is not thoroughly cleaned before applying a revitalizing oil, the oil will likely pool on top of the wax, resulting in a blotchy appearance and reduced penetration into the wood itself. Effective cleaning ensures that the revitalizing coating can directly interact with the existing finish, maximizing its ability to restore and protect the surface.
The method of surface cleaning should be carefully selected based on the type of finish and the nature of the contaminants present. Mild detergents or specialized wood cleaners are often suitable for removing general grime, while solvents like mineral spirits may be necessary to dissolve wax or grease. Abrasive cleaners should generally be avoided as they can damage the existing finish, potentially creating more problems than they solve. Consider an instance where a delicate lacquer finish is being prepared for revitalization. Using an overly aggressive cleaner would likely scratch or dissolve the lacquer, necessitating more extensive repairs before the revitalizing coating can be effectively applied. The practical significance of this understanding lies in the prevention of avoidable damage and the optimization of the revitalization process.
In summary, surface cleaning is not merely a preliminary step, but an integral component of the entire surface revitalization process. It prepares the surface to receive the treatment, ensuring optimal adhesion, penetration, and ultimately, a successful restoration outcome. While often overlooked, inadequate surface cleaning can negate the benefits of even the highest quality revitalizing products. This underscores the necessity of meticulous preparation for achieving the desired aesthetic and protective qualities in surface revitalization projects.
5. Film Repair
Film repair, within the realm of surface revitalization, addresses imperfections in existing coatings such as scratches, crazing, or minor surface damage. Its proper execution is critical to achieving a seamless and aesthetically pleasing restoration using specialized coatings.
- Scratch Concealment
Scratch concealment involves filling superficial abrasions in the finish with a product that blends with the surrounding material. This minimizes the visual impact of scratches without requiring complete refinishing. For instance, a light scratch on a varnished tabletop can be effectively concealed by carefully applying a coating with appropriate filling and leveling properties, resulting in a smoother, more uniform surface.
- Crazing Reduction
Crazing, characterized by fine cracks in the finish, can be minimized by employing a coating that penetrates and fuses with the existing film, improving its structural integrity. The rejuvenating solution fills in the cracks, reducing their visibility and preventing further degradation. An example includes the reduction of crazing on an antique lacquer finish, where a carefully applied product re-amalgamates the lacquer, consolidating the cracked areas.
- Leveling Imperfections
Leveling imperfections involves the use of a coating that smooths out minor irregularities in the surface, creating a more even and consistent appearance. This technique addresses issues such as orange peel or brush marks. A coating with self-leveling characteristics can mitigate these imperfections, resulting in a smoother and more refined surface.
- Adhesion Enhancement
Adhesion enhancement is crucial for ensuring the applied repair integrates seamlessly with the existing finish, preventing peeling or flaking. A coating designed to promote adhesion creates a strong bond between the repair and the original surface, prolonging the lifespan of the restoration. The use of a bonding agent before applying a touch-up coating can enhance adhesion, particularly on surfaces with compromised finishes.
These facets of film repair collectively contribute to the effective utilization of surface revitalization approaches, enabling the restoration of damaged finishes while preserving the character and integrity of the underlying substrate. Through careful attention to scratch concealment, crazing reduction, leveling imperfections, and adhesion enhancement, it is possible to achieve professional-quality results in surface restoration projects.
6. Rejuvenation
Rejuvenation, in the context of surface coatings, signifies the restoration of vitality and aesthetic appeal to aged or damaged finishes. This concept forms the core objective of “restorer finish” products, which are designed to revitalize surfaces without necessitating complete removal of the existing finish.
- Replenishment of Lost Oils
Rejuvenation, often facilitated by “restorer finish,” involves the replenishment of oils that have evaporated from the original coating over time. This process restores flexibility and luster to the finish, reducing the appearance of dryness and cracking. For example, a common application involves the revival of an antique table where the finish has become brittle and dull due to age. The “restorer finish” penetrates the existing coating, replenishing lost oils and restoring the wood’s natural sheen.
- Softening of Aged Resins
Many “restorer finish” products work by softening hardened resins within the existing coating. This allows the finish to regain some of its original elasticity, improving its ability to withstand stress and resist further damage. Consider a scenario where a piece of furniture’s lacquer finish has become rigid and prone to chipping. The “restorer finish” softens the lacquer, improving its flexibility and reducing the likelihood of further chipping.
- Enhancement of Color and Clarity
Rejuvenation also encompasses the enhancement of color and clarity in faded or discolored finishes. “Restorer finish” products may contain pigments or dyes that restore the original color of the finish, as well as solvents that improve its clarity and transparency. A typical example is the restoration of a sun-faded chair, where the “restorer finish” revitalizes the color and removes surface haze, resulting in a brighter and more vibrant appearance.
- Protection Against Future Degradation
The rejuvenation process often includes the application of protective elements that shield the finish from future environmental damage. Many “restorer finish” products incorporate UV inhibitors or moisture-resistant compounds that safeguard the coating against sunlight, humidity, and other degrading factors. For example, furniture treated with “restorer finish” including UV inhibitors will retain its color and integrity longer than untreated furniture, especially when exposed to direct sunlight.
These elements of replenishment, softening, enhancement, and protection collectively define rejuvenation as it applies to “restorer finish” products. By addressing the root causes of finish degradation and providing ongoing protection, these products offer a practical means of preserving the beauty and value of finished surfaces.
7. Scratch Minimization
Scratch minimization is an integral function of a restorer finish, directly addressing a common form of surface degradation. These finishes are designed to lessen the visual impact of superficial scratches on existing coatings. The cause of such scratches can range from daily wear and tear to accidental abrasions. The effect of scratch minimization is an improved aesthetic appearance, bringing the surface closer to its original condition. The importance of this component within a restorer finish lies in its ability to address surface-level imperfections without necessitating complete refinishing. For example, a table with fine scratches accumulated over years of use can have those blemishes significantly reduced through the application of a restorer finish designed for scratch minimization, thus avoiding the extensive process of stripping and re-coating the entire surface.
The practical application of scratch minimization within a restorer finish involves several mechanisms. Some products contain fillers that physically occupy the scratch, leveling the surface and reducing the visual depth of the imperfection. Other formulations incorporate refractive elements that diffuse light, making the scratch less noticeable. Furthermore, the solvents and oils in many restorer finishes can soften the existing finish around the scratch, allowing it to partially self-heal and further diminish the scratch’s appearance. Consider a scenario where a piano’s polished surface has suffered minor scratches. A restorer finish, when carefully applied, can fill those scratches, diffuse the light reflecting off them, and soften the surrounding finish, resulting in a noticeably smoother and less damaged appearance. This showcases the practicality and tangible benefits of scratch minimization.
In summary, scratch minimization is a significant attribute of a restorer finish, offering a less invasive method of improving the appearance of surfaces marred by superficial damage. The challenge lies in selecting the appropriate restorer finish for the type and severity of scratches present. The practical understanding of the interplay between scratch minimization techniques and the composition of restorer finishes allows for informed decisions that enhance the longevity and aesthetic appeal of treated surfaces. This function aligns with the broader goal of preserving and revitalizing furniture and other objects without resorting to more drastic refinishing methods.
Frequently Asked Questions About Restorer Finish
The following questions address common concerns and misconceptions regarding the utilization and efficacy of surface revitalization coatings, commonly known as restorer finish.
Question 1: What is the intended purpose of a restorer finish?
A restorer finish is designed to rejuvenate existing coatings on furniture and other wooden surfaces. It is formulated to penetrate and revitalize aged finishes, minimizing the appearance of scratches, fading, and minor damage.
Question 2: Is a restorer finish a substitute for complete refinishing?
No. A restorer finish is intended for situations where the existing finish is in relatively good condition but exhibits minor imperfections. For surfaces with significant damage, such as deep scratches, extensive peeling, or complete loss of finish, complete refinishing is the more appropriate solution.
Question 3: Can a restorer finish be applied to any type of finish?
The suitability of a restorer finish depends on the compatibility with the existing finish. Generally, these coatings are compatible with varnish, lacquer, and shellac finishes. However, it is essential to test the product in an inconspicuous area to verify compatibility and prevent adverse reactions. Application to surfaces with polyurethane or other synthetic coatings may yield unsatisfactory results.
Question 4: How should a surface be prepared before applying a restorer finish?
Proper surface preparation is critical for optimal results. The surface should be cleaned thoroughly to remove dust, dirt, grease, and wax. A mild detergent or mineral spirits can be used for cleaning, depending on the nature of the contaminants. Allow the surface to dry completely before applying the restorer finish.
Question 5: How is a restorer finish properly applied?
Apply the restorer finish using a clean, lint-free cloth. Apply thin, even coats, working with the grain of the wood. Avoid over-application, as this can result in a sticky or uneven finish. Allow the coating to dry completely between coats, following the manufacturer’s recommendations.
Question 6: Are there any safety precautions to consider when using a restorer finish?
Yes. Restorer finishes often contain solvents and other chemicals that can be harmful if inhaled or ingested. Use the product in a well-ventilated area, and wear appropriate personal protective equipment, such as gloves and a respirator, if necessary. Keep the product out of reach of children and pets. Dispose of used cloths and applicators according to local regulations.
Proper utilization and understanding of the purposes and limitations of restorer finish products will greatly impact the success of any wood rejuvenation project.
The answers to these frequently asked questions provide a foundation for understanding the proper use of these finishes. Subsequent articles will discuss specific application techniques and product selection criteria.
Conclusion
This exploration has illuminated the multifaceted nature of restorer finish and its application in surface revitalization. Key aspects, ranging from penetrating oils and solvent blends to color blending, surface preparation, film repair, scratch minimization and, most importantly, the overarching goal of rejuvenation, have been discussed. Each component contributes to the overall effectiveness of these products, provided they are employed in appropriate situations and with careful attention to detail. The responsible application of restorer finish offers a viable alternative to complete refinishing, preserving the character and integrity of valued furniture and wooden objects.
The judicious selection and utilization of restorer finish, informed by a thorough understanding of its composition, application, and limitations, is essential for achieving optimal results. Continued adherence to best practices and exploration of emerging technologies in this field will further enhance the capabilities of these finishes and their contribution to the preservation of material culture. Recognizing its power in preservation ensures its place in maintaining valued furnishings for generations to come.


