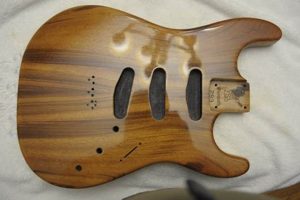
The process of applying an oily substance to prepared lumber surfaces is a common method for enhancing the aesthetic appeal and protective qualities of the material. This technique involves saturating the wood’s pores with a refined product derived from natural or synthetic sources. For example, tung oil or linseed oil are often utilized to impart a rich, warm tone and provide a degree of water resistance.
The practice offers several advantages, including highlighting the wood’s natural grain, providing a durable, easily repairable surface, and offering a less toxic alternative to some synthetic varnishes. Historically, artisans and craftsmen have favored this approach for its ability to penetrate the substrate, resulting in a resilient and attractive coating. This method has been applied to furniture, flooring, and other wooden objects for centuries.
The subsequent sections will detail various types of substances used in this manner, preparation techniques for optimal results, application methods, and maintenance procedures to ensure long-lasting beauty and protection. Considerations such as safety precautions and environmental impact will also be addressed.
Tips for Achieving Optimal Results
Maximizing the benefits of saturation-based lumber surface treatments requires careful attention to detail. These recommendations are designed to enhance the application process and the resulting finish.
Tip 1: Surface Preparation is Paramount. Thorough sanding, starting with coarser grits and progressing to finer grits (e.g., 120, 180, 220), ensures a smooth and receptive substrate. Remove all sanding dust with a tack cloth or vacuum before application.
Tip 2: Select the Appropriate Substance. Different types yield varying results. Tung offers a durable, water-resistant finish, while linseed typically provides a warmer tone. Research the characteristics of each to determine the best fit for the wood species and desired aesthetic.
Tip 3: Apply Thin, Even Coats. Avoid applying excess material. Multiple thin coats are preferable to a single thick coat, as they promote better penetration and prevent a tacky surface. Allow each coat to dry fully, according to the manufacturer’s instructions, before applying the next.
Tip 4: Wipe Away Excess. After a suitable soaking period (typically 15-30 minutes), wipe away any unabsorbed excess with a clean, lint-free cloth. This prevents a gummy or uneven finish.
Tip 5: Allow Adequate Drying Time. Full curing can take several days or even weeks, depending on the product and environmental conditions. Avoid placing objects on the finished surface until it is completely dry to the touch and no longer emits an odor.
Tip 6: Consider a Sealer. Applying a sealer before the process can help control absorption and prevent blotching, particularly on porous wood species. Test the sealer in an inconspicuous area first.
Tip 7: Maintain a Clean Work Environment. Dust and debris can contaminate the finish. Work in a well-ventilated area and take measures to minimize airborne particles.
By adhering to these guidelines, a durable, aesthetically pleasing, and long-lasting protective coating can be achieved. This careful approach ensures the lumber surface will be effectively enhanced and protected.
The following section addresses common issues encountered during the application process and provides solutions for achieving a professional-grade result.
1. Wood Preparation
Effective wood preparation is a prerequisite for achieving a durable and aesthetically pleasing protective coating with an oily substance. The condition of the wood surface directly influences the penetration, adhesion, and overall performance of the finish. Proper preparation ensures optimal results and minimizes the likelihood of defects.
- Sanding and Surface Smoothing
Sanding is a crucial step in preparing wood for an oily finish. It removes imperfections, such as scratches, dents, and mill marks, creating a smooth and uniform surface. Progressively finer grits of sandpaper are used to refine the surface, ultimately resulting in a more even and visually appealing finish. Without proper sanding, the oily substance may highlight existing imperfections, leading to an unsatisfactory result. For example, applying an oil-based product to a rough-sawn board will accentuate the roughness, while a carefully sanded surface will allow the finish to enhance the wood’s natural grain.
- Cleaning and Dust Removal
Contaminants on the wood surface, such as dust, dirt, and grease, can interfere with the penetration and adhesion of the oily finish. Thorough cleaning and dust removal are essential to ensure proper bonding. A tack cloth or vacuum cleaner can be used to remove loose particles, while a solvent-based cleaner may be necessary to remove stubborn residues. Failure to remove these contaminants can result in a blotchy finish or premature failure of the coating. For example, residual sawdust can prevent the even distribution of the oil, creating uneven color and texture.
- Moisture Content Management
The moisture content of the wood can significantly impact the performance of the protective coat. Wood that is too wet may not absorb the oily substance properly, while wood that is too dry may absorb it excessively, leading to an uneven finish. It is important to ensure that the wood is properly acclimated to the environment before applying the finish. Allowing lumber to reach equilibrium moisture content reduces the risk of warping, cracking, or finish failure. For instance, applying an oily coating to freshly kiln-dried lumber, which is often excessively dry, may result in excessive absorption and a dull appearance.
- Wood Species Considerations
Different wood species have varying densities, grain patterns, and oil absorption characteristics. Understanding these characteristics is essential for selecting the appropriate preparation techniques and the best type of substance. For example, open-grained woods like oak may require a grain filler to prevent excessive absorption, while dense woods like maple may require more aggressive sanding to improve penetration. Ignoring these differences can lead to inconsistent results and an unsatisfactory finish. Applying the same preparation method to both pine and walnut, without adjusting for their different properties, will likely result in a less than optimal outcome.
In summary, effective wood preparation is not merely a preliminary step but an integral part of the entire process. Sanding, cleaning, moisture control, and wood species considerations directly influence the quality and longevity of the resultant protective coating. By addressing these facets diligently, one can ensure that the oil-based finish performs as intended, enhancing the beauty and durability of the wood.
2. Oil Type Selection
The choice of oil significantly impacts the final attributes of a lumber surface treatment. This selection constitutes a critical decision within the overall process, directly influencing the resulting appearance, durability, and protective qualities. The selection must be based on the intended use of the wood item and the desired aesthetic. For instance, for a butcher block countertop intended for food preparation, a food-grade mineral oil is essential to prevent contamination and ensure safety. Conversely, for exterior furniture, a tung oil or a modified linseed oil with UV inhibitors may be preferred for enhanced weather resistance and longevity.
Specific examples illustrate the significance. Linseed-based substances, often chosen for their ability to impart a warm, amber hue, are prone to yellowing over time, particularly in areas with limited light exposure. Tung offers a more water-resistant finish compared to pure linseed. A modified or polymerized version offers increased durability and faster drying times. Using an inappropriate selection can lead to problems such as inadequate protection against moisture, excessive sheen, or a finish that remains tacky for an extended period.
Therefore, the type of substance selected must correspond to the performance requirements and aesthetic goals. A detailed understanding of the inherent properties of each type of oil is vital. This includes consideration of drying time, viscosity, color, and resistance to environmental factors. The effective implementation of a protective lumber surface treatment relies substantially on a well-informed selection of the appropriate oil. Failure to select the correct oil for a specific application can compromise the integrity and longevity of the final product.
3. Application Technique
The efficacy of any protective coating applied to lumber surfaces is inextricably linked to the methods employed during its implementation. Proper application maximizes the penetration, adhesion, and overall performance of oil-based finishes. Conversely, a flawed technique can compromise the finish’s integrity, resulting in aesthetic defects and diminished protection.
- Brush Application
The use of brushes allows for precise control and even distribution of the substance, particularly on intricate surfaces or areas requiring targeted coverage. Selecting an appropriate brush type, such as natural bristle for oil-based products, is crucial for preventing streaking and ensuring a smooth finish. An example would be using a high-quality brush to carefully apply tung oil to a carved wooden detail, ensuring even coverage in the recessed areas. Improper brush technique, such as applying excessive pressure, can lead to brush marks and an uneven sheen.
- Cloth Application
Applying oil with a lint-free cloth is advantageous for achieving thin, even coats and wiping away excess material. This method is often preferred for achieving a natural, low-luster finish and minimizing the risk of drips or runs. Consider using a clean cotton rag to apply a thin coat of linseed oil to a tabletop, then immediately wiping away any unabsorbed oil. Neglecting to wipe away excess oil can result in a tacky or gummy surface.
- Spraying Application
Spraying provides a uniform and efficient method for applying finishes to large, flat surfaces, such as doors or tabletops. This technique requires careful control of the spray pattern and pressure to prevent runs, drips, and orange peel texture. For instance, utilizing a HVLP (High Volume Low Pressure) sprayer to apply a modified oil to a wooden door can provide a consistent, even coating with minimal overspray. Insufficient surface preparation or improper sprayer settings can lead to adhesion problems and an uneven finish.
- Multiple Coat Application
Applying several thin coats, rather than a single thick coat, promotes better penetration, adhesion, and durability. This approach allows each coat to fully cure, resulting in a stronger and more resilient finish. Imagine applying three thin coats of tung oil to a wooden floor, allowing each coat to dry completely before applying the next. Rushing the process or applying thick coats can trap solvents, leading to a soft or easily damaged finish.
These application techniques, when executed with precision and attention to detail, contribute significantly to the aesthetic appeal and protective properties of oil-based finishes. The selection of the appropriate method, coupled with skilled execution, ensures that the lumber surface is effectively enhanced and protected, prolonging its lifespan and preserving its natural beauty.
4. Drying/Curing Process
The drying and curing stage represents a critical transformation in the application of an oily substance to lumber, dictating the final protective and aesthetic qualities. This phase involves a complex interaction of chemical and physical processes, directly influencing the hardness, durability, and longevity of the finish. Improper management of this stage can lead to a range of defects, undermining the intended benefits of the treatment.
- Evaporation of Solvents
The initial phase of drying involves the evaporation of volatile solvents present in the oily substance. These solvents, often added to improve workability and penetration, must fully dissipate to allow the remaining solids to coalesce and form a cohesive film. Insufficient ventilation or low temperatures can impede this process, resulting in a finish that remains tacky or soft. For example, applying a linseed oil-based product in a poorly ventilated space can significantly extend drying time and increase the risk of dust contamination. The complete removal of solvents is essential for achieving a hard, durable surface.
- Oxidative Polymerization
Many oil-based finishes, particularly those containing drying oils such as linseed and tung, undergo oxidative polymerization. This process involves the absorption of oxygen from the air, which triggers a chemical reaction that cross-links the oil molecules, forming a solid network. The rate of polymerization is influenced by factors such as temperature, humidity, and the presence of catalysts or driers. For instance, adding a small amount of Japan drier to linseed oil can accelerate the curing process, reducing drying time and improving the hardness of the finish. Incomplete polymerization can result in a finish that remains soft and susceptible to damage.
- Film Formation and Hardness Development
As the drying and curing process progresses, a solid film forms on the surface of the wood. The hardness of this film is determined by the degree of cross-linking achieved during polymerization and the inherent properties of the oily substance. Proper drying conditions are essential for achieving optimal film formation and hardness development. For example, maintaining a consistent temperature and humidity level can promote uniform curing and prevent cracking or wrinkling of the finish. A fully cured finish should be resistant to scratching, abrasion, and chemical exposure.
- Environmental Factors and Drying Time
Environmental factors such as temperature, humidity, and air circulation significantly influence the rate and quality of drying and curing. High humidity can impede the evaporation of solvents and slow down the polymerization process, while low temperatures can inhibit chemical reactions. Proper ventilation promotes the removal of solvents and facilitates the absorption of oxygen, accelerating drying and curing. For example, applying an oil-based finish in a damp basement can significantly extend drying time and increase the risk of mold growth. Monitoring and controlling environmental conditions are crucial for achieving a durable and aesthetically pleasing finish.
In conclusion, the drying and curing process is not simply a passive waiting period but an active phase that requires careful management and attention to detail. Factors such as solvent evaporation, oxidative polymerization, film formation, and environmental conditions must be carefully controlled to achieve a durable, aesthetically pleasing, and long-lasting protective coating on lumber surfaces. A thorough understanding of these factors is essential for maximizing the benefits of applying a finish.
5. Maintenance Schedule
The establishment of a consistent maintenance schedule is paramount to preserving the integrity and aesthetic appeal of lumber surfaces treated with an oily substance. Regular upkeep prevents degradation, enhances durability, and prolongs the lifespan of the protective layer.
- Routine Cleaning
Regular removal of dust, dirt, and grime prevents the accumulation of abrasive particles that can dull or scratch the surface. Gentle cleaning with a soft cloth and a mild soap solution is recommended. For example, furniture in high-traffic areas should be cleaned more frequently than items in less-used spaces. Failure to clean regularly allows contaminants to embed in the finish, accelerating wear and tear.
- Periodic Re-oiling
Over time, the protective qualities of an oily finish diminish due to natural wear and environmental exposure. Periodic re-application replenishes the saturated layer, restoring its water resistance and luster. The frequency of re-oiling depends on the wood type, the intensity of use, and environmental conditions. For instance, a wooden countertop used daily requires more frequent re-application than a decorative wooden bowl. Ignoring this aspect leads to drying out, cracking, and eventual failure of the surface protection.
- Spot Repair
Localized damage, such as scratches or watermarks, should be addressed promptly to prevent further deterioration. Spot repairs involve cleaning the affected area, lightly sanding the damaged finish, and applying a small amount of the original oily substance. Prompt attention minimizes the need for extensive restoration later. An example would be repairing a small scratch on a wooden floor immediately after it occurs, preventing the scratch from expanding due to moisture exposure.
- Environmental Control
Maintaining stable environmental conditions, particularly humidity levels, minimizes stress on the wood and the finish. Excessive fluctuations in humidity can cause the wood to expand and contract, leading to cracking or delamination of the finish. Using a humidifier in dry environments and avoiding prolonged exposure to direct sunlight contribute to a more stable environment. For example, placing wooden furniture away from direct sunlight prevents fading and drying out of the oily substance.
These facets of maintenance, when implemented consistently, ensure the long-term performance and appearance of surfaces treated with an oily substance. Neglecting any of these areas can accelerate the degradation process, necessitating more extensive and costly repairs in the future. The value of establishing and adhering to a well-defined maintenance schedule cannot be overstated in preserving the investment in wood finishing.
Frequently Asked Questions
This section addresses common inquiries regarding the application of protective oily coatings to lumber surfaces. The information provided aims to clarify processes, address potential issues, and promote best practices.
Question 1: What distinguishes a “drying” oily substance from a “non-drying” one in lumber surface treatment?
Drying oils, such as linseed and tung, undergo a chemical reaction (polymerization) upon exposure to air, forming a solid film. Non-drying oils, like mineral, remain liquid, offering protection primarily through saturation. The choice depends on desired durability and finish.
Question 2: Is surface preparation genuinely necessary prior to applying an oily coating?
Yes, thorough surface preparation, including sanding and cleaning, is essential. This step removes imperfections, opens wood pores, and allows for optimal penetration and adhesion of the oily substance.
Question 3: Can any oily substance be applied to any type of wood?
No, different wood species exhibit varying absorption rates and require different substances. Open-grained woods may need grain fillers, while dense woods may need more aggressive sanding. Selection should match wood characteristics.
Question 4: What are the hazards associated with oil-soaked rags?
Oil-soaked rags, particularly those containing drying oils, can spontaneously combust. Proper disposal involves laying them flat to dry in a well-ventilated area or submerging them in water before disposal.
Question 5: How often should a lumber surface treated with an oily substance be re-applied?
Re-application frequency depends on usage and environmental conditions. High-traffic surfaces require more frequent re-application. Visual inspection for dryness or loss of luster is a reliable indicator.
Question 6: Is it possible to apply a varnish or other topcoat over an oily substance?
The application of a varnish over an oily substance is generally not recommended. The presence of an oily layer can inhibit proper adhesion of the varnish, potentially leading to peeling or cracking.
These answers provide fundamental insights into the use of oily substances on lumber surfaces. Adherence to these guidelines will enhance the efficacy and longevity of the treatment.
The subsequent segment will detail potential problems and offer solutions for optimizing outcomes.
Concluding Remarks on Lumber Surface Treatment
This exploration has detailed essential aspects of the process to finish wood with oil. Effective preparation, informed selection of substances, appropriate application techniques, and diligent maintenance schedules have all been addressed. The culmination of these practices yields not only enhanced aesthetic properties but also improved durability and protection against environmental factors.
Consistent application of the outlined principles is paramount. The decision to implement this finishing method represents a commitment to both preservation and enhancement of the material. As such, adherence to these guidelines ensures that the investment in time and resources results in a lasting and valuable outcome.


