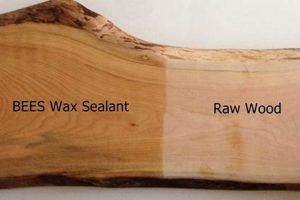
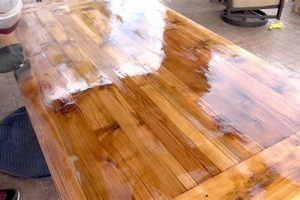
The process enhances and protects the surface of a specific type of hardwood. This involves applying treatments such as sealants, stains, and topcoats to the material to improve its appearance, durability, and resistance to environmental factors. For example, applying a clear coat to a desktop made of this wood will prevent scratches and water damage.
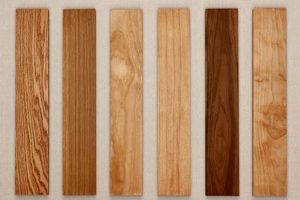
The careful treatment of this wood is crucial for preserving its aesthetic qualities and extending its lifespan. Properly executed, it reveals the wood’s natural grain patterns and prevents issues such as cracking, warping, and discoloration. Throughout history, skilled artisans have recognized the value of appropriate techniques in preserving and showcasing the beauty of this readily available material.
The subsequent discussion will delve into various preparatory steps, explore different types of sealants and topcoats suitable for this particular wood, and outline best practices for achieving professional-grade results. Techniques for addressing common issues and ensuring long-lasting protection will also be covered.
Tips for Achieving a Superior Surface on Birch
The following recommendations aim to optimize the outcome and durability when applying treatments to birch wood, ensuring a professional-quality result.
Tip 1: Sanding is Paramount: Thorough sanding is essential for a smooth, even surface. Begin with a coarser grit (e.g., 120) and progressively move to finer grits (e.g., 220, 320) to eliminate scratches and imperfections. Proper sanding maximizes sealant and topcoat adhesion.
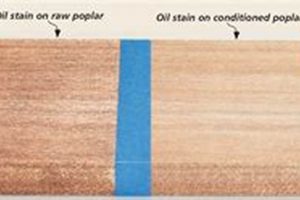
Tip 2: Apply a Wood Conditioner: Birch is prone to blotching when stained. Applying a wood conditioner prior to staining helps to ensure even stain absorption and minimize uneven coloration.
Tip 3: Choose the Right Sealant: Select a sealant formulated for hardwoods. Consider factors such as desired sheen, moisture resistance, and compatibility with the chosen topcoat. Test the sealant on an inconspicuous area first to ensure desired results.
Tip 4: Apply Thin, Even Coats: Avoid applying sealants and topcoats too thickly. Multiple thin coats are preferable to a single thick coat, as they minimize runs, drips, and air bubbles. Allow each coat to dry completely before applying the next.
Tip 5: Sand Between Coats: Lightly sand between coats of sealant and topcoat with a fine-grit sandpaper (e.g., 400 grit) to remove any imperfections and create a smooth surface for the next coat. Ensure thorough dust removal before proceeding.
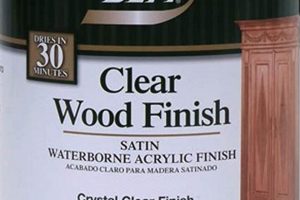
Tip 6: Consider a Water-Based Finish: Water-based finishes offer several advantages, including low VOC content, easy cleanup, and fast drying times. They also tend to yellow less over time compared to oil-based finishes, preserving the wood’s natural color.
Tip 7: Temperature and Humidity Control: Apply sealants and topcoats in a well-ventilated area with controlled temperature and humidity. Extreme temperatures or high humidity can negatively impact drying times and finish quality.
Adhering to these guidelines will result in a more aesthetically pleasing and durable surface, enhancing the wood’s natural beauty and extending its lifespan.
These recommendations serve as a foundation for achieving professional-grade results. The subsequent sections will address specific techniques and troubleshooting tips for complex applications.
1. Sanding Techniques
Sanding techniques are foundational to achieving a successful finish on birch wood. The quality of the sanded surface directly impacts the adhesion, appearance, and longevity of any subsequent sealers, stains, or topcoats. Inadequate sanding can lead to a range of problems, from uneven color absorption to premature finish failure.
- Grit Progression
Employing a proper grit progression is essential. Starting with a coarser grit (e.g., 80-120) removes imperfections and levels the surface. Subsequent sanding with progressively finer grits (e.g., 180-220, then 320) refines the surface, eliminating scratches left by the coarser grits. Skipping grits can result in visible scratch patterns under the finish. For example, if one starts with 120 grit and immediately jumps to 220, the deeper scratches from the 120 grit may not be fully removed.
- Sanding Direction
Sanding with the grain is critical. Sanding against the grain creates cross-grain scratches that are difficult to remove and become highly visible once a finish is applied. This is particularly important with birch, as its closed grain can make these scratches even more apparent. A practical example includes meticulously aligning the sander’s movements parallel to the wood grain during each pass.
- Dust Removal
Thorough dust removal between sanding stages is paramount. Residual sanding dust can contaminate the finish, leading to a cloudy appearance or adhesion problems. Effective dust removal methods include vacuuming, tack cloths, and compressed air. An example illustrating this is when small specs of dust get trapped in a sealer, creating unwanted textures.
- Sanding Sealers
Sanding sealers, applied before the final topcoat, help fill the wood’s pores and create a smoother surface. Lightly sanding the sealer after it dries provides a uniform base for the final finish coat. Without a sanding sealer, the topcoat may be absorbed unevenly, resulting in a less consistent sheen. For instance, after applying a sanding sealer, light sanding with a 320-grit sandpaper before the final topcoat often yields a more consistent, glass-like finish.
These sanding techniques, when applied diligently, are essential for preparing birch wood for a durable and aesthetically pleasing finish. Precise execution significantly contributes to the overall quality and longevity of the finished piece. Attention to detail in each stage of sanding ensures optimal results in the subsequent finishing processes.
2. Sealer Selection
The selection of an appropriate sealer represents a critical decision point in the process of enhancing and protecting birch wood. The sealer’s properties directly influence the adhesion, durability, and ultimate appearance of the finished surface, requiring careful consideration of various factors.
- Pore Filling Capability
Birch, although a relatively closed-grain wood, still possesses pores that can absorb finish unevenly, leading to inconsistencies in color and sheen. A sealer with good pore-filling capabilities creates a uniform surface for subsequent coats, ensuring a smoother and more even finish. For instance, using a high-solids sealer will help to fill these pores more effectively, compared to a low-solids option. The result is a more consistent appearance and improved durability.
- Adhesion Promotion
The sealer acts as a bonding agent between the bare wood and the topcoat. It must adhere well to both surfaces to prevent peeling, cracking, or other forms of finish failure. A sealer with poor adhesion properties compromises the entire finishing system, regardless of the quality of the topcoat. An example of this would be a shellac-based sealer promoting enhanced adhesion properties when used with a lacquer topcoat, creating a strong chemical bond.
- Sealer Compatibility
The selected sealer must be compatible with the chosen topcoat to avoid adverse reactions. Incompatibility can manifest as clouding, wrinkling, or poor drying. It is imperative to consult the manufacturer’s recommendations regarding compatible products. Using an oil-based polyurethane sealer with a water-based topcoat could lead to adhesion issues, highlighting the importance of confirming compatibility.
- Type of Sealer
Various types of sealers are available, each with distinct properties. Shellac-based sealers are known for their excellent sealing and sanding properties. Lacquer-based sealers provide a fast-drying option. Water-based sealers offer low VOC content. Oil-based sealers provide enhanced durability and a warm color tone. The selection must align with the desired properties of the final finish and the intended application. For example, a water-based sealer might be selected when a low-odor, environmentally conscious finish is desired.
In summary, the meticulous selection of a sealer tailored to the specific characteristics of birch wood and the intended finishing system is paramount. This ensures a durable, aesthetically pleasing, and long-lasting finish. Appropriate sealer selection safeguards against premature finish failure and preserves the wood’s natural beauty.
3. Stain application
Stain application is a crucial component of surface preparation in the context of treating birch wood. The process introduces color and accentuates the grain, fundamentally altering the wood’s aesthetic appearance. However, the characteristics of birch wood pose unique challenges that necessitate careful execution. Birch is known for its tendency to absorb stain unevenly, leading to blotching. The cause of this uneven absorption lies in variations in the wood’s density and pore structure. A practical example includes the application of a dark stain to birch plywood, where certain areas become significantly darker than others, resulting in an undesirable mottled effect. Therefore, understanding and mitigating this potential unevenness is essential for achieving a professional finish.
Effective stain application requires strategic surface preparation and the application of pre-stain conditioners. These conditioners partially seal the wood’s surface, reducing its ability to absorb stain and promoting more uniform color penetration. The selection of appropriate stain types is also critical. Gel stains and pigment stains often perform better on birch than dye stains due to their ability to sit on the surface and minimize absorption. For instance, a gel stain allows for controlled color deposition, especially on birch veneer, enabling a more consistent look. Precise application techniques are paramount, involving even spreading, controlled drying times, and the removal of excess stain to prevent pooling. Failure to adopt these measures often results in noticeable imperfections and a compromised finish.
Ultimately, successful stain application to birch relies on a comprehensive understanding of the wood’s properties, appropriate product selection, and meticulous application techniques. Addressing the inherent challenges presented by birchs propensity for uneven stain absorption is critical for achieving a visually appealing and professional-quality finish. Ignoring these factors often results in an aesthetically displeasing outcome that diminishes the natural beauty of the wood and necessitates costly rework.
4. Topcoat options
The selection of a topcoat is a decisive element in surface treatment. This decision directly influences the durability, aesthetics, and protective characteristics of birch wood surfaces. Understanding the available options and their implications is essential for achieving the desired outcome.
- Polyurethane Finishes
Polyurethane coatings provide a durable and water-resistant layer, suitable for surfaces subjected to heavy use. Oil-based polyurethanes offer enhanced warmth and depth but tend to yellow over time. Water-based polyurethanes offer better clarity and lower VOC emissions. An example includes using water-based polyurethane on birch cabinets to maintain the wood’s natural color while providing protection against moisture and scratches.
- Lacquer Finishes
Lacquer provides a fast-drying and smooth finish, commonly used for furniture and musical instruments. It offers good clarity but is less resistant to scratches and chemicals than polyurethane. Pre-catalyzed lacquer offers increased durability. Applying several thin coats of lacquer to a birch desktop provides a smooth, professional-looking surface, albeit one requiring careful handling to prevent damage.
- Varnish Finishes
Varnish provides good durability and water resistance. It is available in various sheens, from matte to gloss. Spar varnish is specifically formulated for outdoor use, offering enhanced UV protection. Varnishing a birch entry door provides protection from the elements, preserving its appearance for a longer period.
- Oil Finishes
Penetrating oil finishes, such as linseed oil or tung oil, enhance the wood’s natural grain and provide a soft, matte appearance. They offer minimal surface protection and require periodic reapplication. Applying tung oil to a birch tabletop brings out the wood’s natural beauty but necessitates regular maintenance to prevent water damage and wear.
The diverse array of topcoat options offers distinct advantages and disadvantages in terms of durability, appearance, and maintenance requirements. Careful consideration of these factors is paramount when selecting a topcoat for birch wood, ensuring that the chosen finish aligns with the intended use and aesthetic goals. Improper selection can compromise the long-term performance and visual appeal of the finished piece. Evaluating the use case and desired aesthetic ensures a balance between protection and beauty.
5. Drying times
Drying times are a critical parameter in the process, directly influencing the quality and durability of the completed surface. Inadequate attention to drying times can result in a range of issues, from compromised adhesion to impaired surface integrity.
- Influence of Environmental Conditions
Ambient temperature and humidity levels significantly affect the rate at which finishes dry. High humidity retards evaporation, prolonging drying times and potentially leading to a compromised finish. Conversely, excessively high temperatures can cause finishes to dry too rapidly, resulting in cracking or bubbling. An example is the extended drying time required for oil-based finishes in humid climates, compared to drier environments. Maintaining controlled environmental conditions is essential for optimal results.
- Impact on Inter-Coat Adhesion
Allowing adequate drying time between coats of sealer, stain, or topcoat is crucial for proper inter-coat adhesion. Premature application of subsequent coats can trap solvents, preventing complete curing and weakening the bond between layers. A practical illustration of this principle is observed when applying multiple coats of lacquer. Insufficient drying between coats can result in a soft, easily damaged finish due to trapped solvents.
- Finish Type Dependency
Different types of finishes exhibit varying drying times. Water-based finishes generally dry faster than oil-based finishes. Lacquer dries much more quickly than polyurethane. Adhering to the manufacturer’s recommended drying times for the specific product being used is essential. An example of this is the considerably shorter drying time required for a water-based topcoat compared to a traditional oil-based varnish.
- Effect on Final Surface Hardness
Complete and thorough drying is necessary for a finish to achieve its maximum hardness and durability. Premature use or handling of a surface before it is fully cured can lead to scratches, dents, and other forms of damage. An example of this would be setting objects on a freshly finished table before the finish has had sufficient time to harden, which could leave permanent marks or indentations.
Proper management of drying times, taking into account environmental conditions, finish type, and the need for inter-coat adhesion, is integral to achieving a high-quality, durable finish on birch wood. Neglecting these considerations can lead to compromised results and diminished longevity of the finished surface. Careful adherence to recommended drying times guarantees a well-cured, robust, and aesthetically pleasing final product.
6. Surface preparation
The effective enhancement and protection of birch wood fundamentally depend on meticulous surface preparation. This phase, preceding the application of sealers, stains, or topcoats, directly determines the quality and longevity of the final finish. Inadequate surface preparation is a primary cause of finish failures, manifesting as uneven color absorption, peeling, cracking, or diminished durability. Proper preparation involves sanding, cleaning, and, in some cases, pre-treatment with conditioners to ensure optimal adhesion and visual uniformity. A real-world example involves a poorly sanded birch plywood panel exhibiting pronounced scratch marks and uneven stain absorption after a seemingly high-quality finish is applied. This outcome underscores the pivotal role of meticulous groundwork.
The practical significance of comprehensive surface preparation extends beyond aesthetics. A well-prepared surface allows the subsequent finishes to properly bond with the wood, providing essential protection against moisture, UV radiation, and physical abrasion. This is particularly relevant for birch, which, while relatively hard, can be susceptible to environmental damage without adequate surface treatment. As an illustration, consider a birch countertop in a kitchen setting. If the surface is not properly sealed and protected, it will quickly become stained and damaged from water and everyday use. Conversely, a properly prepared and finished birch surface can withstand years of wear, maintaining its appearance and structural integrity.
In summary, surface preparation is not merely a preliminary step; it is an integral component of successfully enhancing and protecting birch wood. Its impact cascades through every subsequent stage of the finishing process. Neglecting proper preparation introduces inherent vulnerabilities, undermining the desired aesthetic and protective outcomes. The practical consequence is a compromised final product, necessitating costly repairs or complete refinishing. Therefore, the investment in meticulous surface preparation represents a critical element of quality control and long-term value.
7. Environmental conditions
Environmental conditions exert a significant influence on all phases of surface treatment. Temperature, humidity, and air circulation directly affect the drying times, adhesion, and overall quality of sealers, stains, and topcoats applied to birch wood. Deviations from recommended environmental parameters can lead to a range of problems, including prolonged drying times, blushing (cloudiness) in lacquer finishes, and compromised adhesion between coats. For instance, the application of an oil-based polyurethane in a high-humidity environment may result in a finish that remains tacky for an extended period, attracting dust and other contaminants, ultimately degrading the appearance and protective properties of the coating. Moreover, elevated temperatures can accelerate the evaporation of solvents, potentially causing finishes to dry too quickly, resulting in cracking or bubbling. Maintaining a stable and controlled environment, within the manufacturer’s specified ranges for the chosen products, is therefore critical for optimal results.
The practical implications of environmental control extend beyond immediate aesthetic concerns. Inadequate temperature and humidity management can weaken the bond between the finish and the wood substrate, rendering the surface more susceptible to damage from moisture, abrasion, and chemical exposure. Consider the example of birch furniture being finished in an unheated workshop during winter. The low temperatures may significantly prolong the curing process, and the resulting finish may exhibit reduced flexibility and increased susceptibility to cracking under stress. Conversely, excessive heat and low humidity can cause the wood to dry out too rapidly, leading to warping or splitting, and hindering the finish’s ability to properly adhere. Therefore, a controlled environment is not simply a matter of aesthetics but a prerequisite for ensuring the long-term integrity and performance of the finished birch product.
In summary, environmental conditions constitute an integral component. Precise control over temperature, humidity, and air circulation is paramount for achieving a durable, aesthetically pleasing, and long-lasting finish. The understanding of these influences, coupled with diligent adherence to manufacturer recommendations, minimizes the risk of finish failures and maximizes the protective properties of the surface treatment. Ignoring these considerations inevitably leads to compromised results and diminished service life of the finished birch wood, thereby underscoring the practical significance of environmental management in this process.
Frequently Asked Questions
This section addresses common queries related to enhancing and protecting birch wood surfaces. These answers provide clarity on best practices and potential challenges.
Question 1: Is sanding before surface treatments genuinely necessary?
Sanding constitutes an indispensable step. It creates a smooth, uniform surface, facilitating optimal adhesion and ensuring a professional aesthetic. Skipping this step compromises the integrity of the final product.
Question 2: Why does birch wood tend to blotch when stained?
Birch exhibits variations in density and pore structure, leading to uneven stain absorption and blotching. Employing a wood conditioner prior to staining helps to mitigate this issue.
Question 3: Can any type of sealant be applied to birch?
No. The sealant must be specifically formulated for hardwoods to ensure proper adhesion and prevent adverse reactions with the wood’s natural oils. Compatibility with the intended topcoat is also a crucial consideration.
Question 4: What are the risks associated with applying thick coats of finish?
Thick coats impede proper drying and curing, leading to runs, drips, and trapped solvents. Applying multiple thin coats is a more effective approach to achieving a durable and aesthetically pleasing finish.
Question 5: How important are environmental conditions during the finishing process?
Environmental factors, such as temperature and humidity, significantly influence drying times and finish quality. Extreme conditions can compromise adhesion and surface integrity.
Question 6: Does water-based topcoat or oil-based topcoat work for birch?
Both oil-based and water-based topcoats work for birch. However, oil-based usually has more VOC and warm tone. On the other hand, water-based has less VOC and preserve the wood’s natural color.
Proper surface treatment hinges on a meticulous approach. Adherence to established best practices is imperative for achieving optimal results and long-term durability.
The subsequent section provides a comprehensive troubleshooting guide for addressing common issues encountered during the process.
Conclusion
The preceding discussion has comprehensively addressed the multifaceted process of finishing birch wood. Key elements include meticulous surface preparation, appropriate product selection, adherence to recommended drying times, and precise environmental control. Mastery of these techniques ensures a durable, aesthetically pleasing, and long-lasting protective surface.
Successful finishing of birch wood requires a commitment to quality and precision. Further exploration of advanced techniques and continuous refinement of established methods will undoubtedly yield even greater enhancements in both the protective and aesthetic properties achievable on this versatile material. Diligence and informed practice remain paramount in maximizing the potential of this valuable resource.


