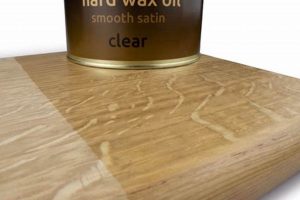
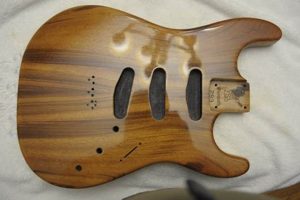
The application of a specific oil-based wood finish provides a durable and attractive surface. This process involves applying multiple thin coats of an oil blend, allowing each coat to penetrate and harden within the wood fibers. A typical application might include three coats, each buffed smooth after drying, to achieve a satin sheen.
This method enhances the natural grain and color of the wood, offering protection against moisture and wear. It is a popular choice for furniture, cabinetry, and other wooden objects due to its ease of application and the warm, natural look it imparts. Historically, this technique offered a relatively simple and effective way to protect and beautify wood before more complex finishes were developed.
Understanding the proper preparation of the wood surface is crucial for optimal results. Subsequent sections will delve into surface preparation techniques, application methods, drying times, and troubleshooting common issues, ensuring a successful and long-lasting result.
Tips for Optimal Results
Achieving a superior outcome requires careful attention to detail during each stage of the process. Adhering to the following guidelines will maximize the aesthetic appeal and protective qualities of the treated surface.
Tip 1: Surface Preparation is Paramount: Prior to commencing, ensure the wood is sanded to a smooth finish, typically progressing through grits up to 220 or 320. Remove all dust particles using a tack cloth or vacuum. Inadequate surface preparation will result in an uneven and unsatisfactory final appearance.
Tip 2: Apply Thin, Even Coats: Avoid applying the material too thickly. Multiple thin coats, allowing sufficient drying time between each, are preferable to a single heavy application. Over-application can lead to a sticky or uneven finish.
Tip 3: Proper Drying Environment: Maintain a well-ventilated environment with stable temperature and humidity levels during the drying process. Extreme temperature fluctuations or high humidity can impede proper curing and lead to complications.
Tip 4: Buffing Between Coats: Lightly buffing the surface with fine steel wool (0000 grade) or a synthetic abrasive pad between coats promotes a smoother finish. This process removes any imperfections or raised grain.
Tip 5: Complete Removal of Excess: After each application, thoroughly wipe away any excess material from the surface. Failure to do so can result in a gummy or tacky residue that detracts from the final appearance.
Tip 6: Adequate Curing Time: Allow sufficient time for the finish to fully cure before subjecting the treated item to regular use. The manufacturer’s guidelines should be consulted for specific curing times, which can vary depending on environmental conditions.
Tip 7: Consider a Final Wax (Optional): For enhanced protection and sheen, a coat of wax can be applied after the final coat has fully cured. This provides an additional layer of defense against moisture and scratches.
Following these tips will significantly enhance the quality and durability of the resulting surface. Proper technique and patience are essential for achieving professional-grade results.
With these guidelines in mind, the subsequent sections will address common issues and provide further refinement techniques to ensure a flawless final result.
1. Wood Preparation
Wood preparation is an indispensable precursor to the successful application of an oil finish. The state of the wood surface directly influences the penetration, absorption, and overall aesthetic outcome of the finish. Inadequate preparation leads to uneven absorption, highlighting imperfections, and compromising the protective qualities of the oil. For example, if a wood surface retains residual saw marks or planer ripples, the applied oil will accentuate these defects, resulting in a visually unappealing texture. Similarly, the presence of dust or contaminants inhibits proper bonding, leading to potential peeling or flaking over time. The foundational importance of wood preparation cannot be overstated; it is a determinative factor in the final quality.
Specific preparatory steps involve sanding, cleaning, and, in some cases, applying a pre-stain conditioner. Sanding progresses through increasingly finer grits, typically culminating in a 220- or 320-grit finish, depending on the wood species and desired smoothness. This process removes imperfections, opens the wood pores, and creates a uniform surface for optimal oil penetration. Cleaning removes sanding dust and other contaminants that would otherwise interfere with adhesion. Pre-stain conditioners are particularly beneficial for softwoods or woods with uneven grain patterns, as they mitigate blotching by regulating oil absorption rates. These measures collectively ensure a receptive and uniform surface, maximizing the benefits of the oil finish.
Proper wood preparation serves as the cornerstone of a durable and visually appealing finish. Neglecting this critical step invariably compromises the final result, regardless of the quality of the oil itself. By investing time and effort in meticulous preparation, one ensures the oil finish can fully express the natural beauty of the wood while providing lasting protection. The challenges lie in identifying appropriate preparation methods for diverse wood species and project requirements. Understanding this relationship is fundamental to achieving professional-grade results.
2. Application Technique
Application technique is a critical determinant in the success of the final finish. Improper application methods directly lead to uneven color, surface imperfections, and compromised durability. The process dictates how the oil interacts with the wood, influencing penetration, saturation, and the development of a protective layer. For example, applying too much oil at once leads to pooling and a sticky residue, while insufficient application results in a dry, unprotected surface. Real-world scenarios demonstrate the practical significance: a poorly applied finish on a tabletop is more susceptible to scratches, stains, and moisture damage, necessitating premature refinishing. Thus, mastering the correct application is fundamental to achieving a lasting and aesthetically pleasing result.
Specific application methods vary depending on the desired outcome and project scale. Techniques include using a brush, cloth, or spray gun, each requiring specific considerations. Brushing, while labor-intensive, offers control for intricate surfaces. Cloth application is suitable for achieving thin, even coats and is often preferred for highlighting wood grain. Spraying ensures uniform coverage on large or complex pieces but requires proper ventilation and safety precautions. Regardless of the chosen method, consistency in stroke direction, pressure, and material quantity is paramount. Moreover, diligent removal of excess oil after each coat is essential to prevent a tacky or uneven surface, highlighting the technique’s crucial role.
In summary, proper application technique directly influences the quality and longevity of an oil finish. Challenges arise in adapting techniques to diverse wood types and project complexities. Understanding the nuances of each method, including surface preparation, material control, and environmental factors, is crucial. By embracing the importance of precise application, the user can mitigate potential issues and secure a protective and aesthetically satisfying outcome, ensuring its value and durability.
3. Curing Time
Curing time is a vital component of the oil finishing process, directly influencing the durability and appearance of the finished surface. This timeframe represents the period required for the applied oil to fully oxidize and polymerize within the wood fibers, transitioning from a liquid to a solid state. Insufficient curing undermines the finish’s protective qualities, rendering it susceptible to scratches, moisture damage, and premature wear. For instance, placing objects on a table before the oil has completely cured may leave permanent impressions or disrupt the surface integrity. Therefore, understanding and adhering to recommended curing times is essential for achieving a professional-grade finish.
The duration of curing time is affected by several factors, including the specific oil formulation, ambient temperature, humidity, and the thickness of the applied coats. Some oils contain additives that accelerate the curing process, while others cure more slowly. High humidity and low temperatures can impede oxidation, extending the curing period. Multiple thick coats, though seemingly efficient, trap solvents and slow down the overall hardening process. Practical application involves monitoring environmental conditions and carefully controlling coat thickness to optimize the curing rate. Additionally, consulting the manufacturer’s specifications for recommended curing times is critical for avoiding common issues.
In summary, curing time is not merely a waiting period but an active phase in the transformation of the oil finish. Neglecting this aspect compromises the finish’s structural integrity and aesthetic appeal. Challenges lie in balancing desired project completion timelines with the necessity for complete curing. By understanding the factors influencing curing time and implementing best practices, professionals and hobbyists can ensure a durable, beautiful, and long-lasting finish, making it a key element for the oil finishing process.
4. Coat Quantity
The number of coats applied during the finishing process significantly impacts the appearance, durability, and protective qualities of the resulting surface. Insufficient application leads to inadequate protection against moisture, scratches, and wear, leaving the wood vulnerable to environmental factors. Conversely, excessive application can result in a surface that is tacky, uneven, or prone to cracking. The optimal coat quantity depends on the wood species, the desired aesthetic, and the intended use of the finished object. For instance, a coffee table subjected to frequent use requires more protection than a decorative item. The balance between under-application and over-application is, therefore, crucial in achieving a satisfactory outcome.
Practical application involves assessing the wood’s porosity and absorption rate. Open-grained woods, such as oak, may require more coats than closed-grained woods, like maple, to achieve the desired level of saturation and protection. Observing the wood’s response to each coat and allowing adequate drying time between applications is essential for making informed decisions about subsequent coat quantities. Moreover, buffing between coats promotes adhesion and enhances the smoothness of the final finish, contributing to both its aesthetic appeal and protective capabilities. Following manufacturers’ recommendations regarding coat quantity provides a baseline, but adjustments based on specific project requirements are often necessary.
Ultimately, determining the appropriate coat quantity represents a nuanced aspect of the finishing process. Understanding the properties of both the wood and the oil is essential for achieving a durable, visually appealing result. The challenge lies in accurately assessing the wood’s needs and adapting the application accordingly. By carefully controlling the number of coats applied and employing proper application techniques, it is possible to achieve a lasting finish that enhances the natural beauty of the wood while providing adequate protection against the elements. This skill is key to maximizing the benefits of an oil finish.
5. Environmental Conditions
Ambient environmental conditions significantly influence the application and curing of oil finishes. Temperature, humidity, and ventilation directly affect the viscosity of the oil, its rate of penetration into the wood, and the speed at which it oxidizes and polymerizes. For example, high humidity can impede evaporation, prolonging drying times and potentially leading to a cloudy or uneven finish. Conversely, excessively high temperatures may cause the oil to dry too quickly, preventing proper penetration and resulting in a weak or brittle protective layer. Inadequate ventilation hinders the removal of volatile organic compounds (VOCs) released during curing, contributing to a prolonged and potentially hazardous environment. Therefore, controlling environmental conditions is a critical factor in achieving a successful and durable finish.
Practical application requires close monitoring and adjustment of the finishing environment. Optimal conditions generally involve a temperature range between 65F and 75F (18C to 24C) and a relative humidity level between 40% and 60%. Adequate ventilation, achieved through open windows or mechanical systems, promotes air circulation and accelerates the drying process. In situations where precise control is not possible, adjustments to the oil formulation or application technique may be necessary. For instance, adding a drying agent can compensate for cooler temperatures or high humidity, while applying thinner coats can mitigate the effects of rapid drying in warmer environments. Maintaining consistency in environmental conditions throughout the application and curing phases is essential for ensuring uniform results.
In summary, environmental conditions represent a critical variable in the oil finishing process. Failing to account for these factors can compromise the quality, durability, and aesthetic appeal of the finished surface. Challenges arise in adapting to fluctuating environmental conditions and implementing appropriate mitigation strategies. By understanding the interconnectedness of temperature, humidity, ventilation, and oil curing, it is possible to create an environment conducive to a successful and lasting finish. The ability to effectively manage these conditions translates to superior results, emphasizing their indispensable role in the oil finishing endeavor.
6. Buffing Process
The buffing process represents a critical stage in achieving a refined and durable surface. Its execution directly influences the smoothness, sheen, and overall aesthetic appeal of a finished piece. Buffing serves to level imperfections, remove residual oil, and enhance the protective qualities of the finish, contributing significantly to the final outcome.
- Leveling Imperfections
Buffing removes minor surface irregularities, such as dust particles or raised grain, that may become embedded during the finishing stage. This process employs fine abrasives to gently smooth the surface, creating a uniform plane. For example, minute imperfections that are barely visible to the naked eye can detract from the finish’s overall clarity and smoothness. Buffing corrects these issues, resulting in a more professional and visually appealing surface.
- Removing Residual Oil
The buffing process eliminates any excess oil that may remain on the surface after the curing period. Unremoved residual oil can lead to a tacky or sticky texture, attracting dust and detracting from the finish’s clarity. Buffing with clean cloths or specialized pads removes this excess, leaving a dry and smooth surface. This step is crucial for ensuring a pleasant tactile experience and preventing the accumulation of contaminants.
- Enhancing Sheen
The buffing process directly contributes to the final sheen of the finish. Varying the buffing technique and abrasive material allows control over the degree of gloss. For instance, aggressive buffing with coarser compounds can create a high-gloss finish, while gentle buffing with finer compounds results in a satin or matte sheen. This flexibility allows for customization of the finish to suit specific aesthetic preferences and project requirements.
- Improving Protective Qualities
Buffing can compress and harden the surface of the oil finish, enhancing its resistance to scratches and minor abrasions. The pressure applied during buffing consolidates the oil molecules, creating a more durable barrier against environmental factors. This increased surface hardness contributes to the longevity of the finish and reduces the likelihood of damage from everyday use.
The integration of the buffing process is thus integral to achieving a high-quality and lasting finish. Its ability to level imperfections, remove residual oil, enhance sheen, and improve protective qualities ensures a superior outcome, highlighting the importance of meticulous execution. Omission of the buffing process often results in a compromised finish with reduced aesthetic appeal and diminished durability.
7. Oil Composition
The composition of the oil blend directly dictates the performance characteristics of a finish. This influence spans penetration depth, curing time, durability, and final appearance. The specific blend of oils, resins, and additives determines how the finish interacts with the wood substrate and its resilience to environmental factors. For example, a finish with a high percentage of drying oils, such as linseed or tung oil, will typically exhibit faster curing times and enhanced hardness compared to one composed primarily of non-drying oils. This difference in formulation dictates the resulting properties and suitability for various applications.
Component selection within the oil blend plays a crucial role in achieving the desired results. Drying oils polymerize upon exposure to air, forming a solid film that protects the wood. Resins enhance the hardness and durability of the finish, while also influencing its sheen and clarity. Additives, such as driers, accelerate the curing process, and UV inhibitors protect against sunlight-induced fading and degradation. A carefully balanced formulation optimizes these properties to create a finish that is both aesthetically pleasing and functionally effective. A practical example is the use of a tung oil-based finish on exterior doors, where its water-resistant properties provide crucial protection against the elements.
Understanding oil composition is fundamental to predicting and controlling the outcome of the finishing process. Formulations are selected based on the specific requirements of each project, taking into account wood species, environmental conditions, and desired aesthetic properties. Challenges lie in navigating the wide range of available products and identifying those best suited to particular applications. A thorough understanding of the interplay between oil components and their impact on the final finish enables informed decision-making and ensures consistent, high-quality results.
Frequently Asked Questions About Finishing with Danish Oil
This section addresses common inquiries concerning the application, properties, and maintenance of surfaces treated with an oil finish. These questions aim to clarify misconceptions and provide guidance for achieving optimal results.
Question 1: How does surface preparation impact the final appearance of a surface treated in this manner?
Surface preparation is paramount. Imperfections, such as sanding marks or dust particles, will be accentuated by the oil, resulting in an uneven and unsatisfactory finish. Proper sanding and cleaning are essential for achieving a smooth, uniform surface.
Question 2: What is the optimal method for applying this type of wood finish?
Thin, even coats are recommended. Multiple thin coats, with adequate drying time between each, allow for proper penetration and prevent a sticky or uneven surface. Excess oil should be thoroughly removed after each application.
Question 3: How long should a surface treated with this oil be allowed to cure before use?
Curing time varies depending on the specific product and environmental conditions. Consulting the manufacturer’s guidelines is essential. Generally, a minimum of 24-72 hours is required for full curing.
Question 4: Can this oil finish be applied over existing finishes?
Application over existing finishes is generally not recommended. The underlying finish may impede penetration and adhesion, resulting in a compromised result. Removal of the existing finish is typically necessary.
Question 5: How should a surface treated with this oil be maintained to preserve its appearance?
Regular dusting and occasional cleaning with a mild soap solution are recommended. A wax polish can be applied periodically to enhance the sheen and provide additional protection.
Question 6: Is this finish suitable for outdoor use?
While it offers some moisture resistance, it is generally not recommended for prolonged outdoor exposure. UV radiation and harsh weather conditions can degrade the finish over time. Finishes specifically formulated for outdoor use are more suitable.
These questions highlight key considerations for successful application and maintenance. Adhering to these guidelines will contribute to a durable and aesthetically pleasing result.
The subsequent section will delve into troubleshooting common problems and providing advanced techniques for refining the finishing process.
In Conclusion
This exposition has detailed the multifaceted nature of finishing with danish oil, emphasizing the importance of wood preparation, application technique, curing time, coat quantity, environmental conditions, buffing, and oil composition. Each element contributes critically to the final outcome, affecting both the aesthetic appeal and the protective qualities of the treated surface. Neglecting any of these aspects can compromise the integrity and longevity of the finish.
The understanding and meticulous application of these principles represent a commitment to quality craftsmanship. The enduring beauty and protection afforded by this finishing method justify the diligent effort required. Continued adherence to best practices will ensure the preservation of valued wooden objects for generations to come.


