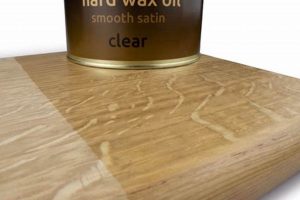
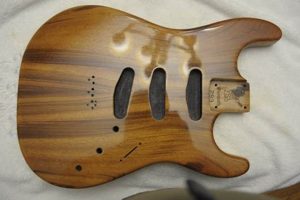
The practice involves saturating timber with a natural drying oil derived from flax seeds. This process creates a protective and aesthetically pleasing surface. A common application includes enhancing the grain and providing a low-luster sheen to furniture and interior woodwork.
Its enduring popularity stems from several advantages. It offers ease of application and a warm, traditional look. Beyond aesthetics, it penetrates the wood fibers, providing protection from moisture and preventing the wood from drying out and cracking. Historically, its use dates back centuries, valued for its effectiveness and the natural, renewable source of the oil itself.
The following sections will delve into the specific types of oil available, the proper techniques for application, considerations for drying time, and necessary safety precautions during the process. Furthermore, different finishing outcomes will be addressed, including achieving desired levels of gloss and addressing potential issues such as tackiness.
Essential Guidance for Oil Application
Achieving optimal results necessitates careful planning and execution. These guidelines address key considerations for successful application, ensuring durability and aesthetic appeal.
Tip 1: Surface Preparation is Paramount: Thoroughly sand the wood surface progressively to a fine grit (e.g., 220-320) before application. Remove all dust and debris. This ensures proper penetration and adhesion.
Tip 2: Apply Thin, Even Coats: Avoid applying excessively thick layers. Opt for multiple thin coats, allowing each to fully penetrate and dry before applying the next. This minimizes tackiness and promotes uniform curing.
Tip 3: Use Boiled Oil for Faster Drying: Boiled oil contains metallic driers that accelerate the curing process. Raw oil can take significantly longer to dry, increasing the risk of dust contamination and prolonged tackiness.
Tip 4: Wipe Off Excess Oil Thoroughly: After allowing the oil to penetrate for approximately 20-30 minutes, vigorously wipe off all excess oil with a clean, lint-free cloth. Failure to do so will result in a sticky, uneven finish.
Tip 5: Allow Adequate Drying Time: Ensure sufficient drying time between coats, typically 24-72 hours depending on environmental conditions (temperature, humidity). Proper ventilation is crucial for promoting evaporation and hardening.
Tip 6: Consider Lightly Sanding Between Coats: Lightly sanding with very fine grit sandpaper (e.g., 400-600) between coats can help to smooth out any imperfections and improve the final finish. Remove sanding dust completely before applying the next coat.
Tip 7: Dispose of Oil-Soaked Rags Safely: Due to the risk of spontaneous combustion, oil-soaked rags must be disposed of properly. Lay them flat to dry outdoors, away from flammable materials, or submerge them in water before disposal in a sealed metal container.
Adhering to these best practices maximizes the potential of this finish, resulting in a beautiful and enduring surface protection. The following section will address troubleshooting common issues that may arise during the application process.
1. Penetration
The degree to which the oil permeates the wood’s cellular structure is directly proportional to the protection afforded. Deeper penetration allows the oil to displace moisture and create a barrier against future water absorption, reducing the likelihood of warping, cracking, and decay. For example, a softwood species like pine, characterized by its open grain structure, will exhibit greater oil absorption compared to a dense hardwood such as maple. Adequate penetration in pine translates to enhanced resistance against environmental stressors.
Insufficient penetration compromises the protective capabilities. A surface coating, lacking sufficient depth, is vulnerable to abrasion and easily damaged. This is particularly critical in high-traffic areas or on frequently handled objects. Consider a wooden countertop treated only with a thin surface application; repeated cleaning and contact with liquids will quickly degrade the finish, necessitating frequent reapplication. Conversely, deeper saturation forms a resilient foundation, extending the lifespan of the treated wood.
Therefore, proper surface preparation, thin coat application, and the selection of oil appropriate for the wood species are essential for achieving optimal penetration. Failure to consider these factors undermines the intended benefits, resulting in diminished protection and a compromised aesthetic. Understanding this crucial relationship between penetration and protection is fundamental to successful wood finishing.
2. Protection
The fundamental purpose of applying it to wood surfaces is to impart a measure of protection against environmental factors and physical wear. The oil penetrates the wood fibers, creating a water-resistant barrier that minimizes moisture absorption. This reduction in moisture uptake is crucial for preventing warping, swelling, and cracking, common issues associated with untreated or inadequately protected wood. As a result, wooden furniture, flooring, or architectural elements that undergo this treatment exhibit greater longevity and structural integrity than their unprotected counterparts.
Beyond mitigating moisture damage, the hardened oil finish offers a degree of resistance to scratches and abrasions. While it does not create an impenetrable shield, it does provide a sacrificial layer that absorbs minor impacts and surface-level damage, preserving the underlying wood from more significant harm. For example, a wooden tabletop finished with it will withstand everyday use, such as the placement of objects and casual spills, without immediately showing signs of wear. Regular reapplication of oil can further enhance this protective quality, addressing any areas that have become compromised over time. The level of protection is also influenced by the number of coats applied and the thoroughness of the application process.
In summary, protection is a core benefit of the method, extending the life and preserving the appearance of wooden objects. Understanding this protective mechanism informs informed decisions regarding product selection, application techniques, and maintenance schedules. While other wood finishing options may offer superior levels of protection in specific scenarios, this method offers a balance of protection, aesthetic enhancement, and ease of application, making it a practical choice for a variety of wood finishing applications. The achieved level of protection is directly influenced by the thoroughness and care put into the method.
3. Durability
The inherent durability imparted to wood surfaces through the application of oil stems from its ability to penetrate and solidify within the wood’s porous structure. This process creates a network of hardened oil that resists moisture intrusion, a primary factor in wood degradation. The extent of this durability is directly proportional to the saturation achieved and the type of oil used. For instance, boiled formulations, containing metallic driers, cure faster and form a harder, more resilient finish compared to raw oil, enhancing resistance to scratches and abrasions. However, even boiled oil offers only moderate protection compared to modern synthetic finishes like polyurethane. Therefore, the longevity of a finish depends significantly on the intended use of the wooden object. A lightly used decorative item will exhibit far greater durability than a heavily trafficked floor.
Consider a solid wood dining table finished solely with oil. Its durability is manifested in its ability to withstand repeated wiping, spills, and the occasional impact from dishes or utensils without readily showing wear marks. This resilience is a direct consequence of the oil’s penetration, which strengthens the wood fibers and provides a degree of protection against surface damage. Maintenance, in the form of periodic reapplication, is crucial for sustaining this protective layer and preventing the wood from drying out and becoming brittle. The absence of regular maintenance will inevitably lead to a decline in the finish’s durability, increasing the likelihood of surface damage and accelerated wear.
In conclusion, the resulting durability is a critical aspect of this finishing technique, albeit one that is influenced by several factors, including the type of oil employed, the thoroughness of application, and the level of maintenance provided. While offering a pleasing aesthetic and ease of application, its essential to acknowledge its limitations in comparison to more robust synthetic finishes. The choice to use oil should be informed by a clear understanding of the anticipated wear and tear and a commitment to regular maintenance to preserve the integrity and longevity of the finished wood surface. Failure to appreciate these nuances can result in premature deterioration and diminished performance.
4. Sheen
The resulting sheen, or level of gloss, is a significant aesthetic characteristic directly influenced by the application of oil to wood. The oil’s refractive properties and its interaction with the wood’s surface determine the final appearance, ranging from matte to a subtle luster. The achievable sheen is contingent upon various factors inherent to the process.
- Oil Type
The selection of oil profoundly affects the resulting sheen. Raw oil typically produces a matte finish due to its slower drying time and less pronounced surface build-up. Boiled oil, with its metallic driers, dries more quickly, resulting in a slight sheen as it forms a harder surface film. Further, polymerized formulations are available, designed to build a higher gloss with fewer coats.
- Application Method
The technique employed in applying the oil dictates the uniformity and smoothness of the finish, thereby influencing the sheen. Multiple thin coats, each allowed to fully dry and then lightly buffed, typically yield a more even and refined sheen than a single, heavy application. Wiping away excess oil is critical; failure to do so can result in a sticky, uneven surface that diminishes the desired sheen.
- Wood Preparation
The condition of the wood surface prior to application directly impacts the final sheen. Thorough sanding to a fine grit ensures a smooth, even surface that reflects light uniformly. Conversely, a rough or uneven surface will scatter light, resulting in a duller, less consistent sheen. Proper filling of open-pore woods is also necessary to achieve a consistent sheen across the entire surface.
- Buffing and Polishing
The application of buffing and polishing techniques can enhance the sheen after the oil has fully cured. Gentle buffing with a soft cloth can bring out a subtle luster, while the use of specialized polishing compounds can create a higher gloss finish. The extent of buffing and polishing should be carefully controlled to avoid damaging the oil finish or creating an artificial-looking shine.
In conclusion, the achievable sheen represents a nuanced aspect of finishing wood surfaces with oil, dependent on the interplay of oil type, application technique, wood preparation, and post-application treatments. Understanding these factors enables achieving the desired aesthetic outcome, from a natural matte appearance to a subtle, refined luster, and ensures that the final finish complements the inherent beauty of the wood.
5. Application
The process of applying the oil dictates the final appearance, durability, and protective qualities of the wood finish. Proper application techniques are paramount to achieving desired outcomes and avoiding common pitfalls associated with this method.
- Surface Preparation
Thorough surface preparation is a prerequisite for successful application. Sanding to progressively finer grits removes imperfections and creates a smooth, receptive surface for the oil to penetrate. Failure to properly prepare the surface can result in uneven absorption, poor adhesion, and a compromised finish. For example, residual dust or existing finishes will impede oil penetration and result in a blotchy or uneven appearance.
- Coat Thickness and Number
Applying multiple thin coats is generally preferred over a single thick coat. Thin coats allow for better penetration and more uniform drying, minimizing the risk of tackiness or wrinkling. Each coat should be allowed to fully dry before the next is applied. The optimal number of coats depends on the wood species and the desired level of protection and sheen. Softwoods, which are more porous, typically require more coats than hardwoods.
- Application Technique
Various application methods can be employed, including brushes, cloths, and sprayers. The choice of method depends on the size and complexity of the project. Brushes are suitable for detail work and small surfaces, while cloths are ideal for applying thin, even coats and wiping away excess oil. Sprayers can be used for larger surfaces, but require careful technique to avoid runs and drips. Regardless of the method, it is crucial to apply the oil evenly and thoroughly, ensuring that all surfaces are saturated.
- Wiping and Buffing
After allowing the oil to penetrate for a specified period, typically 20-30 minutes, excess oil must be thoroughly wiped away with a clean, lint-free cloth. Failure to remove excess oil will result in a sticky, uneven finish that attracts dust and debris. Buffing the surface after the final coat has dried can further enhance the sheen and create a smoother, more refined finish. A soft cloth or a buffing pad can be used for this purpose.
In summary, the success of finishing wood with oil hinges on meticulous application techniques. From surface preparation to wiping and buffing, each step plays a critical role in achieving a durable, aesthetically pleasing finish that protects and enhances the natural beauty of the wood. Diligence in following recommended procedures ensures that the resulting finish exhibits the desired sheen, protection, and longevity.
6. Drying Time
The duration required for to fully cure following application significantly impacts the overall quality and success of the finish. The curing process involves the oxidation and polymerization of the oil, transforming it from a liquid to a solid state. Understanding the factors that influence this timeline is crucial for achieving a durable, aesthetically pleasing, and protective coating.
- Oil Type and Formulation
The specific type of oil employed directly affects the duration. Raw oil, in its unadulterated form, exhibits the longest drying times, often requiring several days or even weeks to fully cure. Boiled oil, which contains metallic driers (catalysts that accelerate the oxidation process), cures considerably faster, typically within 24-72 hours. Polymerized formulations, such as stand oil, offer intermediate drying times and enhanced durability.
- Environmental Conditions
Ambient temperature and humidity exert a profound influence on the duration. Warmer temperatures accelerate the curing process, while colder temperatures retard it. High humidity inhibits evaporation, prolonging the drying time and potentially leading to a cloudy or uneven finish. Adequate ventilation is essential to promote evaporation and ensure proper curing. In poorly ventilated spaces, drying times can be significantly extended, increasing the risk of dust contamination and tackiness.
- Application Thickness
The thickness of each applied coat is inversely proportional to the duration. Thin, evenly distributed coats dry more rapidly than thick, heavy applications. Thick coats impede oxygen penetration, hindering the oxidation process and prolonging the curing time. The application of multiple thin coats, allowing each to fully dry before applying the next, is therefore preferable for achieving a durable and visually appealing finish.
- Wood Species and Porosity
The species and porosity of the wood also contribute to variations in the required curing duration. Porous woods, such as pine, absorb oil more readily than dense hardwoods like maple, potentially resulting in faster initial drying times. However, the total curing time may be comparable, as the oil must still fully oxidize and polymerize within the wood fibers. Open-grained woods may require additional coats to achieve full saturation and protection, which can extend the overall finishing timeline.
In summary, the elapsed time required for oil to properly dry represents a critical consideration in achieving a successful wood finish. Factors ranging from the oil formulation to environmental conditions to the wood species itself all play a role. Careful attention to these variables, coupled with patience and adherence to recommended drying times, is essential for realizing the full benefits of this finishing method, ensuring both aesthetic appeal and long-term durability.
7. Safety
The process of applying oil to wood necessitates strict adherence to safety protocols due to the inherent hazards associated with the materials and procedures involved. Neglecting these precautions can result in significant risks, ranging from fire hazards to health complications.
- Spontaneous Combustion
Oil, when exposed to air on absorbent materials like rags or steel wool, can undergo spontaneous combustion. This occurs as the oil oxidizes, generating heat. In confined spaces, this heat can build up to ignition temperatures, resulting in a fire. A common scenario involves oil-soaked rags left crumpled in a pile. The folds trap heat, accelerating oxidation. The safest disposal method involves spreading the rags flat to dry in a well-ventilated area, away from combustible materials, or submerging them in water within a sealed metal container. Ignoring this risk has led to numerous fires in workshops and homes.
- Ventilation and Respiratory Hazards
The application of oil, particularly boiled formulations containing solvents, releases volatile organic compounds (VOCs) into the air. Inhalation of these VOCs can cause respiratory irritation, headaches, dizziness, and, in prolonged exposures, more serious health problems. Adequate ventilation is crucial to minimize VOC concentrations in the work area. This may involve opening windows and doors or using a mechanical ventilation system. Respiratory protection, such as a respirator equipped with an organic vapor cartridge, is advisable when working in enclosed spaces or for extended periods. Failing to provide adequate ventilation poses a significant health risk to the applicator.
- Skin Contact and Sensitization
Prolonged or repeated skin contact with oil can lead to skin irritation, dermatitis, and allergic sensitization in some individuals. The oil can strip the skin of its natural oils, causing dryness, cracking, and inflammation. Sensitization can develop over time, resulting in an allergic reaction upon subsequent exposure. Wearing protective gloves, such as nitrile or neoprene gloves, is recommended to minimize skin contact. Washing hands thoroughly with soap and water after handling oil is also essential. Ignoring these precautions can lead to chronic skin conditions and discomfort.
- Eye Protection
Splashes of oil into the eyes can cause irritation, pain, and potentially corneal damage. Eye protection, such as safety glasses or goggles, is crucial to prevent eye contact. This is particularly important when applying oil with a sprayer, as the fine mist can easily enter the eyes. In the event of eye contact, immediate flushing with copious amounts of water for at least 15 minutes is necessary, followed by seeking medical attention. Neglecting eye protection can result in temporary or permanent vision impairment.
Therefore, integrating rigorous safety protocols into every stage of the finishing process is not merely advisable but imperative. These measures are essential for protecting the health and safety of the applicator and preventing potential fire hazards. A comprehensive understanding of the risks and the corresponding preventative measures is paramount for the responsible and successful application of this traditional wood finishing technique.
Frequently Asked Questions About Finishing Wood with Oil
The following questions address common concerns and clarify misconceptions regarding this traditional wood finishing method, offering insights for achieving optimal results.
Question 1: Is is a durable finish for high-traffic surfaces like floors?
Its durability is limited compared to modern synthetic finishes. While providing adequate protection for low-traffic areas and furniture, it is not recommended for high-traffic floors subject to heavy wear and abrasion. Periodic reapplication is crucial for maintaining its protective qualities on any surface.
Question 2: How can tackiness be avoided after application?
Tackiness typically results from applying too much oil or failing to thoroughly wipe away excess. Multiple thin coats, allowing each to fully dry, are preferable. Ensure all excess oil is removed with a clean, lint-free cloth after each application. Proper ventilation is also essential for promoting drying and preventing tackiness.
Question 3: What is the difference between raw and boiled oil, and which should be used?
Raw oil is unprocessed and dries very slowly. Boiled oil contains metallic driers that accelerate the curing process. Boiled oil is generally recommended for wood finishing due to its faster drying time and more durable finish. However, always follow safety precautions due to the addition of metallic driers.
Question 4: How often should wood be re-oiled?
The frequency of reapplication depends on the wood’s exposure to environmental factors and the level of use. Surfaces that are frequently handled or exposed to moisture may require more frequent re-oiling, perhaps every few months. Generally, reapplication is recommended when the finish begins to appear dull or dry.
Question 5: Can this method be applied over existing finishes like varnish or polyurethane?
It generally cannot be applied successfully over existing film-forming finishes like varnish or polyurethane. It penetrates the wood fibers directly, requiring a bare wood surface. Existing finishes must be completely removed through sanding or chemical stripping before application. Applying oil over a sealed surface will result in poor adhesion and an unsatisfactory finish.
Question 6: How should oil-soaked rags be properly disposed of to prevent spontaneous combustion?
Oil-soaked rags pose a significant fire hazard due to spontaneous combustion. The safest disposal method involves spreading the rags flat to dry outdoors, away from flammable materials. Alternatively, rags can be submerged in water within a sealed metal container. Discarding rags in a pile is highly discouraged due to the risk of heat buildup and ignition.
Understanding these answers clarifies the nuances of working with this method, enabling informed decisions and responsible application. Proper execution enhances the wood’s natural beauty while providing lasting protection.
The following section outlines advanced techniques and specialized applications, offering further insights for achieving professional-grade results.
Concluding Remarks on Wood Finishing with a Drying Oil
This exploration has detailed the multifaceted aspects of finishing wood with oil. Key points encompassed the preparation process, application techniques, safety considerations, and the factors influencing drying time and resulting sheen. The inherent limitations of this method, particularly regarding durability compared to synthetic alternatives, were also addressed. Understanding these parameters is crucial for informed decision-making and successful execution.
The information presented serves as a foundation for responsible application. Diligence in adhering to recommended practices ensures both the longevity and aesthetic appeal of treated wood surfaces. While this technique offers a traditional approach to wood preservation, a thorough comprehension of its properties and potential hazards remains paramount for achieving optimal results and safeguarding against risks.


