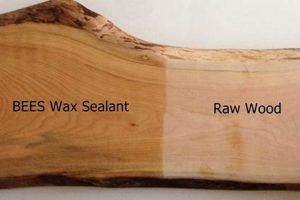
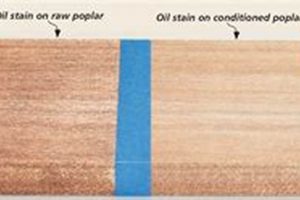
The process of applying a protective or decorative coating to cedar surfaces enhances their longevity and aesthetic appeal. This procedure typically involves preparation, application of the chosen product, and subsequent curing or drying. For example, applying a clear coat sealant protects cedar against moisture damage.
Properly treating cedar offers several advantages. It safeguards against environmental elements, reduces the likelihood of warping or cracking, and can accentuate the wood’s natural grain and color. Historically, methods for preserving cedar have evolved from simple oil treatments to sophisticated chemical formulations, reflecting advancements in material science and preservation techniques.
The following sections will detail specific techniques, product options, and essential considerations for achieving optimal results. This includes surface preparation, sealant selection, application methods, and maintenance recommendations.
Essential Considerations for Cedar Treatment
The following guidelines offer critical advice for achieving a durable and aesthetically pleasing finish on cedar wood.
Tip 1: Surface Preparation is Paramount: Thoroughly clean and sand the cedar surface to remove any dirt, mill glaze, or existing coatings. This ensures proper adhesion of the chosen finish.
Tip 2: Select the Appropriate Product: Consider the environment and intended use of the cedar. Penetrating oils, stains, and clear sealants offer varying degrees of protection against moisture, UV radiation, and fungal growth.
Tip 3: Perform a Test Application: Before applying the finish to the entire project, test it on a small, inconspicuous area. This allows evaluation of the color, penetration, and overall appearance.
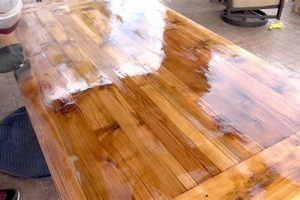
Tip 4: Apply Thin, Even Coats: Avoid applying excessive amounts of the finish at once. Multiple thin coats are preferable to a single thick coat, which can lead to runs, drips, and uneven drying.
Tip 5: Allow Adequate Drying Time: Follow the manufacturer’s recommendations for drying times between coats and before exposing the finished cedar to the elements. Insufficient drying can compromise the integrity of the finish.
Tip 6: Address End Grain Properly: Cedar end grain is highly absorbent. Apply extra coats of finish to these areas to prevent moisture intrusion and potential splitting.
These tips are crucial for ensuring longevity and preserving the natural beauty of cedar. Adherence to these guidelines will contribute significantly to a successful outcome.
The subsequent sections will delve deeper into specific finishing products and maintenance strategies for preserving treated cedar.
1. Surface Preparation
The effectiveness of any finishing treatment on cedar wood is inextricably linked to the quality of the initial surface preparation. Imperfect preparation invariably leads to compromised results, regardless of the finish product utilized. Consider, for instance, applying a sealant over a surface contaminated with mill glaze. The sealant’s adhesion would be severely impaired, resulting in premature peeling and rendering the protective coating ineffective. Therefore, the cause-and-effect relationship is clear: inadequate preparation causes finish failure. Surface Preparation is not merely a preliminary step; it is a fundamental component of the entire finishing process.
Proper surface preparation for cedar necessitates the removal of any existing coatings, dirt, debris, and, crucially, mill glaze. Mill glaze, a shiny, compressed layer of wood fibers resulting from the milling process, obstructs the penetration of finishes and hinders proper bonding. Sanding, typically with progressively finer grits of sandpaper, is the standard method for removing mill glaze and creating a receptive surface profile. Cleaning with appropriate solvents removes oils or contaminants that could interfere with finish adhesion. The practical application of this understanding is evident in long-lasting, aesthetically pleasing finished cedar projects, where attention to surface detail has ensured optimal finish performance.
In summary, surface preparation stands as a critical determinant in the success of finishing cedar. Its impact on adhesion, penetration, and overall finish durability necessitates meticulous attention to detail. Overlooking this stage presents a significant challenge to achieving long-lasting and visually appealing results. Surface preparation’s importance is a cornerstone skill in properly finishing cedar wood.
2. Product Selection
The choice of finishing product significantly impacts the longevity, appearance, and protective qualities imparted to cedar wood. Careful consideration must be given to the specific properties of each product to ensure compatibility with cedar and suitability for the intended application.
- Penetrating Oils
Penetrating oils, such as linseed or tung oil, saturate the wood fibers, enhancing natural grain and providing a degree of water resistance. These oils offer a natural look but generally require more frequent reapplication compared to other finishes. Their use is particularly effective for interior applications where a low-gloss, natural aesthetic is desired.
- Stains
Stains alter the color of cedar while allowing the wood grain to remain visible. Oil-based stains typically provide better penetration and durability than water-based alternatives. When selecting a stain, UV resistance is a critical factor, especially for exterior applications, to prevent fading and discoloration caused by sunlight exposure.
- Clear Sealants
Clear sealants, including varnishes and polyurethanes, form a protective film over the cedar surface. These finishes offer excellent water resistance and protection against abrasion. However, they can sometimes impart a plastic-like appearance. Selecting a sealant with UV inhibitors is essential for exterior use to prevent yellowing and cracking due to sun exposure.
- Water Repellents/Preservatives
These specialized products are designed to protect cedar from moisture damage, rot, and insect infestation. They often contain fungicides and insecticides. Water repellents and preservatives are particularly important for cedar used in ground contact or exposed to consistently damp conditions, extending the lifespan of the wood in challenging environments.
The proper selection is vital in achieving long-lasting protection and aesthetic enhancement. Each product category offers a distinct set of characteristics that must be carefully evaluated in relation to the specific requirements of the cedar project. The performance will depend on the product selected.
3. Application Technique
The successful execution of finishing treatments on cedar wood hinges significantly on the application technique employed. The manner in which a finish is applied directly influences its penetration, uniformity, and overall protective efficacy. Inadequate application techniques frequently lead to issues such as uneven coverage, blistering, or premature finish failure. For example, applying a thick coat of stain to cedar with the assumption that it will enhance the color intensity can result in an uneven finish that is prone to cracking as the underlying wood is unable to properly breathe and dry. Proper application is, therefore, a critical component in the successful process.
The selection of appropriate application tools and methods is crucial. Brushes, sprayers, and cloths each offer distinct advantages depending on the type of finish being used and the desired outcome. Brushing is well-suited for applying penetrating oils and stains to highlight the wood grain, while spraying can provide a more uniform and efficient application of sealants. Regardless of the chosen method, the application must be performed with consistent strokes or passes, maintaining a wet edge to prevent lap marks. Real-world examples of proper application include skilled carpenters who carefully brush penetrating oil into cedar siding, ensuring the product is worked into the wood grain to create a durable, long-lasting finish. A careless application of these same products can result in runs or blotches. Proper knowledge of these application choices is essential.
In summary, achieving a durable and aesthetically pleasing finish on cedar wood necessitates a comprehensive understanding of application techniques. Paying close attention to the specific requirements of each finish product and employing appropriate tools and methods are essential. Overlooking this crucial aspect can result in a compromised finish with reduced longevity and diminished aesthetic appeal. The expertise on how the product is used is vital to the cedars integrity.
4. Drying Conditions
The ambient environment during the drying phase exerts a significant influence on the final outcome of finishing cedar wood. Suboptimal conditions can impede proper curing, resulting in a compromised finish. Elevated humidity levels, for instance, retard the evaporation of solvents from oil-based finishes, prolonging drying times and potentially causing clouding or a tacky surface. Conversely, excessively high temperatures can lead to rapid surface drying, trapping solvents within the finish layer and causing blistering or cracking. Therefore, controlled environmental conditions are essential for achieving a durable and aesthetically pleasing finish.
The ideal drying environment for most cedar finishes typically involves moderate temperatures (between 65F and 75F) and moderate humidity levels (below 70%). Adequate ventilation is also crucial to facilitate solvent evaporation. For instance, when applying a polyurethane coating to cedar furniture, maintaining a temperature-controlled workshop with proper air circulation ensures that the finish cures uniformly and achieves its maximum hardness and clarity. Deviations from these recommended conditions often lead to avoidable problems that impact the finish’s performance and longevity. Examples of this include a woodworker spraying a lacquer finish on a humid day leading to ‘blushing’ of the finish; or oil based paints that are allowed to dry inside of a cold garage in the winter resulting in days of cure time before hardening.
In summary, the environmental drying conditions are an indispensable factor in successfully finishing cedar wood. Meticulous attention to temperature, humidity, and ventilation is paramount. Failure to manage these factors can undermine the entire finishing process, resulting in a substandard outcome with reduced durability and compromised aesthetic appeal. Proper drying conditions can provide the best results of a quality finish.
5. Maintenance Schedule
The longevity and sustained aesthetic quality of finished cedar wood are directly contingent upon the implementation of a consistent maintenance schedule. The absence of regular maintenance invariably leads to deterioration of the finish, exposing the underlying wood to environmental stressors and accelerating the degradation process. For instance, exterior cedar siding left unmaintained will exhibit cracking, peeling, and discoloration over time, necessitating costly repairs or replacement. Thus, a proactive maintenance schedule is an integral component of ensuring the long-term success of finishing cedar.
A comprehensive maintenance schedule for finished cedar typically includes periodic cleaning to remove dirt, mildew, and other surface contaminants. Mild detergents and soft-bristled brushes are recommended to avoid damaging the finish. Furthermore, regular inspections for signs of wear, such as scratches, fading, or cracking, allow for timely repairs and touch-ups. Depending on the type of finish and the environmental conditions, reapplication of the finish may be necessary every few years to maintain optimal protection. An illustrative example is the re-staining of a cedar deck every two to three years to preserve its color and water resistance.
In summary, a diligent maintenance schedule is not merely an optional addendum but a fundamental requirement for preserving the integrity and appearance of finished cedar wood. Its impact on finish durability and the wood’s overall lifespan necessitates a proactive and consistent approach. Overlooking this crucial aspect will inevitably result in a compromised finish with diminished protective properties and reduced aesthetic appeal. The maintenance schedule should be viewed as an indispensable tool in maximizing the value and longevity of finished cedar projects.
Frequently Asked Questions about Finishing Cedar Wood
This section addresses common queries concerning the proper techniques and considerations for achieving optimal results when finishing cedar wood.
Question 1: Is sanding cedar necessary before applying a finish?
Sanding is generally required to remove mill glaze, surface imperfections, and create a profile conducive to finish adhesion. The appropriate grit sequence depends on the condition of the wood.
Question 2: What type of finish is best suited for outdoor cedar projects?
Finishes containing UV inhibitors, such as marine-grade varnishes or specialized exterior stains, are recommended for outdoor applications. These products protect against sun damage and weathering.
Question 3: How often should cedar siding be refinished?
Refinishing frequency depends on factors such as climate, exposure, and the type of finish applied. A visual inspection for signs of wear, such as fading or cracking, should be conducted annually to determine if reapplication is necessary.
Question 4: Can water-based finishes be used on cedar?
Water-based finishes can be used on cedar, but they may raise the grain, requiring additional sanding. Ensure the product is specifically formulated for exterior wood applications if used outdoors.
Question 5: Is a primer necessary before applying a topcoat to cedar?
The necessity of a primer depends on the type of topcoat and the desired level of protection. Some primers can enhance adhesion and provide additional moisture resistance, particularly for exterior projects.
Question 6: How can tannin bleed be prevented when finishing cedar?
Tannin bleed, the discoloration caused by the migration of tannins to the surface, can be minimized by applying a tannin-blocking primer before the topcoat. Proper surface preparation and the selection of compatible finishes are also crucial.
These FAQs offer a foundational understanding of key considerations when finishing cedar wood. Adherence to these guidelines will contribute to a more successful and durable outcome.
The subsequent section will explore specific product recommendations and application techniques in greater detail.
Achieving Enduring Beauty and Protection
This exposition has outlined the crucial considerations inherent in the process of imparting a durable and aesthetically pleasing finish to cedar wood. From meticulous surface preparation and the discerning selection of appropriate products to the implementation of skillful application techniques, optimal drying conditions, and a consistent maintenance schedule, each element is integral to the long-term preservation of cedar’s integrity and visual appeal. Mastery of these principles is paramount for professionals and discerning homeowners alike.
The principles of how to finish cedar wood, when diligently applied, transcend mere surface treatment. They represent an investment in the enduring value of this exceptional material, ensuring its resilience against the ravages of time and the environment. Consistent vigilance and adherence to these best practices will safeguard the beauty and longevity of cedar projects for years to come.


