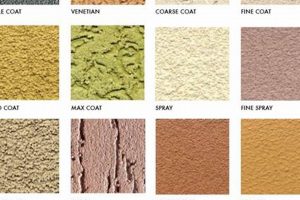
This wall texture is characterized by its subtle, flattened peaks, creating a gently uneven surface. It is achieved by applying drywall mud to the wall and then lightly flattening the raised texture with a wide knife, creating a pattern of “knocked down” peaks. The resulting effect is less aggressive than heavily textured surfaces, providing visual interest without being overly distracting.
A key advantage of this surface treatment is its ability to conceal minor imperfections in the underlying drywall. The gentle texture scatters light, minimizing the visibility of seams or uneven areas. It offers a balance between visual appeal and ease of maintenance, often requiring less effort to clean and repair compared to more intricate textures. Historically, it became popular as a more streamlined alternative to heavily stippled or swirled finishes, reflecting a trend towards simpler interior aesthetics.
The subsequent sections will delve into specific techniques for achieving this textured surface, appropriate tools and materials, preparation procedures, potential challenges, and suitable applications within various interior design styles.
Tips for Achieving an Excellent Result
The following guidance aims to facilitate the successful application of this wall surface texture. Careful planning and execution are essential for achieving a professional and aesthetically pleasing outcome.
Tip 1: Priming is Paramount: Prior to applying any texture compound, the drywall surface must be properly primed. Use a high-quality drywall primer to ensure proper adhesion and prevent the texture from drying too quickly, which can lead to cracking.
Tip 2: Consistent Mud Consistency: Maintain a uniform consistency in the drywall mud. Slightly thinned mud is typically preferable for spraying. Test the consistency before application to ensure even distribution and prevent nozzle clogging.
Tip 3: Spray Application Technique: When employing a hopper gun, practice the spray pattern on a scrap piece of drywall. Overlap each pass slightly to ensure consistent texture coverage and avoid thin spots.
Tip 4: Timing the Knockdown: The timing of the knockdown is crucial. Allow the texture to set for a short period, typically 15-30 minutes, before lightly flattening the peaks. Test a small area to determine the optimal timing, as environmental conditions can affect drying time.
Tip 5: Use a Clean, Wide Knife: Employ a wide, clean taping knife for the knockdown process. A 10-12 inch knife is generally recommended. Wipe the knife clean frequently to prevent mud buildup and ensure a smooth, consistent finish.
Tip 6: Light and Even Pressure: Apply light and even pressure when knocking down the texture. Avoid pressing too hard, which can flatten the texture completely. The goal is to subtly flatten the peaks, not to create a smooth surface.
Tip 7: Feather the Edges: Pay close attention to the edges of the textured area. Feather the edges to blend seamlessly with adjacent surfaces. This is particularly important when patching or repairing existing surfaces.
These tips highlight the importance of preparation, consistency, and technique. Adhering to these guidelines will greatly increase the likelihood of achieving a professional-looking and durable wall surface.
The following sections will cover troubleshooting common issues and explore advanced application techniques.
1. Texture Density
Texture density is a crucial determinant of the final appearance and effectiveness of the knockdown wall surface treatment. It refers to the amount of texture material applied per unit area of the wall. Variations in texture density directly influence the size, shape, and prominence of the resulting flattened peaks. Higher density results in more numerous and closely spaced peaks, which, when knocked down, create a busier, more pronounced texture. Conversely, lower density yields fewer and more widely spaced peaks, resulting in a subtler and less defined surface. For example, a restaurant might choose a lower density for a sophisticated, understated atmosphere, while a family room might utilize a higher density for a more visually engaging and forgiving surface that hides imperfections effectively. The selection of appropriate density depends heavily on the desired aesthetic and the functional requirements of the space.
The relationship between texture density and knockdown timing is also significant. A higher density application typically requires a shorter set time before knockdown, as the increased volume of material slows the drying process. If the knockdown is delayed, the peaks may become too firm, resulting in a less uniform and more difficult flattening process. Conversely, a lower density application may require a slightly longer set time to prevent the peaks from collapsing under the pressure of the knockdown knife. Furthermore, the appropriate tool selection, such as nozzle size for hopper guns or trowel application techniques, directly impacts the ability to achieve the intended texture density uniformly across the wall surface.
In summary, texture density is a foundational element in achieving a successful and visually appealing knockdown wall texture. Careful consideration of the desired aesthetic, application technique, and environmental conditions is necessary to determine the optimal density. Improper density can lead to an uneven, unattractive finish that fails to meet the functional or aesthetic requirements of the space. Understanding and controlling texture density is, therefore, essential for professionals and homeowners alike when working with this popular wall surface treatment.
2. Application Technique
The application technique directly dictates the final appearance of the knockdown wall texture. Varied methods, such as hopper guns, trowels, or even paint rollers, each impart a distinct character to the underlying pattern. Using a hopper gun, for example, involves spraying the drywall mud onto the wall, allowing for relatively rapid coverage and a somewhat randomized peak formation. The size of the nozzle and the air pressure significantly influence the size and distribution of these peaks. In contrast, a trowel application relies on the manual spreading and manipulation of the mud, affording greater control over the texture’s pattern and density. This technique is often chosen when a more customized or artistic effect is desired. The chosen application technique, therefore, serves as the primary determinant of the raw texture before the “knockdown” process itself.
The selection of an application technique must also consider the scale of the project and the experience level of the applicator. Hopper guns are efficient for larger areas but require practice to master consistent coverage and prevent runs or inconsistencies. Trowel applications, while offering more control, are significantly more time-consuming and demand a higher degree of skill to achieve a uniform and aesthetically pleasing result. In a residential renovation, a homeowner might opt for a simple roller application to create a subtle texture before knocking it down, while a professional contractor might utilize a hopper gun for efficiency in a larger commercial setting. Consequently, the application method is not merely a matter of preference but a critical factor affecting the project’s timeline, cost, and ultimate quality.
In conclusion, the application technique forms an integral component of the knockdown finish. It dictates the initial texture characteristics, influences the speed and ease of the process, and ultimately determines the final aesthetic outcome. Understanding the nuances of each technique is essential for achieving the desired result and ensuring a successful knockdown finish that enhances the visual appeal of the space. Ignoring the influence of the application method can lead to undesirable textures, increased project costs, and ultimately, a less satisfactory finished product.
3. Mud Consistency
The consistency of the drywall mud is paramount to achieving a successful knockdown wall finish. Inadequate or inappropriate mud consistency directly impacts the texture’s formation, adhesion, and subsequent workability during the knockdown process. If the mud is too thick, it may not spray or spread evenly, leading to an uneven texture with prominent ridges and a difficult knockdown. Conversely, if the mud is too thin, it will run or sag on the wall, creating a lack of definition and a weak bond, resulting in a texture that easily flakes or crumbles. For instance, when using a hopper gun, overly thick mud will clog the nozzle, while overly thin mud will produce a splattered and inconsistent pattern. Achieving the appropriate consistency is, therefore, a foundational step that directly influences the overall quality and durability of the final wall finish.
The optimal mud consistency varies depending on the chosen application technique. When using a hopper gun, a slightly thinned mud is typically preferred to ensure smooth spraying and even distribution. With trowel applications, a slightly thicker mud may be desirable to maintain the peaks’ shape before knockdown. Regardless of the technique, careful mixing and testing are essential. This involves gradually adding water to the dry mud mix, thoroughly blending until a smooth, creamy consistency is achieved. Before application, the mud should be tested on a small, inconspicuous area to verify its workability and adhesion. Real-world examples demonstrate that professional drywall contractors routinely adjust the mud consistency based on environmental conditions, such as temperature and humidity, which can significantly affect the drying time and overall performance of the mud.
In summary, mud consistency is a critical determinant of the quality and longevity of a knockdown wall finish. It dictates the ease of application, the texture’s appearance, and the mud’s ability to adhere properly to the wall surface. While the ideal consistency may vary depending on the specific application technique and environmental conditions, careful attention to mixing, testing, and adjustment is essential for achieving a professional and lasting result. Failure to address mud consistency issues can lead to a range of problems, including an uneven texture, poor adhesion, and ultimately, a visually unappealing wall surface.
4. Knockdown Timing
Knockdown timing is a critical parameter within the process of achieving a knockdown wall finish. It refers to the specific interval between the application of the texture material and the subsequent flattening of the raised peaks. This time window is not fixed; its duration depends on several variables, including the ambient temperature, humidity levels, the type of texture material used, and the thickness of its application. Incorrect timing, whether too early or too late, invariably results in an unsatisfactory final appearance. Premature flattening leads to a smearing effect, diminishing the texture and creating a flattened, undefined surface. Conversely, delayed flattening results in hardened peaks that resist the knockdown knife, producing a jagged, uneven finish.
The significance of appropriate timing is evident in various application scenarios. For example, in a dry climate, the texture material will set more rapidly, necessitating a quicker knockdown. Conversely, in humid conditions, the material will remain pliable for a longer period, extending the acceptable timing window. Professional drywall installers meticulously monitor these conditions and conduct small-scale tests to determine the optimal moment for the knockdown process. In practical applications, failing to adhere to proper timing can lead to increased labor costs due to rework and material waste. The texture may require complete removal and reapplication, incurring additional expenses.
In conclusion, knockdown timing represents a crucial control point in achieving a desired wall texture. It directly influences the aesthetic quality of the finish and significantly impacts project efficiency and cost-effectiveness. By understanding the factors that affect setting time and employing careful monitoring techniques, it is possible to consistently produce a well-executed knockdown wall surface. An appreciation of knockdown timing is thus essential for both professional contractors and homeowners seeking to achieve a high-quality interior finish.
5. Surface Preparation
Adequate surface preparation is foundational to the successful application and longevity of any wall texture, including the knockdown finish. Properly preparing the substrate ensures optimal adhesion, minimizes imperfections, and contributes to a uniform and aesthetically pleasing result. Neglecting this essential step can lead to a range of issues, from texture delamination to uneven patterns, ultimately compromising the quality and durability of the finished surface.
- Cleaning and Degreasing
The removal of dust, dirt, grease, and other contaminants is paramount. These substances can interfere with the adhesion of the texture material, leading to peeling or bubbling. For instance, in a kitchen environment, grease buildup must be thoroughly removed using appropriate cleaning agents prior to applying the texture. Failure to do so can result in a compromised bond and eventual failure of the finish.
- Repairing Imperfections
Addressing imperfections such as holes, cracks, and unevenness is crucial for achieving a smooth and consistent textured surface. Filling these imperfections with joint compound and sanding them flush with the surrounding wall creates a uniform base for the texture. If significant damage is present, the drywall may need to be replaced. Untreated imperfections will telegraph through the texture, detracting from the overall aesthetic.
- Priming the Surface
Applying a primer is essential for promoting adhesion and creating a uniform surface for the texture material. Primer seals the existing surface, preventing excessive absorption of moisture from the texture compound, which can lead to cracking or uneven drying. Moreover, tinted primers can help to conceal underlying colors and ensure the texture color is consistent. For example, applying a primer before a knockdown finish helps ensure the texture adheres properly and has a uniform look.
- Ensuring Drywall Integrity
Before applying texture, the structural integrity of the drywall must be verified. Loose, damaged, or poorly secured drywall will not provide a stable base for the texture, leading to cracking and potential detachment. Securing loose drywall with additional screws or replacing damaged sections is essential for ensuring a durable and long-lasting finish. A solid foundation is crucial for the success of the wall texture.
In conclusion, meticulous surface preparation is not merely a preliminary step but an integral component of achieving a high-quality knockdown wall finish. By ensuring a clean, sound, and properly primed surface, one significantly increases the likelihood of a successful application, a visually appealing result, and a durable and long-lasting finish. The time and effort invested in surface preparation are invariably rewarded with a superior outcome.
6. Tool Selection
The achievement of a desired knockdown wall finish is inextricably linked to the selection of appropriate tools. The choice of tools directly influences the texture’s application, manipulation, and ultimately, its aesthetic characteristics. A hopper gun, for example, allows for the rapid and uniform application of texture material over large areas, but necessitates the use of specific nozzle sizes to control the pattern and density. Conversely, a trowel offers greater control and artistic freedom, but demands a different skill set and is more suited for smaller areas or custom designs. The consequence of mismatched tool selection is often an uneven, inconsistent, or visually unappealing finish that fails to meet the intended design objectives.
Furthermore, the knockdown process itself requires specialized tools. The width and flexibility of the knockdown knife directly affect the uniformity and smoothness of the flattened texture. A wide, flexible knife allows for the gentle flattening of peaks over a larger area, minimizing ridges and creating a more seamless effect. In contrast, a narrow or rigid knife can result in a choppy or uneven surface. The maintenance of these tools is equally important; a clean and well-maintained knife ensures consistent performance and prevents the transfer of debris or imperfections to the finished surface. A practical example illustrates this point: a contractor attempting to use a worn or damaged knockdown knife will likely encounter increased resistance, leading to an uneven texture and a more labor-intensive process.
In conclusion, tool selection is not a peripheral consideration but a critical factor in determining the success or failure of a knockdown wall finish. The appropriate tools, coupled with proper technique and maintenance, enable the creation of a consistent, visually appealing, and durable wall texture. Understanding the relationship between tool selection and the final aesthetic outcome is therefore essential for both professional contractors and homeowners seeking to achieve a high-quality interior finish. Ignoring this crucial aspect can lead to increased project costs, wasted materials, and ultimately, a less than satisfactory result.
7. Visual Appeal
Visual appeal is a primary consideration in interior design, and the selection of a wall finish is a critical component in achieving a desired aesthetic. A textured wall, specifically one employing the knockdown technique, offers a multifaceted approach to enhancing the visual characteristics of a space. The strategic application of texture can contribute depth, dimension, and a subtle elegance that a flat, unadorned surface often lacks.
- Subtle Texture and Light Play
The gently uneven surface created by the knockdown finish diffuses light in a way that introduces visual interest without overwhelming the space. This subtle play of light and shadow can soften the harshness of direct light and create a more inviting ambiance. In rooms with ample natural light, the textured surface can enhance the interplay between light and shadow, creating a dynamic and visually stimulating environment. Conversely, in spaces with limited natural light, the texture can add depth and prevent the walls from appearing flat and lifeless.
- Hiding Imperfections
A practical benefit of this textured finish is its ability to conceal minor imperfections in the underlying drywall. Small dents, scratches, or unevenness in the wall surface are effectively masked by the textured pattern. This makes it an attractive option for older homes or spaces where achieving a perfectly smooth wall surface is challenging or cost-prohibitive. The knockdown finish provides a forgiving surface that reduces the need for extensive repairs or skim coating, while still presenting a visually appealing result.
- Versatility in Design Styles
The knockdown finish’s adaptability to various interior design styles is a significant contributor to its widespread popularity. From rustic and traditional to contemporary and minimalist, the texture can be integrated seamlessly into diverse design schemes. The texture’s density and the color palette employed can be adjusted to complement the overall aesthetic of the space. A lightly textured wall in a neutral color can enhance a minimalist design, while a more pronounced texture in a warmer hue can add character to a rustic interior.
- Creating Depth and Dimension
Beyond concealing imperfections, this finish effectively enhances the depth and dimension of a room. The subtle variations in the surface create a sense of tactile richness, making the walls appear more dynamic and engaging. This is particularly valuable in smaller spaces, where adding visual depth can prevent the room from feeling cramped or confined. The texture draws the eye and invites exploration, enhancing the overall sensory experience of the interior.
The visual appeal is an important reason for a knockdown finish. The combination of subtle texture, the ability to conceal imperfections, design versatility, and its capacity to enhance depth, all contribute to the enduring appeal of the knockdown finish as a surface treatment.
Frequently Asked Questions
The following questions address common concerns and provide clarification regarding the application, maintenance, and characteristics of knockdown wall textures.
Question 1: What distinguishes a knockdown finish from other wall textures?
This particular finish is defined by flattened peaks, creating a subtle, stucco-like appearance. Unlike orange peel or popcorn textures, which feature pronounced bumps or protrusions, a knockdown surface is relatively smooth to the touch, with gentle undulations.
Question 2: Is a knockdown finish suitable for all rooms in a home?
This texture is generally appropriate for most interior spaces, including living rooms, bedrooms, and hallways. However, it may not be ideal for high-moisture environments like bathrooms or kitchens, unless properly sealed to prevent water damage.
Question 3: Can a knockdown finish be applied over existing textured walls?
While it is possible, it is generally recommended to smooth the existing texture first. Applying a new texture over an uneven surface can result in an inconsistent and unattractive finish.
Question 4: What are the maintenance requirements for knockdown walls?
This textured surface is relatively easy to maintain. Regular dusting with a soft brush or vacuum attachment is typically sufficient. Minor scuffs or marks can often be removed with a damp cloth.
Question 5: Is it possible to repair damaged areas on a knockdown wall?
Yes, repairs are feasible, but achieving a seamless match can be challenging. The repaired area may be slightly visible, depending on the skill of the person performing the repair and the original texture’s characteristics.
Question 6: Does the knockdown finish affect the acoustics of a room?
This surface can slightly improve the acoustics of a room by diffusing sound waves. However, the effect is generally minimal compared to dedicated acoustic treatments.
These answers provide a foundational understanding of the key considerations related to knockdown finishes. For specific project inquiries, consulting with a qualified drywall professional is recommended.
The subsequent article sections will delve into the economic aspects and the impact of knock down finish on property values.
Conclusion
The preceding exploration has detailed the multifaceted aspects of a knockdown finish on walls. From application techniques and material considerations to aesthetic implications and practical considerations, a comprehensive understanding of this surface treatment is essential for achieving optimal results. This analysis has underscored the importance of meticulous preparation, precise execution, and informed decision-making in the creation of visually appealing and durable wall surfaces.
As interior design trends evolve, the selection of wall finishes remains a critical factor in shaping the ambiance and functionality of interior spaces. The knockdown finish, with its subtle texture and versatility, offers a compelling alternative to traditional smooth walls, yet requires careful planning and skillful implementation. Further research and professional consultation are encouraged to ensure the successful integration of this finish into diverse architectural settings, maximizing its aesthetic and practical benefits.


