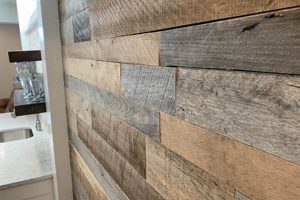
This construction approach involves using plywood as the final, visible surface of interior walls. The material, typically manufactured from thin layers of wood veneer glued together, offers a distinct aesthetic and functional alternative to conventional drywall or plaster finishes. It represents a departure from concealing the structural elements of a wall, instead exposing the inherent texture and characteristics of the wood itself as a design feature.
Employing wood-based panels in this manner offers several advantages. Beyond its visual appeal, the material provides enhanced durability and impact resistance compared to traditional wall coverings. In certain applications, it can contribute to improved sound dampening and thermal insulation. Historically, the utilization of exposed wood paneling reflects both practical considerations, such as cost-effectiveness and ease of installation, and aesthetic preferences, ranging from rustic to contemporary styles.
The subsequent discussion will delve into the specific grades and types of plywood suitable for this application, explore various finishing techniques that can enhance its appearance and longevity, and examine the installation methods necessary to achieve a professional and aesthetically pleasing result. Furthermore, considerations regarding cost, maintenance, and design trends will be addressed to provide a holistic understanding of this construction and design choice.
Plywood Finish Walls
Achieving a successful implementation of this technique requires careful consideration of several factors. The following guidelines offer practical advice for optimal results in both design and execution.
Tip 1: Grade Selection is Critical: The grade of plywood directly impacts the final aesthetic. For visible surfaces, opt for A-grade or cabinet-grade plywood, minimizing knots, voids, and imperfections. Lower grades, while more economical, necessitate extensive filling and sanding, potentially compromising the desired visual outcome.
Tip 2: Consider Veneer Core Options: Plywood comes in various core constructions, including veneer core, MDF core, and particleboard core. Veneer core provides superior screw-holding ability and resistance to sagging, making it preferable for wall applications. MDF and particleboard cores, while denser, are more susceptible to moisture damage and less receptive to fasteners.
Tip 3: Proper Acclimation is Essential: Before installation, allow the plywood to acclimate to the ambient humidity of the installation environment for several days. This minimizes expansion and contraction after installation, preventing warping, buckling, and joint separation.
Tip 4: Edge Treatment Matters: Exposed plywood edges can detract from the overall appearance. Consider edge banding, trim, or a carefully applied finish to conceal the plies and create a cleaner, more refined look. Mitered corners offer a seamless transition, while bullnose edges provide a softer, more contemporary profile.
Tip 5: Employ Appropriate Fasteners: Select fasteners that are compatible with both the plywood and the wall framing. Ring-shank nails or screws offer superior holding power compared to smooth-shank fasteners. Pre-drilling pilot holes minimizes the risk of splitting the plywood, especially near the edges.
Tip 6: Account for Expansion and Contraction: When installing plywood panels, leave a small expansion gap (approximately 1/8 inch) between panels and at the perimeter of the wall. This allows for natural movement without creating stress or distortion.
Tip 7: Finishing Techniques Enhance Durability: Applying a protective finish is crucial for prolonging the lifespan and maintaining the appearance of the plywood. Options include clear coats, stains, paints, and varnishes. Always test the finish on a sample piece of plywood to ensure compatibility and desired color.
These key points underscore the importance of material selection, preparation, and installation techniques. Paying close attention to these details ensures a durable and visually appealing result that showcases the inherent beauty of the wood.
The subsequent section will explore design considerations for this application, including panel layout, joint detailing, and integration with other architectural elements.
1. Grade and species selection
The grade and species of plywood exert a significant influence on the final outcome of “plywood finish walls.” Plywood grade denotes the visual quality and surface characteristics of the veneer, directly impacting the aesthetic appeal of the wall. Higher grades, such as A or cabinet-grade, exhibit minimal knots, patches, or other imperfections, rendering them suitable for applications where a clean and uniform appearance is desired. Conversely, lower grades, while structurally sound, often contain numerous blemishes that may detract from the overall aesthetic. For instance, utilizing a C-grade plywood in a high-end residential setting would likely result in an undesirable visual outcome due to the presence of visible defects.
Species selection plays a crucial role in determining the color, grain pattern, and hardness of the plywood. Hardwood species, such as birch or maple, offer a fine grain and consistent color, lending themselves well to contemporary designs. Softwood species, like pine or fir, typically exhibit a more pronounced grain pattern and can contribute to a rustic or informal aesthetic. The choice of species also affects the plywood’s ability to accept stains and finishes. Lighter-colored woods, such as maple, readily accept stains, allowing for a wide range of color customization. Darker woods, such as mahogany, may require specialized staining techniques to achieve the desired tone. As an illustration, a designer seeking a warm and inviting aesthetic might select a birch plywood with a light stain, while an architect aiming for a modern and minimalist look might opt for a maple plywood with a clear finish.
The interplay between grade and species underscores the importance of careful consideration when selecting plywood for finish walls. Neglecting to account for these factors can lead to unsatisfactory aesthetic results and potentially compromise the long-term durability of the installation. By aligning the grade and species with the intended design and functional requirements, a successful and visually appealing plywood wall finish can be achieved. Selecting the appropriate grade and wood type depends on the project’s budget. This also ensures longevity against regular wear and tear.
2. Fastener type
The selection of fastener type is a critical determinant of the structural integrity and aesthetic quality of plywood finish walls. The primary function of fasteners is to securely attach the plywood panels to the underlying framing, ensuring stability and preventing movement that could lead to warping, cracking, or joint separation. Inadequate fastener selection can result in a compromised installation, requiring costly repairs or replacements. For instance, using nails with insufficient shank length may lead to the plywood detaching from the framing over time, particularly in environments with fluctuating humidity levels. Conversely, employing excessively large fasteners can cause the plywood to split or crack, diminishing its structural strength and aesthetic appeal. Thus, a nuanced understanding of fastener types and their suitability for plywood finish wall applications is essential.
Different fastener types offer varying degrees of holding power, shear strength, and corrosion resistance, each with its own advantages and disadvantages in the context of plywood finish walls. Screws, for example, generally provide superior holding power compared to nails, due to their threaded shank which allows them to grip the framing more securely. Ring-shank nails, featuring annular rings along their shank, offer improved holding power compared to smooth-shank nails. In applications where aesthetics are paramount, countersinking screws and filling the resulting holes with wood putty can create a seamless and visually appealing finish. The choice of fastener material is also significant. Galvanized or stainless steel fasteners are recommended for applications in damp or humid environments to prevent corrosion, which can weaken the connection and stain the plywood. The spacing and pattern of fasteners are equally important. Insufficient fastener spacing can lead to panel bowing or movement, while excessive spacing can create unnecessary holes and weaken the plywood.
Ultimately, the selection of fastener type should be guided by factors such as the thickness and density of the plywood, the type of framing material, the environmental conditions, and the desired aesthetic outcome. Consulting with a qualified construction professional or reviewing relevant building codes and standards can provide valuable guidance in making the appropriate fastener selection. A well-informed decision regarding fastener type is paramount for ensuring the long-term structural integrity, visual appeal, and overall success of any plywood finish wall project. Using the wrong fastener can reduce the cost but cause the structure to fail over time.
3. Seam treatment options
In the context of plywood finish walls, seam treatment options represent a critical element influencing the aesthetic outcome and long-term performance of the installation. The seams, or joints, between adjacent plywood panels inherently present a visual discontinuity and a potential point of vulnerability to moisture intrusion and physical damage. The choice of seam treatment, therefore, directly impacts the finished wall’s appearance, durability, and resistance to environmental factors. Improperly treated seams can detract from the overall aesthetic, creating an unprofessional or unfinished look. Furthermore, inadequate seam sealing can allow moisture to penetrate the plywood, leading to swelling, warping, and ultimately, structural degradation. A practical example would be a plywood wall in a bathroom where untreated seams permit water absorption, resulting in mold growth and material delamination.
A variety of seam treatment options exist, each with its own set of advantages and disadvantages. These include, but are not limited to: butt joints with caulk or sealant, overlapping seams with or without trim, ship-lap joints, tongue-and-groove joints, and the application of joint compound followed by sanding and painting. Butt joints, while simple to execute, require meticulous application of caulk or sealant to prevent moisture penetration and maintain a clean appearance. Overlapping seams, particularly when combined with decorative trim, offer enhanced protection against moisture and can contribute to a more visually textured effect. Ship-lap and tongue-and-groove joints provide a mechanical interlock between panels, creating a stronger and more visually seamless connection. The use of joint compound, similar to drywall finishing, allows for a smooth and continuous surface, ideal for painting but requiring careful attention to detail to prevent cracking or separation over time. A real-world application might see ship-lap joints utilized in a rustic-themed living room to emphasize the wood’s natural texture, while a modern office space might employ joint compound for a sleek, minimalist look.
Selecting the appropriate seam treatment option depends on a multitude of factors, including the desired aesthetic, the environmental conditions, the skill level of the installer, and the project budget. Considerations such as panel thickness, substrate stability, and the type of finish being applied also play a crucial role. Challenges associated with seam treatment often involve achieving a consistent and visually appealing result across the entire wall surface, particularly when dealing with large panels or complex joint configurations. Ultimately, a comprehensive understanding of seam treatment options and their implications is essential for achieving a durable, aesthetically pleasing, and long-lasting plywood finish wall. Neglecting this aspect can compromise the entire project.
4. Finishing coat applications
Finishing coat applications represent a critical and inextricable element in the successful execution of “plywood finish walls.” These applications serve to protect the plywood substrate, enhance its aesthetic qualities, and prolong its service life. Without appropriate finishing coats, plywood is vulnerable to moisture intrusion, ultraviolet (UV) degradation, scratches, stains, and other forms of damage, ultimately compromising the structural integrity and visual appeal of the installation. For example, in a coastal environment, untreated plywood walls would rapidly deteriorate due to the combined effects of salt spray and intense sunlight, leading to delamination, discoloration, and eventual failure. The direct consequence of neglecting finishing coats is a shortened lifespan and increased maintenance costs.
The choice of finishing coat directly impacts the performance and aesthetics of plywood finish walls. Options range from clear sealers and varnishes to opaque paints and stains, each offering varying degrees of protection and visual effects. Clear finishes showcase the natural grain and color of the wood while providing a protective barrier against moisture and UV radiation. Paints offer a wider range of color options and can conceal imperfections in the plywood surface. Stains penetrate the wood, enhancing its grain and adding depth of color. The selection should align with the desired aesthetic, environmental conditions, and intended use of the space. For instance, a polyurethane varnish applied to plywood walls in a high-traffic area, such as a hallway, would provide excellent resistance to scratches and abrasion, while a water-based acrylic paint might be more suitable for a low-traffic bedroom where volatile organic compound (VOC) emissions are a concern.
In summary, finishing coat applications are not merely cosmetic enhancements but essential protective measures for plywood finish walls. The selection of an appropriate finish, coupled with proper application techniques, ensures long-term durability, aesthetic appeal, and reduced maintenance requirements. Failing to adequately address this aspect can lead to premature degradation of the plywood and ultimately undermine the overall success of the project. The proper application and selection of the finishing coat ensures a long life of the “plywood finish walls”.
5. Panel layout planning
Panel layout planning is a foundational element in the successful execution of plywood finish walls, influencing both the aesthetic appeal and the material efficiency of the project. Thoughtful layout design minimizes waste, optimizes visual harmony, and can significantly reduce installation time and associated costs. Without meticulous planning, a project may suffer from inconsistent grain patterns, unsightly seams, and unnecessary material expenditures, ultimately compromising the intended design and budget.
- Material Optimization
Panel layout planning directly impacts material usage. By strategically arranging panel cuts and minimizing waste, the overall cost of the project can be significantly reduced. This involves carefully considering the dimensions of the plywood sheets, the size and shape of the wall surfaces, and the placement of openings such as windows and doors. For example, a well-planned layout might utilize offcuts from larger panels to fill smaller areas, reducing the need to purchase additional sheets.
- Aesthetic Consistency
The visual impact of plywood finish walls is heavily influenced by the continuity and consistency of the grain pattern. Panel layout planning allows for the strategic placement of panels to create a cohesive and visually pleasing aesthetic. This may involve aligning the grain direction to create a sense of flow or intentionally alternating patterns to add visual interest. A poorly planned layout can result in mismatched grain patterns, creating a disjointed and unprofessional appearance.
- Seam Placement and Minimization
Seams are an unavoidable aspect of plywood finish walls. However, careful panel layout planning can minimize their visual impact and structural vulnerability. By strategically positioning seams in less conspicuous locations or aligning them with architectural features, their presence can be effectively concealed or integrated into the overall design. Proper seam placement also contributes to the structural integrity of the wall by ensuring that joints are adequately supported by the framing.
- Structural Considerations
Panel layout planning is not solely an aesthetic exercise; it also has structural implications. The arrangement of panels can influence the overall stability and rigidity of the wall. For instance, staggering the seams between rows of panels can enhance the wall’s resistance to racking forces. Additionally, the orientation of the plywood grain can affect its ability to resist bending and deflection. Consideration of these structural factors is essential for ensuring the long-term performance and safety of the plywood finish walls.
In conclusion, panel layout planning is a multifaceted process that requires careful consideration of material efficiency, aesthetic consistency, seam placement, and structural integrity. A well-executed plan can transform a plywood finish wall from a utilitarian solution into a visually stunning and structurally sound design feature. The integration of these considerations determines its long term success and the overall value of the finished project.
6. Substrate preparation
Substrate preparation is an indispensable precursor to the successful installation of plywood finish walls. The condition of the underlying surface directly influences the adhesion, stability, and aesthetic outcome of the plywood application. An inadequately prepared substrate can lead to a cascade of issues, including uneven surfaces, compromised structural integrity, and premature failure of the finish. For instance, installing plywood over a wall with existing irregularities, such as protruding nails or uneven drywall joints, will result in a visibly uneven surface and may compromise the plywood’s structural support, potentially causing it to warp or crack over time. In essence, substrate preparation is not merely a preliminary step but an integral component that dictates the overall quality and longevity of plywood finish walls.
Practical applications of substrate preparation involve several key processes, each designed to address specific issues. Cleaning the surface to remove dust, debris, and any existing coatings ensures proper adhesion of the plywood. Leveling uneven surfaces with shims or patching compounds creates a smooth and uniform plane for installation. Addressing moisture-related issues, such as leaks or damp spots, is crucial for preventing future damage to the plywood. Priming the substrate can improve adhesion and provide a consistent surface for accepting finishes. An example of this process would involve applying a moisture barrier to a concrete wall before installing plywood, preventing moisture migration that could cause the plywood to rot or delaminate. Thorough substrate preparation also facilitates easier and more accurate installation, leading to a more professional and visually appealing result.
In summary, substrate preparation is a critical element that should not be overlooked in the construction of plywood finish walls. Its importance stems from its direct impact on the structural integrity, aesthetic quality, and long-term performance of the installation. Challenges often arise in identifying and addressing subtle substrate imperfections, requiring a keen eye and attention to detail. Understanding the connection between substrate preparation and plywood finish walls is essential for achieving a durable, visually appealing, and long-lasting result. Neglecting this foundational step compromises the entire project, regardless of the quality of the plywood or the skill of the installer.
Frequently Asked Questions
The following questions address common inquiries and misconceptions regarding the use of plywood as a finished wall surface, providing clarity and factual information on its applications and considerations.
Question 1: What types of plywood are most suitable for interior finish walls?
Plywood grades designated as A or cabinet-grade are generally recommended due to their smooth, defect-free surfaces. Hardwood plywood, such as birch or maple, offers a refined grain pattern and accepts finishes well. However, softwood plywood, like pine or fir, can be appropriate for achieving a rustic aesthetic. Considerations should also be given to the core type (veneer, MDF, or particleboard) with veneer cores generally providing superior screw-holding ability and resistance to sagging.
Question 2: What is the recommended method for fastening plywood to wall studs?
Screws are preferred over nails for securing plywood to wall studs due to their superior holding power. Ring-shank nails offer improved grip compared to smooth-shank nails, but screws provide the most secure attachment. Fasteners should be spaced appropriately, typically 6-8 inches along the edges and 12 inches in the field. Pre-drilling pilot holes is recommended to prevent splitting, especially near the edges of the plywood panels.
Question 3: How can exposed plywood edges be effectively treated to enhance the appearance?
Exposed plywood edges can be concealed using various methods, including edge banding (applying a thin strip of wood veneer or plastic), trim (installing decorative molding), or by carefully applying a filler and finish to the edges. Mitered corners create a seamless transition, while bullnose edges provide a softer profile. The chosen method should complement the overall design aesthetic and provide adequate protection against moisture intrusion.
Question 4: Is it necessary to apply a finish to plywood finish walls?
Applying a finish is highly recommended to protect the plywood from moisture, UV damage, and wear. Options include clear coats, stains, paints, and varnishes. The selected finish should be compatible with the plywood species and intended use of the space. For example, a polyurethane varnish would provide excellent durability in high-traffic areas, while a water-based acrylic paint might be suitable for low-traffic areas where low VOC emissions are desired.
Question 5: What measures should be taken to address expansion and contraction in plywood finish walls?
Plywood, like all wood products, expands and contracts with changes in humidity. To accommodate this natural movement, a small expansion gap (approximately 1/8 inch) should be left between panels and at the perimeter of the wall. This allows for movement without creating stress or distortion. The use of flexible caulk or sealant at the seams can also help to accommodate movement while preventing moisture intrusion.
Question 6: What are the primary disadvantages of using plywood as a finish wall material?
While plywood offers several advantages, it also has some drawbacks. Lower grades can exhibit visual imperfections such as knots and patches. Plywood is susceptible to moisture damage if not properly sealed and maintained. Additionally, some individuals may find the aesthetic of exposed plywood to be less refined than traditional wall finishes such as drywall or plaster. These disadvantages should be carefully weighed against the advantages before making a decision.
The preceding questions and answers serve to clarify common aspects of plywood finish walls. Applying these insights will enhance project quality.
The subsequent section will address prevalent myths and misconceptions surrounding this construction technique.
Conclusion
The preceding discussion has explored various facets of plywood finish walls, encompassing material selection, installation techniques, finishing options, and design considerations. This comprehensive examination underscores the importance of meticulous planning and execution to achieve both aesthetic and functional success. Proper grade selection, fastener type, seam treatment, and finishing coat application are essential elements that directly influence the durability, visual appeal, and long-term performance of plywood installations. Ignoring these factors can compromise the entire project.
Ultimately, the suitability of plywood finish walls depends on the specific project requirements, design intent, and budget constraints. Careful consideration of the discussed principles allows for informed decision-making and ensures that this construction technique is implemented effectively. Further research and consultation with qualified professionals are encouraged to optimize the application of plywood finish walls in diverse architectural contexts, fostering innovation and sustainable building practices. Ignoring the importance of professional advice can jeopardize project success.


