Addressing imperfections and restoring the aesthetic appeal of wooden surfaces is a practice that enhances both the beauty and longevity of furniture, architectural elements, and other wooden objects. This process often involves repairing scratches, addressing discoloration, and applying protective coatings to preserve the underlying material. For instance, a marred tabletop can be brought back to its original luster through careful sanding, staining, and sealing.
The careful maintenance and restoration of wooden surfaces is crucial for preserving their structural integrity and visual appeal. This practice not only enhances the value of items but also prevents further deterioration caused by environmental factors like moisture and sunlight. Historically, various techniques have been developed, from simple oil applications to complex varnish systems, reflecting an enduring desire to protect and beautify wooden objects.
The subsequent sections will delve into specific techniques and materials used for achieving optimal results. Detailed information will be provided regarding surface preparation, product selection, application methods, and troubleshooting common problems encountered during the refurbishment process.
Essential Considerations for Surface Restoration
Effective restoration necessitates a thorough understanding of underlying principles. Adherence to the following guidelines will contribute to a successful outcome.
Tip 1: Identify the Existing Coating. Determining the nature of the existing material (lacquer, varnish, polyurethane, etc.) is paramount. Incompatible products may lead to adhesion issues or undesired reactions.
Tip 2: Proper Surface Preparation is Crucial. Thorough cleaning to remove dirt, grease, and wax is essential. Sanding may be required to address imperfections or provide a suitable key for subsequent coatings.
Tip 3: Color Matching is Critical. Accurately matching the existing color is vital for seamless repairs. Consider using stain pens or tinted finishes for precise adjustments.
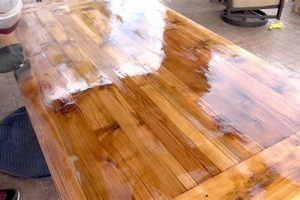
Tip 4: Apply Thin, Even Coats. Multiple thin coats are preferable to a single thick coat, reducing the risk of runs, drips, and uneven drying.
Tip 5: Allow Adequate Drying Time. Insufficient drying time between coats can lead to a soft or tacky finish. Always adhere to the manufacturer’s recommended drying times.
Tip 6: Consider Environmental Factors. Temperature and humidity can significantly affect the drying and curing process. Maintain optimal conditions for best results.
Tip 7: Test in an Inconspicuous Area. Before applying any product to the entire surface, test it in a hidden area to ensure compatibility and desired aesthetic outcome.
Adhering to these key considerations will significantly enhance the quality and durability of any wood restoration project, contributing to a professional and long-lasting result.
The next section will explore specific product recommendations and their appropriate applications.
1. Surface Preparation
Surface preparation is a foundational element in any endeavor to restore or improve a wood surface. Its execution directly impacts the adhesion, appearance, and longevity of subsequently applied coatings. Neglecting this stage invariably leads to compromised results, necessitating further intervention.
- Cleaning and Degreasing
The removal of contaminants such as dirt, grease, wax, and old polish is paramount. These substances impede the bonding of new materials, resulting in peeling, blistering, or fisheyes. A solvent-based cleaner or a mild detergent solution, followed by thorough rinsing, is typically employed.
- Sanding and Smoothing
Sanding serves multiple purposes. It removes existing imperfections, such as scratches, dents, and uneven areas, creating a level plane. More importantly, it provides a mechanical key for the new coating, enhancing adhesion. Progressively finer grits of sandpaper are used to achieve a smooth, consistent texture. Specific sandpaper grit to be used depends on project.
- Dust Removal
After sanding, meticulous removal of sanding dust is essential. Residual dust particles interfere with the finish’s ability to bond properly and create unwanted texture. Vacuuming followed by a tack cloth wipe effectively eliminates this debris, ensuring a pristine surface.
- Repairing Damages
Prior to applying any finish, assessing and repairing significant damages is imperative. Filling holes, cracks, or gouges with appropriate wood filler compounds or epoxy resins ensures a uniform surface for subsequent finishing stages, preventing these imperfections from telegraphing through the final coating.
The facets of surface preparation collectively contribute to the integrity and aesthetic appeal of the restored wood. Proper execution guarantees that the final coating achieves optimal adhesion, smoothness, and longevity, directly influencing the overall success of the project. The alternative is a finish prone to premature failure and visual imperfections, underscoring the critical role of diligent surface preparation in any wood restoration process.
2. Product Compatibility
The success of any undertaking to address a wood surface’s finish is intrinsically linked to the compatibility of the materials employed. Introducing incompatible products can initiate a cascade of adverse effects, ranging from aesthetic imperfections to structural compromise of the finish itself. The chemical composition of existing coatings must be carefully considered when selecting repair materials, stains, and topcoats. A mismatch can manifest as adhesion failure, where the new finish peels or flakes away, or as solvent-induced lifting of the original coating.
Real-world examples underscore the practical significance of this understanding. Applying a water-based polyurethane over an oil-based stain without proper preparation often results in poor adhesion and subsequent peeling. Similarly, using a lacquer thinner on a surface coated with varnish can cause the varnish to soften and wrinkle. Ensuring compatibility also extends to considering the open time and drying characteristics of various products used in conjunction. A fast-drying topcoat applied over a slow-drying stain might trap solvents, leading to bubbling or a prolonged curing period.
Understanding product compatibility, therefore, is not merely a technical detail but a fundamental prerequisite for achieving a durable and aesthetically pleasing result. While challenges exist in precisely identifying every component of aged finishes, careful testing in inconspicuous areas and adherence to manufacturers’ guidelines can significantly mitigate the risks associated with incompatible product pairings. Prioritizing compatibility ensures that the effort invested in repairing or refinishing wood surfaces yields long-term value and avoids costly rework.
3. Application Technique
The manner in which finishing products are applied significantly dictates the outcome of any endeavor to enhance a wood surface. Inadequate or improper application leads to various aesthetic and structural defects, undermining the overall objective. Brush strokes, uneven coverage, runs, drips, and air bubbles are all symptomatic of deficient technique. These imperfections not only detract from visual appeal but also compromise the protective properties of the coating, rendering it vulnerable to premature wear and environmental damage. For example, applying a varnish with excessive brush pressure can introduce air bubbles that remain visible after the finish dries, creating an undesirable textured surface. Conversely, an insufficiently loaded brush results in uneven application, characterized by thin spots and inadequate protection.
Real-world applications highlight the importance of honing relevant skills. Spraying techniques, for instance, require careful calibration of the equipment, consistent distance from the surface, and appropriate overlap to achieve a smooth, uniform coating. Incorrect settings or technique leads to orange peel, a textured surface resembling the skin of an orange. Similarly, when applying stain, consistent lapping and wiping are essential to avoid blotchiness and ensure uniform color penetration. Failure to master these techniques negates the benefits of using premium materials and results in a less-than-satisfactory aesthetic.
Mastery of application technique transcends mere procedural knowledge; it necessitates an understanding of the materials’ properties, environmental conditions, and the desired outcome. Proper surface preparation combined with a precisely executed application, the repaired wood finish delivers the expected and long-term results. The alternative compromises both the aesthetic appeal and protective function of the finish, highlighting the critical role of skilled application.
4. Color Matching
Color matching is an indispensable process in the successful restoration or repair of wooden surfaces. Its precision dictates the seamless integration of repaired areas with the existing finish, ensuring aesthetic continuity and preserving the overall integrity of the piece. Inaccurate color replication can result in visually jarring disparities, diminishing the value and appeal of the restored item.
- Visual Assessment and Analysis
The initial step involves a thorough visual examination of the existing finish under diverse lighting conditions. This assessment aims to identify the dominant hue, undertones, and any variations due to aging or environmental exposure. Employing color charts or spectrophotometers aids in objectively quantifying the color characteristics. Failure to accurately analyze the existing color sets a flawed foundation for the subsequent matching process, resulting in noticeable discrepancies.
- Stain and Pigment Selection
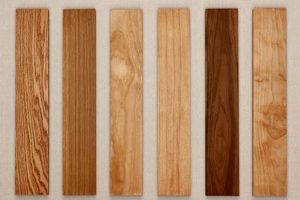
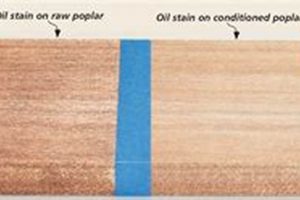
Selecting appropriate stains and pigments is paramount. Wood species inherently influence how finishes absorb and display color. Understanding the wood’s grain structure and porosity informs the choice of stain typeoil-based, water-based, or gel stainto achieve the desired color depth and evenness. Incorrect stain selection can lead to color that is either too saturated or too muted compared to the original finish, disrupting the visual harmony of the piece.
- Blending and Layering Techniques
Achieving precise color matches often necessitates the blending of multiple stains or the layering of tinted topcoats. This iterative process requires careful control and incremental adjustments to gradually approach the target color. Over-application or hasty layering can result in a muddy or unnatural appearance, highlighting the repaired area rather than seamlessly integrating it.
- Application and Blending Methods
The method of applicationbrushing, spraying, or wipingaffects the final color appearance. Feathering or blending the edges of the repaired area with the surrounding original finish is crucial to eliminate sharp transitions. Neglecting this step results in a clearly defined boundary between the old and new finish, undermining the illusion of a unified surface.
These interconnected facets of color matching directly impact the effectiveness of endeavors to restore wooden surfaces. Accurate visual assessment, informed stain selection, skillful blending, and meticulous application contribute to a cohesive and aesthetically pleasing result. When executed proficiently, color matching ensures that the repaired area becomes virtually indistinguishable from the surrounding original finish, upholding the value and beauty of the restored item.
5. Protective Coating
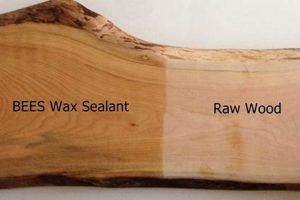
Protective coatings are integral to the process of surface treatment, acting as a final barrier against environmental factors and physical wear. Their application, subsequent to repair or refinishing, determines the longevity and continued aesthetic appeal of the remedied surface. Without an adequate protective layer, the underlying materials are vulnerable to moisture, UV radiation, abrasion, and chemical exposure, reversing the benefits gained from prior restoration efforts. A clear example is a refinished wooden tabletop without a protective topcoat, which is prone to scratching, staining, and water damage, necessitating frequent repairs.
The selection of a specific type of protective material is paramount and must align with the intended use and environmental conditions. Polyurethane, varnish, lacquer, and wax each offer distinct properties regarding durability, water resistance, and sheen. For high-traffic areas or surfaces exposed to moisture, more durable materials, such as polyurethane, are preferable. Conversely, delicate items may benefit from the aesthetic qualities of wax, although it offers less robust protection. Historical preservation often necessitates the use of traditional coatings to maintain authenticity, balancing protection with historical accuracy.
Effective implementation hinges on meticulous surface preparation, proper application techniques, and adherence to manufacturer specifications. Improper application, such as applying too thick of a coating or inadequate drying time, can lead to defects, undermining the intended benefits. The selection and application of a protective barrier is a critical step in extending the life and preserving the aesthetic quality of treated surfaces. It is an investment that ensures the long-term value and appearance of remedied items.
Frequently Asked Questions
The following addresses common inquiries regarding the maintenance and restoration of wood finishes. These responses aim to clarify procedures and potential challenges.
Question 1: What are the primary indicators that a wood finish requires restoration?
Surface deterioration, including scratches, discoloration, water rings, and peeling, signifies a need for attention. Dullness or a lack of luster also suggests that the protective properties of the finish have diminished.
Question 2: What tools and materials are essential for basic wood finish restoration?
Essential items typically encompass sandpaper (various grits), cleaning solutions, wood filler (if necessary), stain (if matching color is required), a brush or applicator, and a protective topcoat such as varnish or polyurethane.
Question 3: How does one determine the type of existing finish on a wood surface?
A solvent test can often help identify the existing finish. Applying small amounts of different solvents (e.g., mineral spirits, lacquer thinner) to an inconspicuous area and observing whether the finish softens or dissolves can provide clues. Otherwise, one should refer to the product manual.
Question 4: What are the most common mistakes encountered during wood finish restoration?
Frequently observed errors include inadequate surface preparation, using incompatible products, applying finishes too thickly, and neglecting proper drying times. These mistakes can lead to adhesion problems, uneven finishes, or prolonged curing periods.
Question 5: Is it possible to restore a damaged wood finish without completely stripping the old finish?
In many cases, spot repairs or refinishing can be performed without full stripping, particularly if the damage is localized. However, complete stripping may be necessary for extensive damage or when the existing finish is severely deteriorated.
Question 6: How can one prevent future damage to a restored wood finish?
Implementing protective measures, such as using coasters and placemats, avoiding exposure to direct sunlight, maintaining a stable humidity level, and regular cleaning with appropriate products, extends the life of the finish. This prolongs the need for future restoration.
Careful planning and execution are critical for successful wood finish maintenance. Addressing issues proactively, while employing recommended methods, ensures lasting protection and beauty.
The subsequent section will discuss advanced techniques for complex wood finish restoration projects.
Conclusion
The preceding sections have presented a detailed overview of the multifaceted process to address wood surface finishes. Key elements include surface preparation, product compatibility, appropriate application techniques, color matching, and protective coating. A comprehensive understanding of each component is vital for achieving optimal and enduring results.
Successful execution, informed by these principles, preserves the aesthetic value and structural integrity of wooden objects. The commitment to proper methods ensures the longevity of valued pieces for future enjoyment. Continued learning and diligent application of these techniques are essential for those involved in this meticulous endeavor.


