The process of applying protective or decorative coatings to surfaces derived from Acer trees enhances both the aesthetic appeal and the durability of the material. This treatment safeguards the wood against environmental factors like moisture and ultraviolet radiation, preventing degradation and extending its lifespan. Examples include applying varnish, lacquer, or oil-based products to achieve a desired sheen and protection level.
Proper surface treatment significantly impacts the long-term value and utility of items constructed from this hardwood. It provides resistance to wear and tear, simplifies cleaning, and can drastically alter the appearance, ranging from a clear, natural look to a rich, colored effect. Historically, these surface treatments have been essential in preserving wooden structures and furniture, contributing to their longevity and beauty.
Understanding the specific techniques, materials, and considerations involved in achieving optimal results is crucial. The subsequent sections will delve into detailed explanations of preparation methods, application techniques, types of coatings, and troubleshooting common issues associated with achieving a professional and lasting result.
Essential Guidance for Optimal Results
Achieving a superior outcome requires meticulous attention to detail and adherence to proven methodologies. The following guidance outlines key considerations for enhancing the quality and longevity of treated surfaces.
Tip 1: Surface Preparation is Paramount. Thorough sanding is essential to create a smooth, uniform substrate. Start with coarser grits to remove imperfections and gradually progress to finer grits (e.g., 220-grit) to refine the surface. Ensure all sanding dust is removed prior to the application of any coating.
Tip 2: Select the Appropriate Coating. Different coating types offer varying levels of protection and aesthetic qualities. Consider factors such as durability, sheen, and intended use when choosing between oil-based, water-based, or specialized coatings like conversion varnish. Research the properties of each product to determine the best fit.
Tip 3: Apply Thin, Even Coats. Multiple thin coats are preferable to a single thick coat. This technique minimizes the risk of runs, drips, and uneven drying. Allow each coat to dry completely before applying the next, following the manufacturer’s recommendations for drying times.
Tip 4: Maintain Consistent Environmental Conditions. Temperature and humidity levels significantly impact the drying and curing process. Ideally, apply coatings in a well-ventilated area with moderate temperature (e.g., 65-75F) and humidity (e.g., 40-60%). Deviations from these conditions can lead to issues such as slow drying, blistering, or clouding.
Tip 5: Utilize Proper Application Tools. The choice of brush, roller, or sprayer can significantly affect the final result. Use high-quality brushes with natural or synthetic bristles appropriate for the coating being applied. Ensure that spray equipment is properly calibrated to deliver a consistent and atomized spray pattern.
Tip 6: Sand Between Coats. Lightly sanding between coats with fine-grit sandpaper (e.g., 320-grit or higher) creates a smoother surface and enhances adhesion. Remove all sanding dust before applying the subsequent coat.
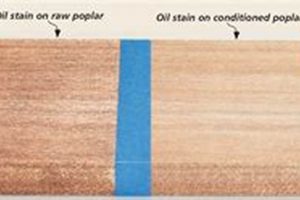
Tip 7: Consider a Sealer or Primer. Applying a sealer or primer before the topcoat can improve adhesion, reduce the amount of topcoat required, and enhance the uniformity of the final appearance. Select a sealer or primer that is compatible with the chosen topcoat.
Tip 8: Allow Adequate Curing Time. While a coating may feel dry to the touch, it is essential to allow sufficient curing time for it to fully harden and achieve its optimal protective properties. Consult the manufacturer’s recommendations for curing times, which can vary depending on the coating type and environmental conditions.
Adherence to these principles significantly enhances the visual appeal, durability, and longevity of the treated surface. Diligence in surface preparation, coating selection, and application techniques are crucial for achieving a professional and lasting result.
The following sections will explore advanced techniques and address common challenges encountered during the treatment process.
1. Surface Preparation
Surface preparation is a foundational element in achieving a durable and aesthetically pleasing finish. Its significance cannot be overstated as it directly influences the adhesion, appearance, and longevity of any coating applied to the surface of Acer wood. Without proper attention to preparation, even the highest quality coatings will fail to deliver the desired results.
- Sanding: Achieving a Uniform Substrate
Sanding removes imperfections, such as scratches, dents, and mill marks, creating a smooth and uniform surface. This process involves using progressively finer grits of sandpaper. Failure to adequately sand results in an uneven surface, leading to inconsistent coating absorption and a visually flawed finish. For example, residual scratches are often amplified by the coating, becoming more visible rather than being concealed.
- Cleaning: Removing Contaminants
Cleaning ensures the removal of dust, dirt, oils, and other contaminants that hinder adhesion. These contaminants can prevent the coating from properly bonding to the wood, leading to peeling, blistering, or other adhesion failures. A common scenario involves residual sanding dust, which must be thoroughly removed using a vacuum, tack cloth, or compressed air before applying any coating.
- Repairing Imperfections: Addressing Defects
Addressing defects, such as filling holes or cracks, ensures a seamless and consistent surface. Ignoring these imperfections leads to visual distractions and can compromise the structural integrity of the finish. Wood fillers, epoxy resins, or wood patches are commonly used to repair damage before applying a coating. Failure to do so results in an unsightly and potentially unstable finish.
- Raising the Grain: Preventing Subsequent Issues
Raising the grain involves wetting the wood surface to raise the wood fibers, followed by light sanding to remove the raised fibers. This process prevents the grain from rising later when a water-based coating is applied, resulting in a smoother and more consistent final finish. Skipping this step can lead to a rough or uneven surface after the coating is applied, requiring additional sanding and recoating.
The facets of surface preparation are interdependent, forming a critical chain of processes that directly dictate the quality and longevity of any application on Acer surfaces. The meticulous execution of each step ensures that the final coating can fully realize its protective and aesthetic potential, leading to a finish that is both visually appealing and structurally sound.
2. Coating Selection
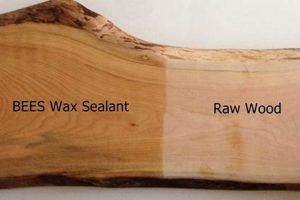
The selection of a coating directly determines the aesthetic outcome, protective qualities, and longevity of a finish applied to Acer wood. The inherent characteristics of this wood, such as its tight grain and light color, necessitate careful consideration of coating properties. For example, using an oil-based polyurethane can impart a warm, amber tone, which may be desirable for certain aesthetics but undesirable if a clear, natural appearance is sought. Conversely, water-based acrylic coatings maintain the wood’s original color more effectively but may not offer the same level of abrasion resistance as oil-based counterparts. The decision must therefore align with the intended use and desired appearance of the finished product.
Furthermore, the porosity of the wood affects coating absorption. High-solid coatings might build up excessively on the surface, leading to an artificial appearance, whereas low-solid coatings might require multiple applications to achieve adequate protection. For instance, when finishing kitchen cabinets made of Acer, a catalyzed varnish offers superior resistance to moisture and chemicals, essential in a high-use environment. In contrast, a simpler wax finish might be suitable for decorative items experiencing minimal wear. The practical significance of this understanding lies in preventing finish failures, reducing maintenance costs, and ensuring the long-term viability of the project.
In conclusion, coating selection is a critical component of effective treatments. A mismatch between the coating and the wood’s properties or the intended application leads to compromised results. Understanding the interaction between various coatings and Acer, coupled with a clear articulation of project requirements, leads to durable, aesthetically pleasing results. This selection process is an investment in the long-term preservation and visual appeal of treated wooden surfaces.
3. Application Technique
Effective application is critical in realizing the full potential of surface treatments on Acer wood. The selected technique directly influences the uniformity, adhesion, and overall appearance of the finish. Improper application leads to defects that compromise both the aesthetic and protective qualities, necessitating rework and increasing project costs.
- Brush Application: Precision and Control
Brush application allows for precise control over coating placement, especially in intricate areas or on smaller surfaces. The brush type (natural vs. synthetic) affects coating flow and leveling. An example is using a natural-bristle brush for oil-based coatings to ensure even distribution, while synthetic brushes are preferred for water-based finishes to minimize swelling and streaking. Incorrect brush technique, such as applying excessive pressure, results in brush marks and uneven coverage.
- Spray Application: Efficiency and Uniformity
Spray application, utilizing HVLP (High Volume Low Pressure) or airless sprayers, offers efficiency and uniformity, particularly on larger surfaces. Proper sprayer settings and technique are essential to prevent issues like orange peel, runs, and inconsistent film thickness. For instance, improper atomization of the coating results in a textured surface (orange peel), while holding the sprayer too close leads to runs. Maintaining a consistent distance and overlap during spraying is crucial for achieving a smooth, even finish.
- Wiping Application: Enhancing Grain and Achieving Specific Effects
Wiping application, commonly used with stains and oils, enhances the grain and allows for specific visual effects. The technique involves applying the coating and then wiping off the excess, leaving behind a subtle color enhancement and showcasing the wood’s natural grain. For example, applying a gel stain and wiping it back highlights the grain pattern of Acer, creating a visually appealing effect. Insufficient wiping or using the wrong type of cloth results in uneven color distribution or a muddy appearance.
- Roller Application: Coverage for Large Surfaces
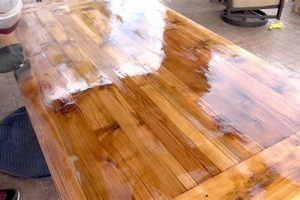
Roller application provides effective coverage over large, flat surfaces. The nap of the roller affects the texture of the finish. For example, a short-nap roller is suitable for applying thin coats of varnish to Acer furniture to minimize stippling. Failure to properly load the roller or using the wrong type of roller creates an inconsistent finish with noticeable roller marks. Proper technique involves even pressure and overlapping strokes to ensure uniform coverage.
The choice of application depends on project scope, the desired aesthetic, and the properties of the chosen coating. Masterful application protects the surface, enhances the natural beauty, and ensures its longevity. The preceding methods demonstrate the interplay between technique and the specific characteristics of Acer wood, highlighting the need for informed and skilled application.
4. Environmental Conditions
Environmental conditions exert a significant influence on the success and durability of surface treatments on Acer wood. Temperature, humidity, and ventilation impact the application, drying, and curing processes, directly affecting the integrity and appearance of the final finish. Maintaining controlled environmental parameters is therefore critical in achieving optimal results.
- Temperature Effects on Coating Viscosity and Flow
Temperature affects the viscosity and flow characteristics of coatings. Lower temperatures increase viscosity, making coatings thicker and more difficult to apply evenly. Higher temperatures reduce viscosity, causing coatings to run or sag. For example, applying varnish to Acer furniture in temperatures below 60F (15C) results in poor leveling and brush marks, while temperatures above 85F (29C) cause the varnish to dry too quickly, trapping air bubbles and producing a rough surface. Controlling the application environment within the manufacturer’s recommended temperature range (typically 65F to 75F or 18C to 24C) ensures proper flow and leveling, leading to a smoother and more uniform finish.
- Humidity’s Impact on Drying and Curing Times
Humidity levels significantly influence the drying and curing times of both water-based and solvent-based coatings. High humidity retards the evaporation of solvents and water, prolonging drying times and increasing the risk of defects such as blushing (clouding) or tackiness. Conversely, low humidity causes coatings to dry too quickly, potentially leading to poor adhesion or cracking. Applying a water-based polyurethane finish to Acer flooring in a humid environment (above 70% relative humidity) results in prolonged drying and a cloudy appearance, while applying it in a very dry environment (below 30% relative humidity) causes the coating to dry too fast, resulting in lap marks. Maintaining humidity within the recommended range (typically 40% to 60% relative humidity) facilitates proper evaporation and curing, resulting in a durable and visually appealing finish.
- Ventilation’s Role in Solvent Evaporation and Air Quality
Proper ventilation is essential for removing volatile organic compounds (VOCs) released during the application and curing of solvent-based coatings. Inadequate ventilation results in a buildup of VOCs, posing health risks and potentially affecting the coating’s drying process. For example, applying lacquer to Acer cabinetry in a poorly ventilated space can lead to slow drying, tackiness, and a strong solvent odor, in addition to creating a hazardous environment for the applicator. Adequate ventilation ensures proper solvent evaporation, reduces the risk of health hazards, and contributes to a more uniform and durable finish.
- UV Exposure and Coating Degradation
Prolonged exposure to ultraviolet (UV) radiation can degrade coatings, leading to discoloration, cracking, and loss of protective properties. This is particularly relevant for Acer wood used in exterior applications, such as outdoor furniture or siding. Applying a UV-resistant clear coat or stain helps mitigate these effects. Failing to protect exterior surfaces from UV exposure results in premature finish failure, necessitating more frequent maintenance and refinishing. Incorporating UV-inhibitors into coatings is crucial for preserving the aesthetic and protective qualities of finishes on Acer wood exposed to sunlight.
These interconnected factors of temperature, humidity, ventilation, and UV exposure collectively define the environmental conditions that dictate the long-term success of surface treatments. Controlling these variables minimizes defects, ensures proper drying and curing, and enhances the durability and aesthetic appeal of finishes, thereby maximizing the lifespan and value of Acer wood products. Careful monitoring and adjustment of these parameters are essential for achieving professional-quality results.
5. Curing Time
Curing time is a critical, yet often overlooked, phase in the surface treatment of Acer wood. It extends beyond simple drying, encompassing the chemical processes wherein the coating achieves its full hardness, durability, and resistance properties. The duration of this phase, and the conditions under which it occurs, directly influence the long-term performance of the finish.
- Development of Hardness and Durability
The curing process facilitates cross-linking between coating molecules, leading to the development of hardness and resistance to abrasion, impacts, and chemical exposure. Insufficient curing results in a soft, pliable finish susceptible to damage. For instance, placing items on a maple table before the lacquer has fully cured leaves impressions or scratches easily. Adequate curing ensures the coating’s protective properties fully develop, safeguarding the wood substrate from daily wear and tear.
- Solvent Evaporation and Off-Gassing
During curing, residual solvents within the coating gradually evaporate. Premature use of the finished item before complete solvent evaporation results in lingering odors and potential health concerns. Furthermore, trapped solvents can compromise the long-term stability of the finish. For example, using newly finished maple cabinets before the varnish has fully cured results in a persistent solvent smell and may lead to finish degradation over time. Allowing adequate curing time ensures complete solvent release, creating a safer and more stable finish.
- Adhesion Enhancement
Curing promotes enhanced adhesion between the coating and the wood substrate. The chemical reactions that occur during this phase strengthen the bond, increasing resistance to peeling, chipping, or blistering. Applying subsequent coats of finish before the previous layer has fully cured hinders proper inter-coat adhesion, weakening the overall finish. Proper curing of each layer maximizes the integrity and longevity of the surface treatment.
- Environmental Impact on Curing Rate
Temperature and humidity significantly affect the curing rate of surface treatments. High humidity and low temperatures slow down the process, while warm, dry conditions accelerate it. However, excessively rapid curing can lead to surface defects like cracking or clouding. Maintaining the environment within the coating manufacturer’s recommended parameters ensures a consistent and predictable curing process, reducing the risk of finish defects and optimizing the coating’s performance characteristics.
The interplay of these factors during the curing phase underscores its profound impact on treatments applied to Acer surfaces. Incomplete curing compromises the protective qualities and aesthetic integrity of the finish. Consequently, adhering to recommended curing times and environmental conditions is paramount in realizing the intended benefits of the chosen coating system. Attention to this detail is an investment in the long-term preservation and beauty of the treated item.
Frequently Asked Questions
This section addresses common inquiries regarding effective surface treatment practices. Clarity on these points is essential for achieving optimal results and prolonging the lifespan of Acer wood finishes.
Question 1: What preparation steps are essential before applying a coating?
Prior to any application, thorough sanding is crucial. The process initiates with coarser grits to eliminate imperfections and progresses to finer grits for surface refinement. Surface cleaning to remove dust, dirt, and oils is equally critical. Repairing any surface defects, such as holes or cracks, ensures a uniform substrate. Raising the grain, followed by light sanding, helps to prevent subsequent issues with water-based finishes.
Question 2: What factors should be considered when selecting a suitable coating?
Coating selection depends on the intended use, desired aesthetic, and environmental exposure. Considerations include the coating’s durability, sheen, UV resistance, and chemical resistance. Oil-based coatings offer robust protection, while water-based options provide lower VOC content and retain the wood’s natural color more effectively. Specialized coatings, such as conversion varnishes, provide enhanced resistance to moisture and chemicals.
Question 3: What techniques are recommended for even coating application?
Achieving an even coating requires careful attention to application technique. Brushing is suitable for detailed areas, while spraying provides uniform coverage on larger surfaces. Wiping application enhances grain definition with stains and oils. Regardless of the chosen technique, thin, even coats are preferable to prevent runs, drips, and uneven drying. Proper brush or sprayer settings are vital for consistent application.
Question 4: How do environmental conditions impact the treatment process?
Temperature and humidity influence coating viscosity, drying times, and overall finish quality. Ideal conditions typically range from 65F to 75F (18C to 24C) with relative humidity between 40% and 60%. Deviations can cause issues such as slow drying, blushing, or cracking. Proper ventilation is essential to remove solvent vapors and maintain air quality during application and curing.
Question 5: How long should the coating be allowed to cure before use?
Curing time varies depending on the coating type, environmental conditions, and manufacturer recommendations. Although a coating may feel dry to the touch, full curing is necessary for optimal hardness, durability, and chemical resistance. Rushing this process can result in a compromised finish susceptible to damage. Consult the coating’s technical data sheet for specific curing time guidelines.
Question 6: What are common signs of a poorly executed process?
Indications of a substandard process include uneven coating, brush marks, runs, drips, blistering, peeling, cracking, and discoloration. These issues often stem from inadequate surface preparation, improper coating selection, incorrect application techniques, or failure to control environmental conditions during drying and curing.
Proper application, including surface preparation, coating selection, controlled environmental conditions, and adequate curing time, ensures durable and visually pleasing treatment outcomes. Adherence to the guidance provided mitigates common issues and maximizes the longevity of Acer wood finishes.
The following section explores troubleshooting strategies for addressing common problems encountered during surface treatment applications.
Conclusion
This exploration has underscored the intricacies involved in the effective treatment of Acer wood surfaces. Crucial aspects encompass meticulous surface preparation, the judicious selection of coatings aligned with specific performance criteria, adherence to prescribed application techniques, the rigorous control of environmental conditions, and the allowance of adequate curing time. Each of these stages directly impacts the longevity, aesthetic quality, and overall protective capabilities of the resultant finish. Deviations from established best practices invariably lead to compromised outcomes, necessitating costly rework and potentially diminishing the inherent value of the wood itself.
The pursuit of excellence in maple wood finishing demands a commitment to informed decision-making and diligent execution. The information presented serves as a foundational resource for professionals and discerning consumers alike, empowering them to achieve superior results and safeguard the enduring beauty of their Acer wood investments. Continued adherence to these principles ensures the sustainable preservation and enhancement of this valued material for generations to come.


