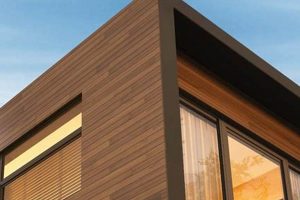
The process of protecting and enhancing wooden surfaces through the application of various coatings is a craft demanding both skill and knowledge. This craft involves surface preparation, the selection and application of appropriate materials, and techniques to achieve desired aesthetic and protective qualities. An example includes sanding a table, applying stain to achieve a desired color, and then sealing it with a clear coat for durability.
Proper execution yields several advantages, including amplified durability against wear and tear, heightened resistance to moisture and environmental damage, and elevated aesthetic appeal. Historically, techniques were developed to preserve wood from the elements and insects, evolving over time to incorporate modern materials that extend lifespan and enhance the visual character of finished products.
The subsequent sections will delve into the critical aspects of surface preparation, appropriate product selection based on wood type and intended use, application methods for different types of finishes, and essential safety precautions necessary for achieving professional-quality results.
Essential Guidance
The following points offer crucial guidance for achieving high-quality results in protecting and beautifying wood surfaces.
Tip 1: Preparation is Paramount: Meticulously prepare the surface by sanding through progressively finer grits. This ensures optimal adhesion and a smooth final appearance. For example, start with 120 grit sandpaper and progress to 220 grit or higher.
Tip 2: Select the Right Finish: Choose a finish appropriate for the wood type and intended use. Polyurethane offers durability for high-traffic areas, while oil-based finishes enhance wood grain on furniture. Researching the specific needs of the project is crucial.
Tip 3: Apply Thin Coats: Multiple thin coats are superior to a single thick coat. This prevents runs, drips, and ensures proper drying and curing. Allow each coat to dry completely before applying the next.
Tip 4: Sand Between Coats: Lightly sand between coats with fine-grit sandpaper (320 grit or higher) to remove imperfections and create a better surface for adhesion. Always remove sanding dust thoroughly.
Tip 5: Maintain Consistent Application: Use consistent brush strokes or spray patterns to achieve a uniform finish. Avoid overlapping or leaving gaps. Practice on scrap wood to develop proper technique.
Tip 6: Control the Environment: Maintain a clean, dust-free environment during application and drying. Dust particles can become trapped in the finish, marring the final appearance. Proper ventilation is also important, especially when using solvent-based products.
Tip 7: Proper Curing Time: Allow the finish to fully cure according to the manufacturer’s instructions. Rushing the curing process can result in a soft, easily damaged finish.
Adhering to these guidelines will contribute significantly to a durable, aesthetically pleasing, and professionally executed end product.
The subsequent section will address common mistakes and troubleshooting techniques, further refining understanding of the process.
1. Surface Preparation
Surface preparation forms the foundational stage in the endeavor of imparting protective and aesthetic finishes to wood. Its significance cannot be overstated; inadequacies at this juncture invariably compromise the integrity and visual appeal of subsequent layers.
- Cleaning and Degreasing
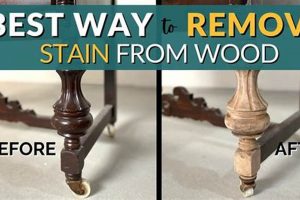
The removal of contaminants such as dirt, grease, and existing coatings is paramount. Residue inhibits adhesion, leading to peeling and uneven finishes. A common example is the necessity of removing wax from antique furniture before refinishing. Failure to do so will prevent new finishes from properly bonding with the wood.
- Sanding and Smoothing
Sanding serves to create a uniform surface texture and to address imperfections such as scratches and dents. The choice of abrasive grit is dictated by the severity of these flaws. For example, coarser grits are employed for initial leveling, followed by finer grits to refine the surface, ensuring optimal smoothness for subsequent finish applications. This process is critical for achieving a consistent sheen and preventing the visibility of underlying blemishes.
- Repairing Defects
The identification and remediation of structural flaws, such as cracks, splits, or rot, are integral to surface preparation. Wood fillers or epoxy resins are typically utilized to fill voids and reinforce weakened areas. Addressing these issues before applying a finish prevents further degradation and ensures the longevity of the treated surface. Neglecting such repairs can lead to premature failure of the finish and continued deterioration of the wood itself.
- Raising the Grain
Water-based finishes can cause wood fibers to swell and roughen the surface. Pre-raising the grain by lightly dampening the wood and allowing it to dry, followed by light sanding, mitigates this effect. This technique ensures a smoother, more consistent finish with water-based products, reducing the need for extensive sanding after the initial coat.
These facets of surface preparation are inextricably linked to the overall success of protecting and enhancing wood. Diligence in these initial steps directly correlates with the durability, aesthetic quality, and longevity of the ultimate outcome. Consequently, meticulous attention to detail during surface preparation is not merely a preliminary step, but rather a critical determinant of the finish’s effectiveness and value.
2. Material Selection
Appropriate material selection is an indispensable facet of successful wood surface enhancement and protection. The chosen materials directly influence the final aesthetic, durability, and longevity of the treated wood. The compatibility of selected coatings with the specific wood species and intended use-case dictates overall performance.
- Types of Finishes
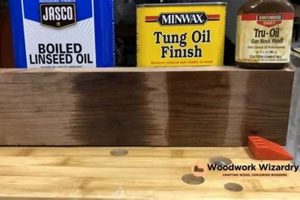
A variety of finishes exist, each possessing unique characteristics. Oil-based varnishes offer warmth and depth but can yellow over time. Water-based polyurethanes provide durability and are less prone to yellowing, making them suitable for lighter-colored woods. Lacquers dry quickly and offer a smooth, hard finish, often employed for furniture. Shellac is a natural resin finish that provides a warm tone and is easily repaired, but it offers less water resistance. The specific requirements of the project dictate the optimal choice.
- Wood Species Considerations
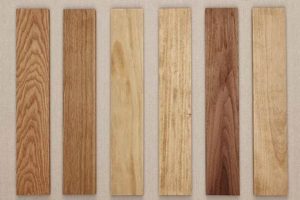
Different wood species possess varying levels of porosity and resin content, influencing finish absorption and adhesion. For instance, softwoods like pine tend to absorb finishes more readily than hardwoods like oak. Resinous woods require special preparation to prevent finish adhesion problems. The selected finish must be compatible with the inherent properties of the wood to ensure a lasting bond and prevent issues such as blistering or peeling.
- Stains and Dyes
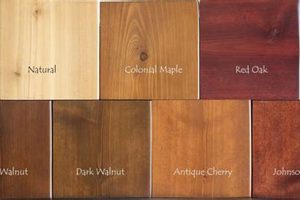
Stains and dyes alter the color of the wood, enhancing the grain or achieving a desired aesthetic. Stains penetrate the wood fibers, while dyes impart color through a surface layer. Oil-based stains offer richer tones but require longer drying times, while water-based stains dry quickly but may raise the grain. The choice depends on the desired color intensity, drying time constraints, and the compatibility with the subsequent clear coat finish.
- Application Tools
The selection of appropriate application tools directly impacts the quality and efficiency of the finishing process. Brushes, spray guns, and wiping cloths each offer unique advantages. High-quality brushes with natural bristles are suitable for applying varnishes and polyurethanes, providing a smooth, even coat. Spray guns offer efficient application over large surfaces, while wiping cloths are ideal for applying penetrating oils and stains. The choice of tool should align with the chosen finish and the size and complexity of the project.
The aforementioned material selection factors are not independent variables; they interact in complex ways to influence the final outcome. Thorough evaluation of these considerations is essential for achieving a professional-quality result. Inadequate material selection leads to compromised durability, aesthetic imperfections, and ultimately, the premature failure of the protective coating.
3. Application Technique
Application technique constitutes a critical determinant in achieving successful wood finishing. The manner in which coatings are applied directly influences the appearance, durability, and overall protection afforded to the wood surface. Incorrect techniques invariably lead to visual imperfections, compromised structural integrity, and diminished longevity of the finish. The relationship is causal: a precise and informed application yields a robust and aesthetically pleasing result, while a flawed application invariably results in an inferior outcome. For instance, uneven brush strokes or inconsistent spray patterns result in visible streaking, pooling, or orange peel texture, detracting from the desired aesthetic.
The selection of application methods must align with the chosen finish and the characteristics of the wood. Brushing, spraying, and wiping each offer distinct advantages and disadvantages. Brushing is often favored for its control and ability to work the finish into the wood grain, but requires meticulous technique to avoid brush marks. Spraying provides a uniform coating over large surfaces but necessitates proper equipment and ventilation. Wiping is suitable for applying oils and stains, allowing for controlled absorption and even distribution. Consider the application of varnish to a tabletop. Employing a high-quality brush, applying thin, even coats with the grain, and feathering the edges prevents visible lap marks and ensures a smooth, durable surface. Conversely, using a low-quality brush, applying thick coats, or neglecting proper edge blending will result in an uneven, aesthetically displeasing, and structurally weaker finish.
In summation, application technique is inextricably linked to the success of wood finishing. It is not merely a procedural step, but rather a skill requiring precision, knowledge, and adaptability. Understanding the nuances of each method, selecting the appropriate technique for the chosen finish and wood species, and executing the application with care are essential for achieving a professional-quality result. Neglecting these aspects inevitably leads to compromised durability, visual imperfections, and a diminished lifespan of the protective coating, reinforcing the critical role of application technique in the overall process of protecting and beautifying wood surfaces.
4. Curing Conditions
Curing conditions represent a critical, yet often underestimated, stage in protecting and beautifying wooden surfaces. The process of finish curing, wherein the applied coating solidifies and attains its final properties, is profoundly influenced by environmental factors. Optimal curing ensures durability, resistance to wear, and long-term aesthetic appeal. Improper conditions compromise the integrity of the finish, leading to defects and premature failure.
- Temperature Influence
Temperature directly affects the rate of chemical reactions within the finish. Elevated temperatures accelerate curing, potentially leading to surface imperfections such as blistering or wrinkling if solvents evaporate too quickly. Conversely, low temperatures retard curing, prolonging drying times and increasing the risk of dust contamination. Maintaining a consistent temperature within the manufacturer’s recommended range is crucial. For example, applying polyurethane in temperatures below 60F significantly extends curing time and may result in a softer, less durable finish.
- Humidity Levels
Humidity impacts the evaporation rate of solvents in the finish. High humidity retards solvent evaporation, potentially causing the finish to remain tacky or soft for extended periods. Conversely, low humidity can accelerate evaporation, leading to premature surface drying and potential cracking. Maintaining appropriate humidity levels is particularly crucial for water-based finishes, which rely on water evaporation for proper curing. A relative humidity between 40% and 60% is generally recommended for most finishes.
- Ventilation and Airflow
Adequate ventilation facilitates the removal of solvents released during the curing process. Insufficient ventilation leads to a buildup of solvent vapors, which can hinder curing, create fire hazards, and pose health risks. Proper airflow promotes uniform drying and prevents the formation of surface defects. For example, applying lacquer in a poorly ventilated area can result in slow drying, a lingering odor, and an increased risk of fire.
- UV Exposure
While not directly related to the initial curing phase for all finishes, ultraviolet (UV) exposure significantly impacts the long-term durability of certain coatings, particularly exterior finishes. UV radiation can degrade the finish, leading to discoloration, cracking, and loss of protective properties. Selecting finishes with UV inhibitors and limiting direct sunlight exposure during and after curing can mitigate these effects. For instance, exterior varnishes without UV protection will degrade rapidly when exposed to direct sunlight, leading to cracking and peeling within a year.
The interplay of these curing conditions underscores the importance of meticulous control. Ignoring these factors compromises the efficacy of surface protection. A controlled environment facilitates achieving a professional-grade end product.
5. Safety Protocols
The implementation of rigorous safety protocols is inextricably linked to the practice of wood finishing. The materials employed, including solvents, stains, and coatings, often contain volatile organic compounds (VOCs) and other hazardous substances. Exposure to these chemicals can result in adverse health effects ranging from respiratory irritation and skin sensitization to more severe conditions with long-term exposure. Consequently, adherence to established safety measures is not merely a recommendation but a critical component of responsible execution.
The application of finishes necessitates adequate ventilation to mitigate the inhalation of harmful vapors. The use of respiratory protection, such as respirators equipped with appropriate cartridges, is often required, particularly when working with solvent-based products in enclosed spaces. Skin protection, including the wearing of gloves and protective clothing, minimizes dermal contact with potentially irritating or sensitizing chemicals. Eye protection, in the form of safety glasses or goggles, safeguards against splashes and accidental exposure. The flammability of many finishing materials necessitates strict adherence to fire safety protocols, including the elimination of ignition sources and the proper storage of flammable materials in designated containers. Failure to comply with these safety guidelines can result in immediate health risks, long-term health consequences, and potential fire hazards. A real-world example is the risk of explosion when solvent-soaked rags are improperly discarded, leading to spontaneous combustion.
In conclusion, safety protocols are not ancillary considerations but integral elements of wood finishing. The potential for harm associated with the materials employed necessitates a proactive and comprehensive approach to safety. Implementing and enforcing stringent safety measures minimizes the risks to personal health, property, and the environment. The selection and utilization of appropriate safety equipment, adherence to established safety procedures, and ongoing education regarding the hazards associated with finishing materials are essential for ensuring a safe and responsible approach. Prioritizing safety mitigates potential risks and contributes to the longevity and well-being of both the practitioner and the environment. This understanding underscores the practical significance of integrating safety into every aspect of the process.
Frequently Asked Questions
This section addresses common inquiries and misconceptions regarding the techniques of coating wooden surfaces. The information provided aims to clarify processes and promote informed decision-making.
Question 1: Is sanding always necessary before applying a wood finish?
Yes, sanding is generally a prerequisite. It creates a surface texture conducive to proper finish adhesion and removes imperfections that would otherwise be visible.
Question 2: What is the ideal temperature range for applying most wood finishes?
A temperature range between 65F (18C) and 75F (24C) is generally considered optimal for many types of finishes, promoting proper drying and curing.
Question 3: How many coats of finish are typically required for adequate protection?
Multiple thin coats, typically two to three, are preferable to a single thick coat. Thin coats ensure even distribution, proper drying, and enhanced durability.
Question 4: What is the purpose of sanding between coats of finish?
Sanding between coats removes minor imperfections, such as dust particles or raised grain, and provides a slightly roughened surface for subsequent coat adhesion.
Question 5: How can brush marks be minimized when applying varnish?
Employing a high-quality brush, using consistent brush strokes, and thinning the varnish slightly can significantly reduce the visibility of brush marks.
Question 6: What precautions should be taken when disposing of rags soaked with oil-based finishes?
Rags soaked with oil-based finishes pose a fire hazard due to spontaneous combustion. They should be laid flat to dry completely outdoors or stored in a sealed, water-filled metal container.
The preceding responses offer clarification on commonly encountered issues. Diligent application of these principles enhances the probability of achieving a satisfactory result.
The subsequent section will present a glossary of terms related to wood finishing, aiding in comprehension of technical language.
Conclusion
The preceding exposition detailed key aspects of the process. Surface preparation, material selection, application technique, curing conditions, and safety protocols were presented as critical, interdependent elements influencing the final outcome. Mastery of these elements is essential for achieving durable, aesthetically pleasing, and safe results when protecting and enhancing wood surfaces.
Successful execution demands diligence and a commitment to best practices. Continuous learning and refinement of technique are encouraged, ensuring long-term proficiency and responsible application. The pursuit of excellence in this craft not only yields functional and beautiful results, but also contributes to the preservation and appreciation of wood as a valuable resource.


