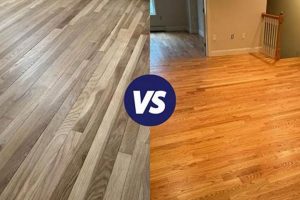
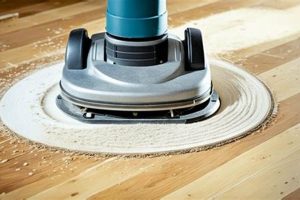
The process of applying a protective and aesthetic coating to a wooden floor is a crucial step in both new construction and renovation projects. This procedure involves preparing the wood surface, applying the chosen finishing product, and allowing it to cure properly. For example, polyurethane, varnish, or penetrating oil can be applied to achieve different levels of sheen and protection.
Properly protecting and enhancing a wooden floor extends its lifespan considerably, guards against everyday wear and tear, and significantly elevates a room’s aesthetic appeal. Historically, various methods and materials have been employed, evolving from simple waxes to durable, chemically advanced coatings designed for high-traffic areas.
The following sections will provide a detailed overview of preparing the wood surface for finishing, a comparison of available finishing products and their applications, and a step-by-step guide to applying the chosen finish for optimal results.
Finishing a Wood Floor
Achieving a professional and durable finish requires meticulous attention to detail and adherence to best practices. The following tips offer guidance to ensure a successful outcome.
Tip 1: Thoroughly Prepare the Surface: Proper preparation is paramount. Sand the floor progressively, starting with a coarse grit and moving to finer grits. Vacuum thoroughly between each sanding stage to remove all dust particles.
Tip 2: Conduct a Test Application: Before committing to a full application, test the chosen finish in an inconspicuous area to evaluate color, sheen, and adhesion to the specific wood species.
Tip 3: Control Environmental Conditions: Maintain consistent temperature and humidity levels within the recommended range for the selected finishing product. Fluctuations can negatively affect drying time and finish quality.
Tip 4: Apply Thin, Even Coats: Multiple thin coats are preferable to a single thick coat. Thick coats can lead to uneven drying, trapped bubbles, and a weakened finish.
Tip 5: Use Quality Applicators: Employ high-quality brushes, rollers, or applicators designed for the specific type of finish being used. This will minimize streaks, brush marks, and other imperfections.
Tip 6: Allow Adequate Drying Time: Adhere strictly to the manufacturer’s recommended drying times between coats. Premature sanding or recoating can compromise the integrity of the finish.
Tip 7: Lightly Sand Between Coats (Optional): For a smoother finish, lightly sand between coats with a fine-grit sandpaper or a sanding screen. This step helps to remove any imperfections and promote adhesion of subsequent coats.
Tip 8: Ensure Adequate Ventilation: When applying solvent-based finishes, ensure sufficient ventilation to prevent the accumulation of harmful vapors and to facilitate proper drying.
By implementing these techniques, a durable, aesthetically pleasing, and long-lasting surface can be obtained. The time invested in meticulous preparation and application directly correlates to the final result’s quality and longevity.
The subsequent sections will delve into specific finishing products and address common challenges encountered during the process.
1. Sanding Progression
Sanding progression is a critical phase in preparing a wood floor for finishing. This process involves using successively finer grits of sandpaper to smooth the surface and remove imperfections, creating an ideal substrate for the application of a finish.
- Initial Coarse Sanding
The initial sanding stage employs coarse-grit sandpaper (e.g., 36- or 40-grit) to remove existing finishes, deep scratches, or unevenness. This aggressive sanding levels the floor and prepares it for subsequent refinement. Failure to adequately remove the old finish can result in poor adhesion of the new finish.
- Intermediate Sanding
Intermediate sanding stages use medium-grit sandpaper (e.g., 60- or 80-grit) to eliminate scratches left by the coarse grit. This step refines the surface, making it smoother and more uniform. Incomplete intermediate sanding can leave visible scratch marks that will be highlighted by the finish.
- Fine Sanding
The final sanding stage employs fine-grit sandpaper (e.g., 100- or 120-grit) to create a smooth, polish-ready surface. This step removes any remaining imperfections and prepares the wood to accept the finish evenly. Over-sanding with too fine a grit can close the wood pores, reducing finish penetration and adhesion.
- Buffing/Screening (Optional)
Before applying the final coat, buffing or screening with a very fine abrasive (e.g., 150-grit screen) can further refine the surface. This creates an even smoother surface that enhances the final appearance of the floor. This step is especially beneficial for achieving a high-gloss finish.
The success of floor finishing is significantly influenced by proper sanding progression. Each stage plays a crucial role in creating a smooth, even surface that will enhance the appearance and durability of the final finish. Skipping steps or using incorrect grits can compromise the outcome, resulting in an uneven, unattractive, or less durable floor surface.
2. Dust Removal
Dust removal represents a critical component in the wood floor finishing process. The presence of dust particles on the wood surface during finishing can lead to imperfections in the final coating, compromising both its aesthetic appeal and protective qualities. This section details the various facets of dust removal and its impact on achieving a professional result.
- Contamination Prevention
Dust particles, whether generated during sanding or introduced from the surrounding environment, act as contaminants. When finish is applied over these particles, they become embedded within the coating, creating bumps, streaks, and an uneven surface. This necessitates additional sanding and refinishing, increasing project time and cost. Real-world examples include visible bubbles or grit trapped under polyurethane coatings, detracting from the floor’s appearance.
- Adhesion Promotion
A dust-free surface promotes optimal adhesion of the finish to the wood. Dust layers act as barriers, preventing the finish from properly bonding with the wood fibers. This can lead to premature peeling, chipping, or cracking of the finish, reducing its longevity. For instance, oil-based finishes require direct contact with the wood for proper penetration and bonding; a layer of dust impedes this process.
- Techniques and Tools
Effective dust removal involves a combination of techniques and tools. Vacuuming with a HEPA-filtered vacuum cleaner immediately after sanding is essential. Tack cloths, lightly dampened with mineral spirits or water (depending on the finish type), are used to wipe down the surface and remove any remaining fine dust. Additionally, proper ventilation minimizes airborne dust during the finishing process. Neglecting these steps can result in a compromised finish, regardless of the quality of the materials used.
- Environmental Control
The surrounding environment significantly impacts dust accumulation. Closing windows and doors minimizes the introduction of external dust. Turning off forced-air heating or cooling systems prevents the circulation of dust particles within the room. Additionally, covering nearby furniture and surfaces with plastic sheeting prevents the settling of dust on unintended areas. These measures contribute to a cleaner working environment and a superior finished product.
In conclusion, thorough and meticulous dust removal is not merely a supplementary step but an integral element in how to finish a wood floor. Failing to address dust adequately can negate the benefits of careful sanding, high-quality finishes, and skilled application techniques, leading to unsatisfactory results. The investment in proper dust control is an investment in the long-term beauty and durability of the finished floor.
3. Product Selection
In the context of how to finish a wood floor, product selection is a pivotal decision-making process that directly influences the floor’s final appearance, durability, and maintenance requirements. The chosen product acts as a protective barrier and aesthetic enhancer, dictating how the wood interacts with its environment and withstands daily use.
- Finish Type and Durability
Different finish types offer varying levels of durability. Polyurethane finishes, for instance, are known for their resilience against scratches and moisture, making them suitable for high-traffic areas. Oil-based finishes provide a natural look and feel but may require more frequent maintenance. Water-based finishes offer lower VOC emissions and faster drying times but may not be as durable as their oil-based counterparts. Selection depends on the anticipated wear and tear and desired longevity of the floor.
- Sheen Level and Aesthetic Impact
The sheen level of a finish significantly impacts the floor’s aesthetic. High-gloss finishes reflect more light, creating a dramatic and formal appearance. Satin and matte finishes offer a more subtle, natural look, concealing imperfections and reducing glare. The choice of sheen should align with the overall design of the space and the desired ambiance. For example, a rustic-style home may benefit from a matte finish, while a modern space might utilize a high-gloss option.
- VOC Content and Environmental Considerations
Volatile organic compounds (VOCs) in finishes can pose health risks and contribute to environmental pollution. Low-VOC or zero-VOC finishes minimize these concerns, promoting healthier indoor air quality. Selecting environmentally friendly products demonstrates a commitment to sustainability and reduces potential health hazards for occupants. Government regulations and labeling standards often provide guidance on VOC content in various products.
- Compatibility with Wood Species
The compatibility of a finish with the specific wood species is crucial. Some wood species, such as oak, have open pores that readily absorb finish, while others, such as maple, have tighter grains that require special preparation for optimal adhesion. Using an incompatible finish can result in uneven absorption, discoloration, or premature failure. Consulting manufacturer guidelines and conducting test applications are essential for ensuring compatibility.
Ultimately, informed product selection, considering durability, aesthetics, environmental impact, and wood species compatibility, is paramount in how to finish a wood floor. The careful evaluation of these factors contributes to a finished floor that is not only visually appealing but also long-lasting and environmentally responsible.
4. Application Technique
The application technique utilized significantly influences the final quality and longevity of a finished wood floor. Precise methods are essential to ensure uniform coverage, optimal adhesion, and the absence of defects that compromise both aesthetic appeal and protective function. The following outlines critical aspects of application technique.
- Coat Thickness and Uniformity
Maintaining consistent coat thickness is paramount. Uneven application leads to variations in sheen, color, and durability. Thin spots offer insufficient protection, while thick areas may exhibit slow drying, bubbling, or cracking. For example, using a floor finish applicator with a consistent release mechanism helps to ensure even distribution. Professionals often utilize multiple thin coats rather than a single thick coat to mitigate these issues.
- Overlap and Blend
Proper overlapping of application strokes is crucial to avoid visible lines or seams. Each stroke should slightly overlap the previous one, ensuring complete coverage and preventing the formation of ridges. This technique, particularly important with fast-drying finishes, requires a steady hand and a consistent pace. Leaving gaps or excessive buildup at overlaps detracts from the finished appearance and creates weak points.
- Applicator Selection and Handling
The choice of applicatorbrush, roller, or paddepends on the finish type and desired effect. Natural-bristle brushes are generally preferred for oil-based finishes, while synthetic brushes are suitable for water-based options. Rollers offer efficient coverage on large areas, but careful selection of nap length is necessary to avoid excessive stippling. Proper handling, including consistent pressure and avoidance of air bubbles, ensures a smooth, professional finish.
- Environmental Control during Application
Environmental factors significantly impact the application process. Temperature and humidity influence drying time and finish viscosity. Applying finishes in excessively hot or humid conditions can lead to rapid drying, trapping air bubbles and creating a cloudy appearance. Maintaining consistent temperature and humidity levels, as specified by the manufacturer, is essential for achieving optimal results. Proper ventilation also prevents the accumulation of harmful vapors and promotes even drying.
In conclusion, mastering application technique is integral to how to finish a wood floor successfully. By adhering to best practices regarding coat thickness, overlapping, applicator selection, and environmental control, one maximizes the finish’s protective qualities and enhances the floor’s aesthetic appeal, ensuring a long-lasting and visually pleasing result. Neglecting these facets results in a compromised finish that necessitates costly repairs or complete re-application.
5. Cure Time
Cure time, in the context of how to finish a wood floor, represents the period required for the applied finish to achieve its maximum hardness, durability, and chemical resistance. It is a phase distinct from drying time, which refers to the period when the finish becomes tack-free. Inadequate cure time directly compromises the floor’s protective qualities and aesthetic longevity. Premature use before full curing can result in scratches, dents, and adhesion failures, necessitating costly repairs or complete refinishing. For example, placing heavy furniture on a floor coated with polyurethane before the recommended cure period may lead to permanent indentations and a compromised finish.
The duration of the cure time is contingent upon the type of finish used, environmental conditions such as temperature and humidity, and the thickness of the applied coats. Oil-based finishes generally require longer cure times compared to water-based alternatives. Elevated humidity levels can significantly prolong the curing process, increasing the susceptibility to damage during this vulnerable phase. Practical application involves strict adherence to the manufacturer’s specifications regarding cure time, combined with implementing measures to maintain optimal environmental conditions, such as controlled temperature and humidity levels. Failure to observe these guidelines often leads to unsatisfactory results, regardless of the quality of materials or application techniques employed.
Proper understanding and management of cure time represent an indispensable aspect of how to finish a wood floor. Ignoring this phase undermines the investment in materials and labor, resulting in a compromised surface that is susceptible to premature wear and damage. The challenges associated with ensuring adequate cure time are mitigated by meticulous planning, adherence to manufacturer’s guidelines, and vigilant monitoring of environmental conditions. This commitment to detail directly contributes to the long-term performance and visual appeal of the finished wood floor, highlighting the practical significance of prioritizing cure time as an integral component of the entire finishing process.
6. Ventilation
Ventilation plays a crucial role in the process of how to finish a wood floor. It directly impacts the safety of individuals involved, the quality of the finish, and the overall success of the project. Adequate ventilation ensures the dispersal of harmful vapors and facilitates the proper curing of the finish, making it an indispensable aspect of the finishing procedure.
- Worker Safety and Health
Many wood floor finishes contain volatile organic compounds (VOCs) that can pose health risks upon inhalation. These compounds evaporate into the air during application and curing. Exposure can lead to respiratory irritation, headaches, dizziness, and, in some cases, more severe health problems with prolonged exposure. Proper ventilation mitigates these risks by diluting the concentration of VOCs in the air, reducing the likelihood of adverse health effects. In poorly ventilated spaces, the accumulation of these vapors can create a hazardous environment for anyone present.
- Finish Drying and Curing
Adequate airflow is essential for the proper drying and curing of wood floor finishes. Many finishes dry through evaporation, and ventilation promotes this process by removing solvent vapors from the surface. Insufficient airflow can lead to prolonged drying times, uneven curing, and a compromised finish. Some finishes may remain tacky or soft if ventilation is inadequate, preventing them from achieving their intended hardness and durability. Conversely, too much airflow can lead to overly rapid drying, creating surface imperfections such as bubbles or cracking.
- Dust and Contaminant Control
Ventilation aids in removing airborne dust and other contaminants that can settle on the wet finish, causing imperfections. A controlled airflow pattern can help direct dust particles away from the freshly coated surface, minimizing the risk of contamination. While ventilation alone is not a substitute for thorough dust removal prior to finishing, it serves as an additional safeguard against imperfections. The effectiveness of dust control is enhanced by using air filtration systems in conjunction with ventilation.
- Odor Management
Many wood floor finishes, particularly oil-based varieties, emit strong odors during application and curing. These odors can be unpleasant and lingering, causing discomfort for occupants. Ventilation helps dissipate these odors, improving the overall environment and reducing the duration of odor exposure. The use of exhaust fans to direct airflow away from occupied areas is a common practice in managing odors associated with wood floor finishing.
In summary, ventilation is an indispensable component of how to finish a wood floor, affecting worker safety, finish quality, dust control, and odor management. Failing to provide adequate ventilation can lead to compromised results, health risks, and prolonged disruptions. Therefore, prioritizing proper ventilation techniques is essential for achieving a successful and safe floor finishing project.
7. Maintenance
The longevity and aesthetic appeal of a finished wood floor are inextricably linked to subsequent maintenance practices. The initial finishing process establishes a protective barrier; however, this barrier is subject to degradation from daily wear, environmental factors, and cleaning methods. Neglecting proper maintenance effectively negates the benefits of a meticulously applied finish, leading to premature wear, diminished aesthetic value, and potentially costly restoration work. For instance, a floor finished with multiple coats of polyurethane will exhibit significantly reduced lifespan if abrasive cleaners are used regularly, compromising the protective layers and accelerating surface damage. Therefore, maintenance should be considered an integral component of how to finish a wood floor, not a separate consideration.
Effective maintenance strategies vary depending on the type of finish applied. Surface finishes like polyurethane require regular sweeping or vacuuming to remove abrasive particles, and periodic cleaning with pH-neutral cleaners specifically formulated for wood floors. Penetrating oil finishes, on the other hand, often benefit from occasional re-oiling to replenish the protective layer and maintain the wood’s natural luster. Ignoring these specific requirements can lead to a breakdown of the finish. As an example, a floor finished with a penetrating oil and subsequently cleaned with harsh detergents will strip the oil, leaving the wood vulnerable to staining and moisture damage. Similarly, allowing dirt and grit to accumulate on any finished wood floor will inevitably result in scratches and a dull appearance.
Ultimately, understanding the connection between the initial finishing process and ongoing maintenance is crucial for preserving the integrity and beauty of a wood floor. The investment in quality materials and skilled application techniques is rendered less valuable without a commitment to appropriate maintenance protocols. Integrating maintenance considerations into the initial finishing plan ensures that the floor remains a durable and visually appealing element of the space for years to come, highlighting the practical significance of viewing maintenance as an essential element of how to finish a wood floor, not just an afterthought.
Frequently Asked Questions
This section addresses common inquiries regarding the process of applying a protective and aesthetic coating to a wood floor.
Question 1: What is the recommended sanding grit sequence for preparing a wood floor for finishing?
The recommended sanding grit sequence typically progresses from coarse to fine. A common sequence is 36-40 grit for initial removal of old finishes, followed by 60-80 grit for leveling, and concluding with 100-120 grit for creating a smooth surface ready for finishing. The precise sequence depends on the condition of the existing floor.
Question 2: How does dust removal affect the outcome of a wood floor finish?
Thorough dust removal is crucial for achieving a smooth and durable finish. Dust particles trapped beneath the finish can create imperfections and compromise adhesion, leading to premature wear and an uneven appearance. Vacuuming with a HEPA filter and using tack cloths are recommended.
Question 3: What factors should be considered when selecting a wood floor finish?
Factors to consider include the desired level of durability, the intended sheen level, the VOC content for environmental concerns, and the compatibility of the finish with the specific wood species. High-traffic areas benefit from durable finishes like polyurethane, while natural oils may be preferred for aesthetic reasons.
Question 4: What is the significance of coat thickness during finish application?
Consistent coat thickness is essential for uniform coverage, color, and durability. Thin spots offer inadequate protection, while thick areas may result in slow drying, bubbling, or cracking. Multiple thin coats are generally preferable to a single thick coat to mitigate these issues.
Question 5: What environmental conditions impact the curing process of a wood floor finish?
Temperature and humidity significantly influence the curing process. Elevated humidity and extreme temperatures can prolong curing times and negatively impact the final finish quality. Maintaining consistent environmental conditions, as specified by the manufacturer, is crucial for achieving optimal results.
Question 6: What maintenance practices are recommended to prolong the life of a finished wood floor?
Recommended maintenance practices include regular sweeping or vacuuming to remove abrasive particles, periodic cleaning with pH-neutral cleaners designed for wood floors, and avoiding harsh chemicals or abrasive cleaning tools. Specific maintenance requirements vary depending on the type of finish applied.
Careful adherence to best practices throughout the finishing process, from preparation to maintenance, ensures a durable, aesthetically pleasing, and long-lasting result.
The following section provides a concluding summary of key considerations for achieving a successful wood floor finish.
Concluding Considerations
This exploration of how to finish a wood floor underscores the multifaceted nature of achieving a durable and aesthetically pleasing result. Critical elements encompass meticulous surface preparation through progressive sanding, diligent dust removal to prevent imperfections, informed product selection tailored to specific needs, precise application techniques to ensure uniform coverage, and adherence to recommended cure times for optimal hardness. Consistent implementation of these principles contributes directly to the longevity and visual appeal of the finished surface.
The enduring value of a properly finished wood floor rests not only on the initial application but also on sustained maintenance practices. By diligently applying the knowledge of how to finish a wood floor, stakeholders secure a lasting investment, enhancing both the functionality and intrinsic value of the built environment. The integration of best practices ensures a surface that withstands the test of time, reflecting a commitment to quality and enduring craftsmanship.


