The process of applying a protective or aesthetic coating to cedar substrates involves several key considerations. Selecting the appropriate treatment depends on the intended application and desired outcome, whether it be preserving the wood’s natural color, enhancing its durability against environmental factors, or achieving a specific visual effect. This procedure impacts the material’s longevity and appearance. For instance, a clear coat might highlight the inherent grain pattern, while a stain can alter the color to complement a design scheme.
Properly treating cedar enhances its inherent resistance to decay and insect infestation, further extending its service life. The practice has historical significance, with evidence of wood preservation techniques dating back centuries. Improved resistance to moisture and ultraviolet radiation prevents warping, cracking, and fading, maintaining the wood’s structural integrity and aesthetic appeal. This safeguards the investment in the material and reduces long-term maintenance requirements.
This discussion will explore the various methods available, including the selection of appropriate products, surface preparation techniques, and application procedures, to achieve optimal results. Specific attention will be given to the nuances of working with this particular type of wood and ensuring compatibility between the chosen treatment and the substrate.
Finishing Cedar
Achieving a durable and aesthetically pleasing finish on cedar requires careful preparation and the application of appropriate techniques. The following tips offer guidance for ensuring optimal results when treating this unique wood.
Tip 1: Surface Preparation is Paramount: Prior to applying any finish, ensure the cedar surface is clean, dry, and free from any mill glaze or imperfections. Sanding with progressively finer grits is essential for creating a smooth and receptive substrate.
Tip 2: Select the Appropriate Product: Consider the intended application and desired outcome when choosing a finish. Oil-based products penetrate deeply and offer good protection, while water-based options are often preferred for their lower VOC content and ease of cleanup. Consider transparent options to highlight cedars natural characteristics.
Tip 3: Apply Thin Coats: Multiple thin coats are preferable to a single thick coat. This allows for better penetration and adhesion, minimizing the risk of runs, drips, and uneven drying.
Tip 4: Allow Adequate Drying Time: Adhere strictly to the manufacturer’s recommended drying times between coats. Insufficient drying can lead to a compromised finish that is prone to peeling or cracking.
Tip 5: Consider a UV Inhibitor: Cedar is susceptible to discoloration from sunlight. Incorporating a finish with UV inhibitors can significantly prolong the wood’s natural color and prevent premature graying.
Tip 6: Back-Priming is Beneficial: For exterior applications, back-priming all sides of the cedar, including the edges and ends, provides an extra layer of protection against moisture intrusion and can significantly extend the lifespan of the finish.
Tip 7: Test in an Inconspicuous Area: Prior to applying any finish to the entire project, test it on a small, hidden area to ensure compatibility and to verify the desired color and appearance.
Following these guidelines promotes longevity and enhances the inherent beauty. Proper application techniques, coupled with the selection of compatible products, preserves its integrity.
The subsequent sections delve into specific finish types and application methods in greater detail.
1. Surface Preparation
Surface preparation forms the foundational step in the process of finishing cedar. The quality of this preliminary stage directly influences the adhesion, appearance, and longevity of the applied finish. Effective surface preparation ensures the cedar is receptive to the chosen treatment, maximizing its protective and aesthetic benefits.
- Cleaning and Degreasing
Cedar wood often contains natural oils and resins that can impede the adhesion of finishes. Cleaning the surface with appropriate solvents removes these substances, creating a clean substrate for optimal bonding. Failure to degrease can result in uneven finish application and premature peeling. For example, using mineral spirits to wipe down cedar siding prior to staining ensures the stain penetrates the wood fibers uniformly.
- Sanding for Smoothness and Porosity
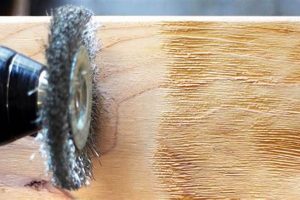
Sanding serves two primary purposes: creating a smooth surface and opening the wood’s pores. Smoothness enhances the aesthetic appeal of the finish, while open pores facilitate better penetration and adhesion. Utilizing progressively finer grits of sandpaper, beginning with a coarser grit to remove imperfections and transitioning to finer grits for a polished surface, is recommended. Without adequate sanding, the finish may sit on the surface rather than bonding with the wood, leading to potential chipping or flaking.
- Addressing Imperfections and Repairs
Prior to finishing, any knots, cracks, or blemishes should be addressed. Filling imperfections with appropriate wood fillers or patching compounds ensures a uniform surface for the finish. Repairs should be sanded smooth and flush with the surrounding wood to prevent visible inconsistencies in the final result. Neglecting to address these issues can compromise the overall appearance and integrity of the finished cedar.
- Dust Removal
After sanding, the removal of dust is crucial. Residual dust particles can contaminate the finish, creating a textured surface or interfering with proper adhesion. Vacuuming the surface followed by wiping with a tack cloth is effective in removing dust. Failing to remove dust will lead to an uneven finish with visible imperfections, undermining the overall quality of the finished product.
The relationship between meticulous surface preparation and a successful finishing outcome cannot be overstated. By properly cleaning, sanding, repairing, and removing dust, the cedar surface becomes an ideal canvas for the chosen finish, resulting in enhanced protection, lasting beauty, and maximized service life.
2. Product Selection
The decision regarding which product to employ in finishing cedar significantly determines the resultant aesthetics, protective capabilities, and longevity of the treatment. This selection is not arbitrary; rather, it is a critical determinant in the overall success of finishing cedar. Different products interact uniquely with cedar’s cellular structure and inherent properties, influencing factors ranging from moisture resistance to color retention. For example, a penetrating oil finish might be chosen to accentuate the natural grain and provide water repellency, while a solid-color stain offers greater opacity and enhanced UV protection. The suitability of a product directly impacts the finished wood’s resistance to environmental stressors.
The range of available products, including penetrating oils, film-forming varnishes, stains, and sealants, each imparts distinctive characteristics. Penetrating oils, like tung oil or linseed oil, soak into the wood fibers, providing dimensional stability and enhancing the natural grain. Film-forming finishes, such as polyurethane or lacquer, create a protective layer on the surface, offering resistance to abrasion and chemical exposure. Stains are used to alter the wood’s color while still allowing the grain to show through, whereas sealants create a barrier against moisture intrusion, preventing warping and decay. The correct choice depends on the desired visual effect, the intended use of the cedar, and the environmental conditions to which it will be exposed. An exterior cedar deck, for instance, will necessitate a different product compared to an interior cedar lining.
In summary, the act of finishing cedar is inextricably linked to the careful selection of the product used. This choice must consider not only the desired aesthetic outcome but also the long-term protective needs of the wood. Neglecting product selection can result in premature finish failure, compromised wood integrity, and ultimately, a diminished aesthetic and functional lifespan. The investment in time and resources for the finishing process necessitates a deliberate and informed approach to product choice.
3. Application Technique
The application technique employed directly influences the outcome when finishing cedar. The method utilized, whether brushing, spraying, or wiping, affects the uniformity, penetration, and overall quality of the final surface. Choosing the right technique and executing it correctly are crucial for maximizing the benefits of the chosen finish.
- Brush Application: Precision and Control
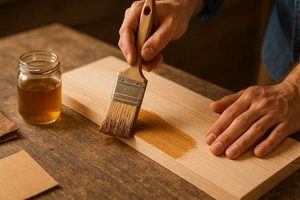
Brush application offers a high degree of control, allowing for precise application in detailed areas and along edges. This technique is particularly suitable for smaller projects or when working with thicker finishes. The selection of the appropriate brush, with consideration for bristle type and size, is paramount. For oil-based finishes, natural bristle brushes are typically preferred, while synthetic brushes are often recommended for water-based products. Improper brush technique can lead to brush marks, uneven coverage, and a compromised finish. For example, applying a varnish with long, even strokes, following the grain, helps to minimize brush strokes and create a smooth surface.
- Spray Application: Uniformity and Efficiency
Spray application, using either airless or HVLP (High Volume Low Pressure) sprayers, provides a uniform and efficient means of applying finishes over large surfaces. This technique is well-suited for achieving a smooth, even coat with minimal brush marks. Proper preparation, including masking and ventilation, is essential when spraying. Furthermore, the sprayer settings must be carefully adjusted to ensure consistent material flow and avoid runs or orange peel texture. Spraying a clear coat on cedar siding allows the grain to show, but it requires skill to prevent an uneven finish.
- Wiping Application: Enhanced Penetration and Grain Definition
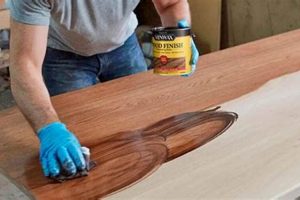
Wiping application is often used with penetrating oil finishes to enhance wood grain and promote deep penetration. This technique involves applying the finish liberally to the surface and then wiping off the excess with a clean cloth. The wiping action forces the finish into the wood pores, maximizing its protective and aesthetic benefits. Wiping stains also allows for better control of color intensity and evenness. Applying teak oil to a cedar bench with this method highlights the wood’s grain and imparts water resistance.
- Multiple Thin Coats vs. Single Thick Coat: Optimizing Durability
The application of multiple thin coats is generally preferred over a single thick coat. Thin coats allow for better penetration and adhesion, minimizing the risk of runs, drips, and uneven drying. Each coat should be allowed to dry thoroughly before the next is applied. This approach results in a more durable and visually appealing finish. A thick coat of varnish, for instance, is more prone to cracking and peeling over time, while several thin coats provide a more flexible and resilient protective layer.
The selection and execution of the application technique significantly impact the quality and longevity. By understanding the nuances of each method and implementing best practices, a lasting, beautiful surface is achievable, ensuring the full benefits are realized. These facets combine to address effectively how one approaches the finishing endeavor.
4. UV Protection
Ultraviolet (UV) radiation from sunlight significantly degrades unprotected cedar wood, causing discoloration, surface checking, and eventual structural weakening. When considering the process of treating cedar, incorporating measures to mitigate UV damage is paramount for preserving its aesthetic qualities and extending its service life. The selection of appropriate finishes plays a crucial role in providing this essential shield. For example, clear finishes without UV absorbers or stabilizers offer minimal protection, leading to rapid graying and surface deterioration, while pigmented stains or paints offer a higher degree of protection by blocking UV rays from penetrating the wood.
Specific products formulated with UV inhibitors are designed to absorb or reflect ultraviolet radiation, reducing its impact on the wood’s surface. These inhibitors can be added to transparent or semi-transparent finishes, allowing the natural grain of the cedar to remain visible while still providing protection. The effectiveness of UV protection depends on several factors, including the type and concentration of inhibitors used, the thickness of the finish application, and the severity of exposure to sunlight. Regular maintenance, involving the reapplication of finish coats, is necessary to maintain the effectiveness of the protective barrier. A real-world example is the difference observed in cedar siding: untreated siding exposed to direct sunlight will exhibit significant graying and weathering within a year, whereas siding treated with a UV-resistant finish can maintain its original color and appearance for several years with proper maintenance.
In conclusion, UV protection constitutes an indispensable component of the comprehensive endeavor to finish cedar wood, particularly for exterior applications. Selection of finishes incorporating UV inhibitors, combined with proper application techniques and regular maintenance, serves to minimize the damaging effects of sunlight, thereby preserving the aesthetic and structural integrity of the cedar over time. Failing to adequately address UV protection undermines the value of other finishing efforts and leads to premature degradation of the wood, resulting in increased maintenance costs and reduced lifespan.
5. Maintenance
Maintaining a cedar finish is an integral component of ensuring its longevity and preserving its aesthetic qualities. The procedures employed for upkeep directly impact the integrity and appearance of the finished surface, thereby representing a continuation of the finishing process rather than a separate, isolated endeavor.
- Regular Cleaning
Routine cleaning removes accumulated dirt, mildew, and debris that can compromise the finish. Using mild soap and water solution, followed by thorough rinsing, prevents the buildup of contaminants. A neglected surface becomes more susceptible to damage, necessitating more extensive and costly restoration efforts. For instance, regularly cleaning cedar siding prevents mildew from embedding itself, which can lead to discoloration and wood rot.
- Periodic Inspection
Scheduled inspections identify potential issues, such as cracks, peeling, or discoloration, before they escalate. Early detection allows for prompt intervention, preventing further deterioration. Addressing localized damage proactively minimizes the need for extensive refinishing. Observing changes, like fading on a cedar deck, prompts timely reapplication of UV-protective coatings.
- Reapplication of Finish
Reapplying the finish at recommended intervals maintains the protective barrier against moisture, UV radiation, and other environmental factors. The frequency of reapplication depends on the type of finish and the severity of exposure. Failure to reapply the finish leads to increased vulnerability and accelerated degradation. Restaining a cedar fence every few years preserves its color and protects it from weathering.
- Repairing Damage Promptly
Addressing damage immediately avoids more extensive and costly repairs later. Small cracks or chips allow moisture intrusion, which can lead to wood rot and structural weakening. Promptly patching these areas preserves the integrity of the wood and prevents further deterioration. Filling a nail hole in cedar trim prevents water from seeping in and causing decay.
These interconnected maintenance activities are essential for preserving the benefits gained. Neglecting maintenance diminishes the return on investment. A consistent and proactive approach safeguards the appearance and prolongs its functional lifespan.
Frequently Asked Questions
The following questions address common concerns and misconceptions regarding cedar finishing, providing clear and concise answers to ensure optimal results.
Question 1: What type of finish is best suited for cedar?
The optimal finish depends on the intended application and desired aesthetics. Penetrating oil finishes accentuate the natural grain and provide water repellency, while film-forming finishes offer increased durability and resistance to abrasion. Stains provide color while allowing the grain to show through, and sealants create a moisture barrier. Evaluate the specific needs to make an informed decision.
Question 2: How often should cedar finishes be reapplied?
The frequency of reapplication varies based on the finish type and environmental exposure. Exterior applications typically require more frequent reapplication than interior applications. Inspect the finish regularly for signs of wear, such as fading, cracking, or peeling. Follow the manufacturer’s recommendations for specific timelines.
Question 3: Is sanding necessary before applying a finish?
Sanding is essential for preparing the surface to ensure proper adhesion. It creates a smooth surface and opens the wood pores, allowing for better penetration. Use progressively finer grits of sandpaper to achieve a smooth, receptive substrate. Remove any residual dust after sanding.
Question 4: Does cedar need a primer before finishing?
Priming can improve the adhesion and durability of certain finishes, particularly for exterior applications or when using paints or solid-color stains. Select a primer specifically formulated for use with cedar to prevent tannin bleed-through and ensure compatibility with the topcoat. Back-priming is also beneficial for exterior projects.
Question 5: How can UV damage to cedar be prevented?
Ultraviolet (UV) radiation causes discoloration and degradation of cedar. Use finishes containing UV inhibitors to absorb or reflect UV rays, protecting the wood surface. Regularly reapply the finish to maintain the UV protective barrier. Pigmented finishes also provide a degree of UV protection.
Question 6: What is the best way to clean cedar before applying a finish?
Clean with a mild soap and water solution to remove dirt and debris. If necessary, use a solvent to remove oils or resins. Allow the wood to dry completely before applying any finish. Avoid harsh chemicals that can damage the wood or interfere with the finish.
Proper preparation, product selection, and application techniques are critical for achieving a lasting and visually appealing result. These considerations ensure the longevity and beauty of the finished product.
The subsequent section will provide practical steps for treating various types of cedar wood.
Concluding Remarks on Finishing Cedar
This exploration of how to finish cedar wood has addressed critical aspects ranging from surface preparation and product selection to application techniques, UV protection, and ongoing maintenance. The presented information underscores that a successful outcome hinges on meticulous attention to each stage of the process, with careful consideration given to the unique properties of cedar and the specific environmental conditions it will face. Understanding these elements is paramount for preserving the wood’s natural beauty and extending its functional lifespan.
The insights provided herein serve as a foundation for informed decision-making. Readers are encouraged to apply these principles with diligence, recognizing that the long-term integrity and aesthetic appeal depend upon a commitment to best practices. Further research and consultation with experienced professionals are recommended for specialized applications or unique environmental factors. By embracing a proactive approach to cedar finishing, one safeguards the investment and ensures lasting performance.


